Monday, September 28, 2009

10mm Miniatures Transport Solution

For a long time, I've been looking for a safe way to store and transport 10mm miniatures, particularly the 10mm American Civil War miniatures I've been painting. There are a lot of companies out there who make storage cases and foam trays specifically for storing miniatures. I have several of the Games Workshop miniature cases, and those work great for 28mm miniatures, but for my 10mm figures I had different needs. Even though there are many companies out there making carry cases for miniatures, after searching the internet for months, I couldn't find a single case that would work for my purposes.

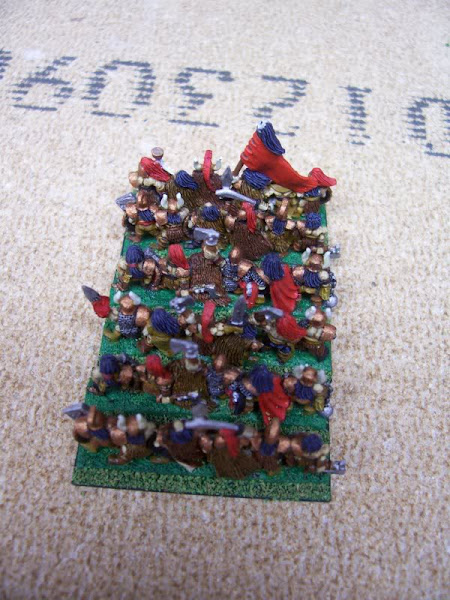
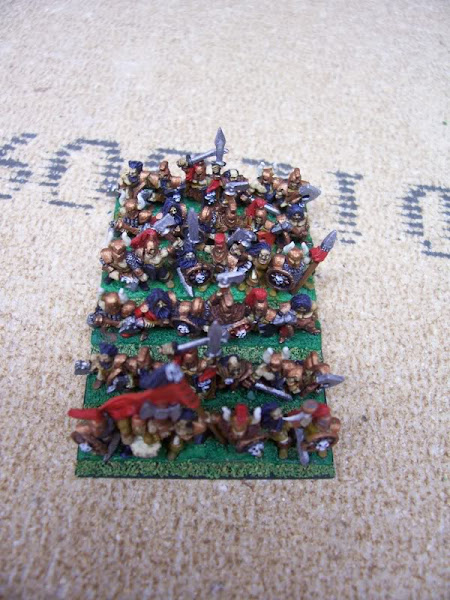
First of all, nobody makes foam trays with cavities that would be useful for me. For my Civil War miniatures, I'd want to store a single unit together, which for infantry would be 3/4" wide by almost 4" long, and for cavalry 1" wide by 4" long. Nobody had foam trays with spots in them that would fit what I wanted. That wasn't such a big deal, because several of the companies have what is usually called a "pick and pluck" foam tray. These are trays filled with perforated squares, and you can remove the ones you want and leave the others. Since I only need rectangular shaped areas to put my units in, this would work out great for me. Most of these kinds of trays have 1/2" squares, which would result in some wasted space, but would work.

The bigger problem was the cases. I wanted to store my miniatures so they would remain upright. Many of the Civil war miniatures have their rifles sticking up, and they are extremely fragile. I didn't want these being pressed up against anything. Especially since the thinnest foam trays are for the most part 1" tall. This left plenty of room above the miniatures when stored upright. Unfortunately, every single maker of miniature transport cases I could find online has it's handle on the side of the case. By that I mean, you put the foam trays in upright, then when you carry the case around, the trays are on their sides. This wouldn't do, because as soon as I picked the tray up, the miniatures would lay on their sides and likely press up against the top, bending all of those bayonets that are sticking out.

I really needed a case with the handle on the top, so you would put the trays in upright, close the lid, then carry the case in the same orientation. This does not seem to exist in the world of miniature carrying cases. In addition, most carry cases are made of some soft material, and I really wanted something rigid. If the case ever got accidentally kicked or stepped on or had something dropped on it, a soft case wouldn't protect the models at all.

Fortunately, most of the companies that sell these carry cases also sell foam trays separately. So, I wrote down the dimentions of all the foam trays I could find for sale that were 1" high with "pick and pluck" foam. Whenever I was out shopping somewhere that might sell any kind of case, I'd bring a tape measure along and try to find one that had dimensions that would fit any of the dimensions I had listed, and that would also be carried upright, so the trays would stay with the same side up.

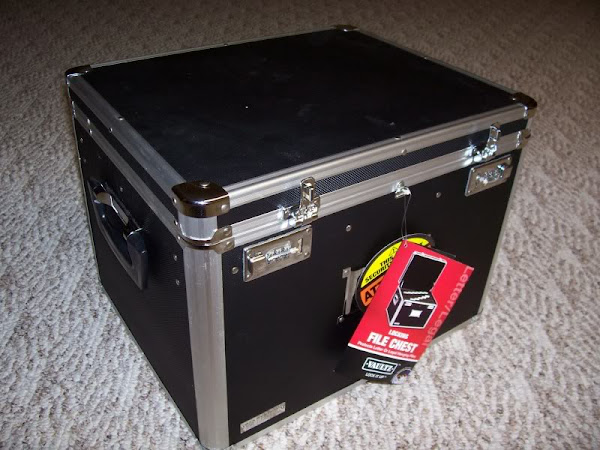
This took a lot longer than you might think. I ever searched online endlessly for any kind of cases or boxes to try and find one with dimensions that would work that was also carried in the proper orientation. I never imagined it would be so difficult to find such a thing, but it took months. Finally one day at an Office Max, I found a file storage box that seemed like it would work. It would just fit the foam trays made by Battle Foam, and was carried upright. It did require two hands to carry, while I would have preferred one with a single handle on top. And it was much taller than I needed. But after searching for so long with no luck, I was willing to give it a try even if it was less than ideal.

One other issue is that the file storage box I got had these railings on the inside along the top on all four sides. These were to hang file folders on, but they were definitely going to get in the way of getting foam trays full of miniatures in and out of the box. I decided to remove them, which turned out to be another thing that was much more difficult than I assumed it would be. The railings were riveted on through the outside of the box. It wasn't easy to detach the railings from the rivets, and afterward I had to pound the rivets down even further so that they wouldn't fall out or move around with the extra slack. The first railing didn't go so well, but after that I got the hang of it and the other three came off without too much trouble.

Next up was the foam. I placed an order with Battle Foam for five 1" tall pick and pluck foam trays, and five foam tray toppers. They trays are 15.5" x 12", which is just slightly less than the interior space I had in the case, so they would fit fairly snugly but with enough room to get them out. Battlefoam, at no extra charge, allows you to add customized test or logos to the trays and toppers. I had no particular need for this, but I figured I might as well have it done. I was paying quite a bit for these trays, after all, at $17 each for the 1" pick and pluck trays. I only went with Battle Foam trays because those are the ones that fit the case I found, so I didn't have any choice. And it would be kind of nice to have each topper labeled with what was in the tray below it when unpacking my miniatures.

It took a few weeks for my order to arrive, I suppose since they had to customize the trays with my text. I assumed the text they added was painted or written on or something, but it is actually etched into the foam, which looks pretty cool. And they didn't misspell anything, so I was pleased with the custom text. On the other hand, based on the dimensions listed for the trays, and the assumption of a 1/2" border around the outside, I assumed there would be an area of 14.5" x 11" for the pick and pluck section, and had planned how I would lay out my units based on this. When the trays arrived, I discovered that the bottom border is actually 1" rather than 1/2", to make room for the custom text I didn't really want. Therefore the actualy useable area of pick and pluck foam is really 14.5" x 10.5". It wasn't a big deal to rearrange some things in my planned layout and get it to work, but for anyone considering buying there foam trays, you should be away of this so you can plan accordingly.

As for the quality of the Battle Foam trays, I wasn't impressed. They aren't terrible I guess, but nowhere near as nice as the Games Workshop foam trays I have that came with the GW carry cases. And considering how expensive the Battle Foam trays are, I assumed I was going to get a pretty high quality product. But I suppose when you buy their stuff, you aren't really paying for quality, you are paying for the customizability. So if you need a custom layout for your foam trays, or you really want the etched writing for some reason, they might be worth it. But if you just want good quality foam trays, there are probably plenty of better ones out there.

First of all, the Battle Foam trays had some wet, still very sticky glue coming out from between the pick and pluck tray and the base it was glued to. I noticed it right away and left them sit out to dry for a while before putting any miniatures near the trays, but others might not be so lucky. Also, some of the bottoms were glued on a bit crooked or off-center, so that was kind of sloppy. The bigger issue was with the pick and pluck foam sections. The ones around the outside of the trays, which had gotten excess glue on them sticking them to the bottom, were almost impossible to pluck out. In fact, they all left little mounts of glued down foam behind them. On top of that, many of the other squares, not around the edges, were extremely difficult to pluck out due to the perforations not going all the way through the tray, or not being there at all. I used an x-acto knife to cut through where I wanted to separate the blocks. Even then some were still very difficult to pull out, and several times while trying to pull out a tenacious block, I accidentally disconnected an adjacent one that I wanted to leave. So the quality control at Battle Foam is obviously not very good, and their pick and pluck foam is very difficult to use without accidentally removing blocks you wanted to leave in place. Again, I wouldn't really recommend them. The Games Workshop pick and pluck foam was much better.

Another issue I ran into was that so such a large number of pretty small spaces, I found I was removing a large percentage of the foam. Since the foam blocks aren't attached to the bottom at all (except the ones around the edges that got accidentally glued to the bottom), what remained was not very stable. The walls in between sections weren't sturdy and moved around a lot, and that caused two problems. First of all, I didn't think it would support the units and keep them still as well as I'd like. Also, that instability makes it much more likely for one of the perforations I left in place to be inadvertently torn, which would make the whole thing really useless.

This, combined with the few perforations I mentioned that I had accidentally torn while trying to pull out others, made me try out gluing the foam together. I first tried some good old Elmer's glue. That didn't work at all. It just soaked into the foam, and took forever to start to dry. I then tried out some super glue and some plastic model glue on some test pieces. The plastic model glue worked the best by far. It was able to hold two foam pieces together really tightly. So I glued back together the mistakes I had made and, once I had the foam pieces I wanted plucked out, glued the remaining foam down to the base. It seems to be holding pretty sturdy now.

So, after that epic saga, I now have a pretty good way to store and safely transport my 10mm American Civil War miniature collection. Below are some pictures of the results of all this effors. Hopefully this article will be helpful to other people tyring to come up with customized storage solutions for different kinds of miniatures. If you have any tips for others, please leave a comment.
10mm miniatures Carry Case

Monday, September 21, 2009

Tyranid Terrain

Between some other painting projects, I finally got around to painting some of the terrain that came with the Battle for Macragge boxed set for 4th Edition Warhammer 40,000. That set came with some interesting extras, and these are the first of them that I've actually gotten around to painting.

Monday, September 14, 2009

Warhammer Fantasy Map Campaign Rules

Here are some rules I've come up with for playing Warhammer Fantasy map based campaigns using the Mighty Empires map tiles and accessories. I'm trying them out right now with my gaming group in a multi-player campaign, and they seem to work well so far. Let me know if you have any comments or suggestions for improvements.


Set Up
Set up a randomly generated hex map to represent the region being fought over. Each allied force gets one side of the map opposite the other force. Each player selects a single hex that is one hex away from his edge. This is where his Fortress is. There will have to be markers made for each player that can be placed on hexes to show that he controls them. To start with, these markers are placed on the fortress hex that the player starts on. As players capture or lose castles, cities, and towns, markers will be placed on or removed from the map hexes containing them.

Each player starts with the same number of Armies, usually three. They will all represent a Warhammer army of an agreed upon points value, usually 2000. Armies are represented by a flag of a different color for each player. Each player places his armies on his Fortress hex or within one hex of it. Two armies of the same side can never occupy the same hex.

Each player will be allowed only one lord level character in the campaign, representing the commander of his army. This Lord choice is essentially a special character, and he will not change from game to game. If he is used in a battle, he must be taken with exactly the same magic items, mount, etc. Each player will need a token to represent which of his armies the Lord is currently with. It can start with any of his armies, and during a player’s movement phase, he can move his Lord to any of his armies. Otherwise, the character moves along with the army he is with. If the army the Lord is in gets into a battle, the player may choose to use the Lord character in the game if he wishes. If the character is used, points are paid for him as normal, and he uses up a character slot. If the character is with an army that gets completely Massacred, the character is captured or killed and can no longer be used in the campaign. If the character is killed in a battle in a challenge, then the character is killed and can no longer be used.

Features such as towns and villages are placed randomly on the map.

Turn Phases
If there are multiple players on each side of the war, all players on the same side take their turn at the same time. Each turn is broken into the following phases:


  1. Move Armies

  2. Fight Battles

  3. Battle Results


Move Armies
Armies are allowed to move a maximum of D3 hexes during their turn. They subtract one from the roll if they start their move adjacent to a hex with an unbroken enemy army, to a minimum of 1. Each army is rolled for and moved one at a time, so you will not know how far the rest of your armies will be able to move. You can not move through a hex with an enemy army in it or an enemy controlled settlement. You may pass through a hex with a friendly army in it, but may not end your move in the same hex as a friendly army. You may end your move in a settlement (Town, Village, City, or Fortress) controlled by an allied player, provided there is not another army already there.

An enemy controlled settlement without an enemy army in the hex can be captured by an army ending its move on the hex. Mark that the capturing player now controls the settlement. Enemy controlled locations that have an enemy army on them can be captured, but in order to do so the attacker must first win the battle with the enemy army. An army can move into a hex that an enemy army is occupying, in which case it must halt there even if it has more movement. The two armies will do battle.

Fight Battles
After movement is complete, a Warhammer battle will be fought anywhere there are armies from both sides occupying the same hex on the map. Each player selects an army up to the points value agreed upon for the armies.

The two players proceed to fight the Warhammer battle with their selected armies. The attacker is the player whose turn it is. The defending player deploys a unit first in the game and the attacking player gets the first turn. Roll off for choice of deployment zones as normal. At the end of the game calculate victory points to determine the results.

Instead of always fighting a pitched battle, you can determine the scenario you fight by rolling on the following chart:

1-3: Pitched Battle
4: Supremacy
5: Flank Attack
6: Last Stand

If a Pitched Battle is being played, both players randomly select a special objective and reveal it to the other player. (Note it is possible to get a blank special objective, which means you have no special objective for the battle). For either side, completing the objective gives that player bonus victory points equal to 10% of the size of the game. So for 2000 point games, it would grant 200 bonus victory points.

As an alternative, instead of fighting a Warhammer battle, the result of the battle can be determined by dice rolling as follows. Each player rolls a die. A player subtracts one if his army suffered a minor defeat in the last turn, or two if the player’s army is broken as a result of a major defeat. Subtract one if attacking an enemy on a special location. The results are compared, and if one player gets a higher result than the other, the difference determines the level of his victory according to the following chart:

Difference: Result
0-1: Draw
2: Minor Victory
3: Major Victory
4-5: Massacre


Battle Results
Draw
If the result of the battle is a draw, the attacking army is moved back one hex to the hex it came from.

Minor Victory
If the result of the battle is a minor victory, the loser moves back 1 hex. If the attacker lost, he must move back in the direction he came from or one of the two adjacent directions from the hex where the battle was fought. If the defender lost, he must move in the direction opposite the one the attacker came from, or one of the two directions adjacent to that one. A losing army is not allowed to retreat into an enemy controlled settlement. In addition, the losing army is shaken. This means that for one full turn, the army suffers the following effects in any battles it fights: his opponent is allowed to choose a deployment zone, he must begin deploying first, and his opponent may choose whether to go first or second.

Major Victory
If the result of the battle is a major victory, the loser moves back 1 hex as described in the Minor Victory section above. In addition, the losing army is now considered broken until it can rally. A broken army cannot attack another army, and if it is attacked it suffers the following effects in the battle: the army gets 10% fewer points, the opponent is allowed to choose deployment zone, the entire army must be deployed first before the opponent’s army being deployed, and the opponent can choose to go first or second. Broken armies can rally by ending their regular move (not retreat move) on a hex with a friendly settlement. Once they do this, the army returns to normal.

Massacre
If the result of the battle is a massacre, the losing army is removed from the game permanently. The winning army stays where it is. If this happens to an army containing the player’s Lord character, the character is captured and takes no further part in the campaign.

Surrounded
In the case of a Minor or Major victory when the losing army is compelled to make a retreat move, cases may occur where it is impossible for the army to make the required move, due to enemy armies or the edge of the map or mountains blocking all the possible destinations. If this happens, the army is trapped, and is wiped out as if the result of the battle was a Massacre. If the army is blocked by a friendly army, they may move one extra hex through them if possible and if there is no other possible place to move.

Ending the Game
The game is played until one side has no armies remaining, or one side has lost all their fortresses. The other side is the victor.

Special Locations
Towns, villages, hills, bridges, and other features of the landscape can be used by a clever general to gain tactical advantages over his opponent. The following are some special locations that may be placed on the hex map. Special locations grant certain benefits to armies on or near them. Unless otherwise specified, benefits of special locations apply to an army occupying the hex the terrain feature is on. If a battle takes place on a hex with a special location, unless otherwise specified the benefit applies to the defender. In cases where the player is allowed to place terrain, it is placed after all normal terrain has been set up for the game, and deployment zones have been chosen.

Village: Defender can place up to 12” of linear obstacle in his deployment zone. He gains +50 bonus victory points for each of his starting table quarters that he controls at the end of the game. An army that starts its turn on a Village, it gets +1 movement.

Town: Defender can place up to 18” of linear obstacle and one building (up to 2 stories) OR one special terrain feature in his deployment zone. He gains +100 bonus victory points for each of his starting table quarters that he controls at the end of the game. An army that starts its turn on a Town, it gets +1 movement.

City: Defender can place up to 24” of linear obstacle and up to two buildings (up to 3 stories) OR one such building and one special terrain feature in his deployment zone. He gains +150 bonus victory points for each of his starting table quarters that he controls at the end of the game. An army that starts its turn within 1 hex of a friendly controlled City gets +1 movement.

Fortress: Play a siege game. The defender gets 75% of the point value of the attacker. Both armies get 25% of the point value of the attacker to spend on siege equipment. If the attacker wins, it counts as a massacre. If the defender wins, it counts as a minor victory. An army that starts its turn within 1 hex of a friendly controlled Fortress gets +1 movement.

Hill: Defender can place a hill of any size in his deployment zone. The attacker is not allowed to place any hills in his own deployment zone. The Defender adds +1 to his roll to determine deployment zones, and +1 to his roll to determine who goes first.

Bridge: It is difficult to attack and retreat across a narrow bridge. If the attacker loses a battle on a hex with a bridge, the loss is counted as one level more severe. So a minor victory for the defender becomes a major victory, a major victory becomes a massacre.

River: Fighting in the area of a river with no bridge makes it hard to escape if an army gets surrounded. Both armies fighting a battle in a river hex gain double victory points for controlling table quarters. If there is a bridge in the hex, use the rules for a Bridge location instead.

Monday, September 7, 2009

Warmaster Chaos Marauders

I bought the Warmaster rulebook a long time ago, around when it was released, but I've never actually played a game. I bought some Chaos Warrior miniatures, and painted a few. Unfortunately, nobody else I knew put together an army, so I was never able to play. Recently I've gotten interested in the game again, and I'm hoping to actually be able to play it sometime. I just finished painting my first Warmaster unit in years, a unit of Marauders. Here are some pictures.
Warmaster Chaos Painted

Considering I hadn't done anything for Warmaster in years, I think they turned out pretty well. They actually fit in decently with the units I had already painted way back. Here's a picture of an entire brigade, with three old units and the newly painted one.
Warmaster Chaos Painted