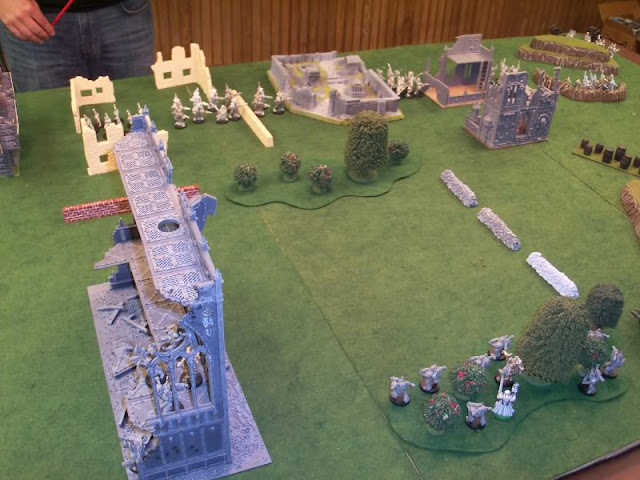
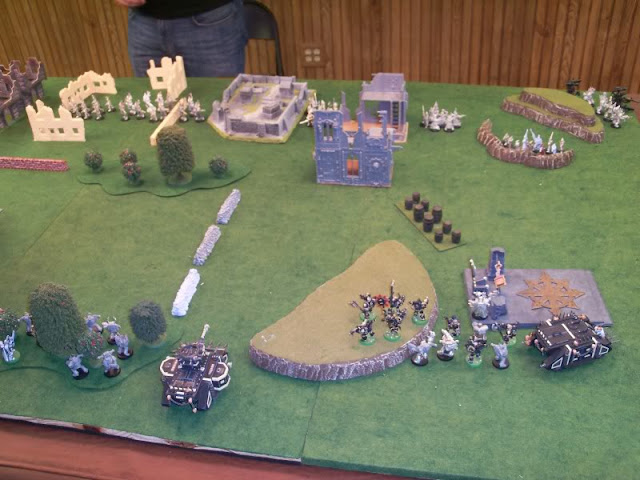
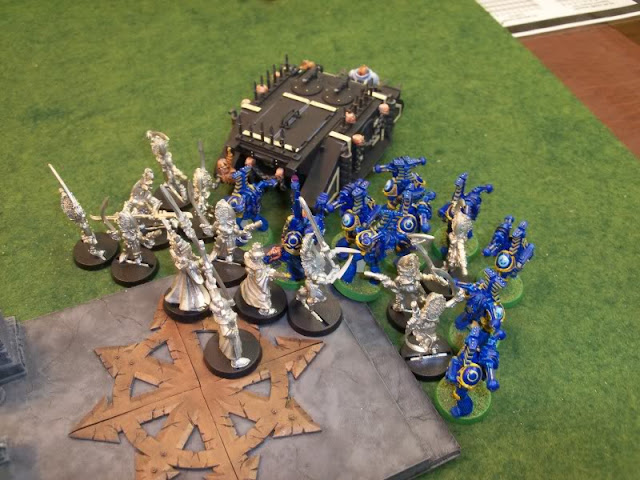
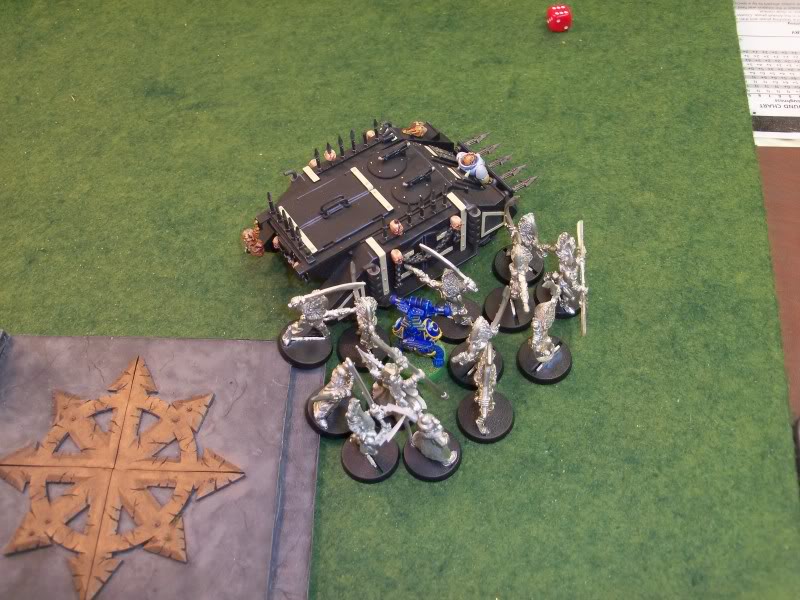
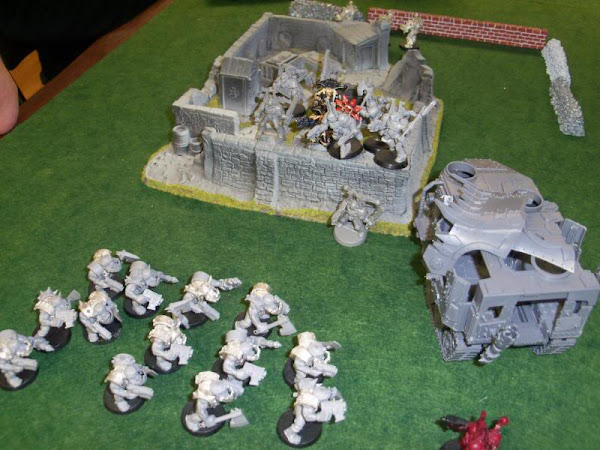
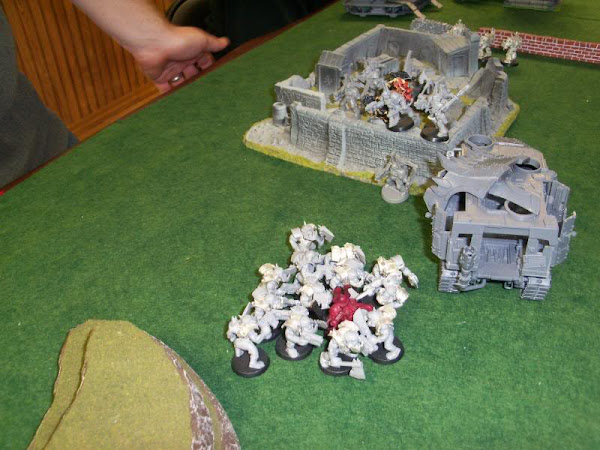
The heretic astartes of the Crusaders chapter are assisting in an uprising on an Imperial world, mostly performing small, covert operations. When a loyalist shuttle is shot down near their base of operations, a squad is sent to investigate and recover any useful intelligence they can find at the crash site. However, almost immediately a unit of primaris space marines arrive to recover or destroy any sensitive information that may have been on the shuttle. Now both sides race to recover as much as the can from the wreck before it is too late.
Showing posts with label Chaos Space Marines. Show all posts
Showing posts with label Chaos Space Marines. Show all posts
Tuesday, May 28, 2019
Monday, May 20, 2019
Warhammer 40,000 Kill Team - Heretic Astartes vs Orks
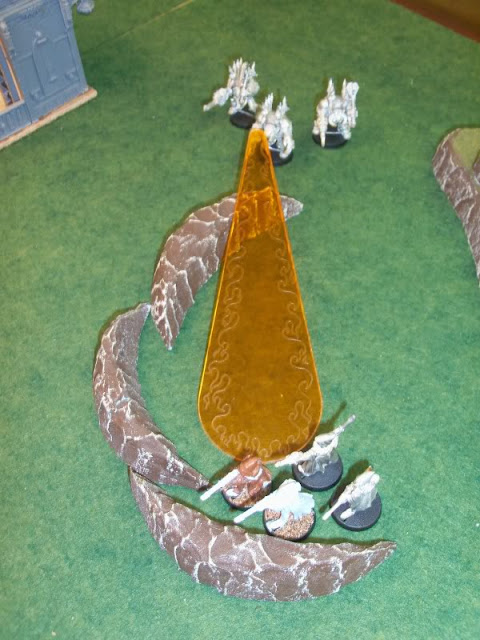
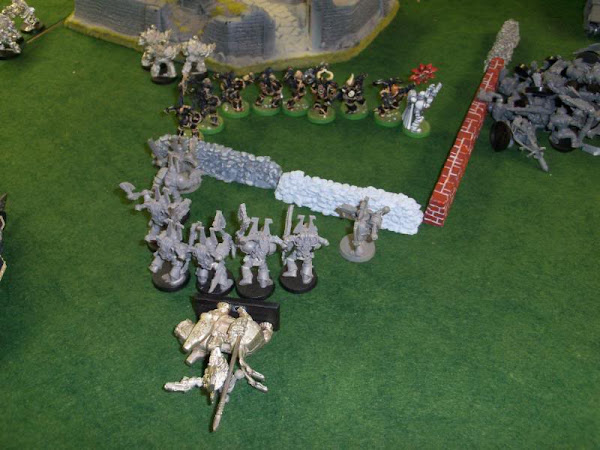
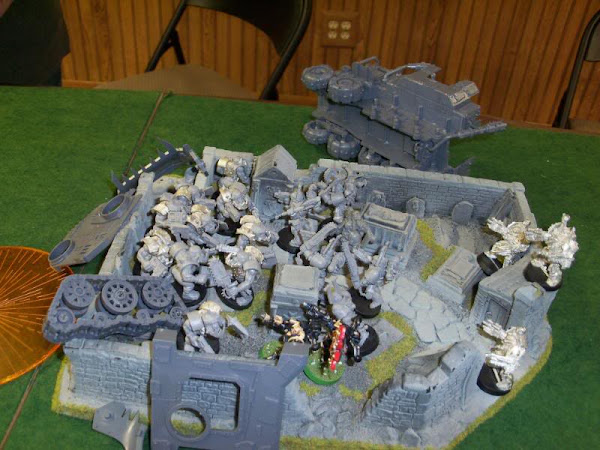
The heretic astartes of the Crusaders chapter have come to a human world in open rebellion against the Imperium of Man in order to aid the rebels in their uprising. The war torn world has, like many war torn worlds, attracted the attention of rampaging orks drawn by the prospect of violence presented by the conflict. The heretic astartes prepare to enact dark rituals that will call on the powers of the warp to aid the rebels. Unknown to them, a squad of Deathskull orks lead by Grukk Daggafist have been scouting out their positions, and have located a camp that has been hastily assembled by the heretics to house their captives. As the orks prepare to launch their sneak attack on the camp, a single squad of heretic astartes stands ready to defend it.
Monday, August 6, 2018
Warhammer 40,000 Kill Team - Renegade Astartes vs Salamanders
For the Covert War mission, we each place an objective. We then roll for a victory condition. In our case, holding an objective in the enemy deployment zone was worth victory points, but holding your own was not. You hold an objective by having more of your models than enemy models within 2" of it at the end of the 5th battle round. In the event of a tie, the person without the strategic advantage would win a minor victory. I had the strategic advantage (as I won the roll off), so I could choose which side to deploy on.
Monday, February 18, 2013
Chaos Space Marine Apothecary Conversion
Thursday, September 13, 2012
Warhammer 40k Space Marines vs Chaos Space Marines battle report
Tuesday, June 21, 2011
Warhammer 40,000 Battle Report: Eldar vs Chaos Space Marines
The Setup
This was a 1500 point standard Warhammer 40,000 game, pitting Eldar against Chaos Space Marines. It used the standard missions and deployment from the rulebook. The objective of the mission was simply to gain more Kill Points than the enemy. Deployment 12" on to the long table edges. The Eldar deployed first and would have the first turn.
The Story
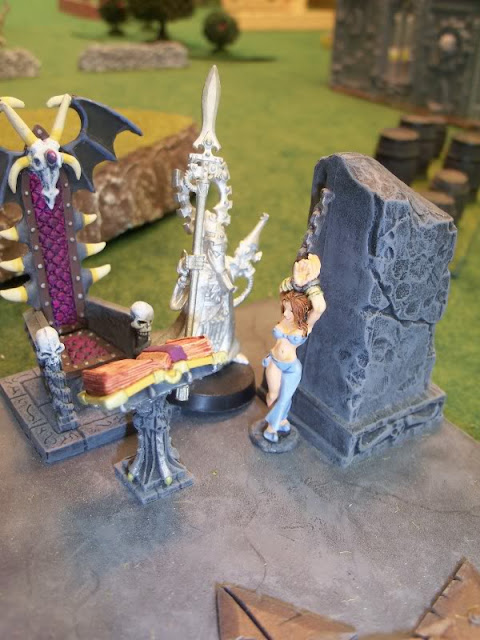
Renegade Space Marines of the Crusaders chapter are assisting a rebellion on an Imperial world, as they are wont to do. Pursuant to such, they have destroyed and then desecrated an Imperial church, along with some other outbuildings. Having done so, they are now occupying the area whilst a Thousand Sons aspiring sorcerer amongst them prepares an arcane ritual. This ritual, like any good arcane ritual, requires the sacrifice of a beautiful, scantily-clad woman. In truth, it probably just requires any old human sacrifice, but given the choice, why not choose the beautiful, scantily-clad woman?
And so the sorcerer has, and said woman is now chained up awaiting her fate. Unbeknownst to all, an Eldar Farseer has taken an unusual interest in the fair maiden (though to any who've seen her, the interest taken is perfectly understandable). The Farseer has examined the threads of future destiny, and decided that he needs to rescue the sacrificial woman. Perhaps saving her life on this day will result in many Eldar lives being saved in the future (probably the lives of all the Eldar he imagines he'll be fathering with her once he rescues her). At any rate, he doesn't have to explain himself to anyone and, furthermore, if he says the future of the Craftworld depends on saving some hussy, then save her they shall.
Turn 1
The Renegade Marines were pretty focused on their pillaging, so the Eldar managed to sneak up pretty close to them before being noticed. Once spotted, however, they were still out of range with most of their short-ranged weapons, so they all moved forward to close the distance. The sole exception was the rangers, who were in a good position and fired with their sniper rifles, but caused no wounds. There must have been a gust of wind.

In response, the Berzerkers in the remnants of the church struggled through the rubble towards the now visible Dire Avengers, not realizing the epic struggle they were about to engage in. Most of the rest of the marines held their ground and fired, with the Predator causing a few casualties in the Farseer's bodyguard of Warlocks. The Thousand Sons, in the Rhino on the right flank, drove up to the other side of the Altar to protect it.

Turn 2
Appearing from out of the warp, a unit of aptly-named Warp Spiders destroyed the Rhino containing the Thousand Sons, forcing them to disembark. They jumped again to add some distance between them and their foes, but return fire from the Thousand Sons and Crusader marines nearby killed several of them. The rangers found their range, and managed to kill a couple of the Crusader marines on the hill by the altar.

In the middle of the battlefield, the ponderous advance of the Wraithguard was held up when two Obliterators (in this case, renegade Techmarines) teleported in directly in front of them. They opened fire with everything they had, aided by the Marines in the woods behind, but after the barrage most of the wraithbone constructs still stood.

On the Renegade Marine left flank, the Dire Avengers fell back while firing at the Berzerkers, killing two of them. That really annoyed the Berzerkers, and they continued their headlong charge at their foe.

Turn 3
With well-practiced precision, the Dire Avengers again fell back, staying just close enough to keep the Berzerkers in range, and felled two more of them. Now the Berzerkers were getting angry. They fired a few bolt pistol shots at the Dire Avengers, but to no effect.

In the center, the Wraithguard all fired on the Renegade Techmarines, but only killed one of them thanks to their powerful force fields. A unit of Swooping Hawks landed, dropping enough grenades to kill a couple of the marines on the hill near the altar. The Swooping Hawks then immediately fled the battlefield upon taking a few casualties from return fire.

Having failed to eliminate the last Techmarine with warp-tearing energy fired from their Wraithcannons, the Wraightuard charged in to beat him to death with them instead. The Warlock leading them was crushed to death by the Techmarine, but the Wraithguard fought on, only managing to wound their adversary.

On the right of the Renegade Marine battle line, the Howling Banshees and the Farseer with his Warlock bodyguards sprinted full speed to assault the Thousand Sons marines near the altar. It doesn't take a powerful Farseer to predict how that turned out. However, one tenacious Thousand Son did survive the initial onslaught, and so prolonged his twisted semblance of life for another few seconds.

Previously, a unit of four Terminators, one with a Heavy Flamer, teleported down in the rear of the Eldar force to take out the pesky rangers. Unfortunately, they arrived far off target. They had, however, drawn the fire of the Rangers, who only managed to take down one of the Terminators. Undeterred by the loss, they advanced to within Heavy Flamer range and roasted most of the Eldar Rangers in an instant. The four remaining Rangers bravely, though foolishly, held their ground.
Turn 4
The Howling Banshees, Farseer, and Warlocks easily put an end to the one remaining Thousand Son, and advanced toward the Crusader Marines on the nearby hill. Sprinting at full speed, both Eldar units charged into combat with the Marines before they could get off a volley. Most of the Marines were cut down in a blur of flashing power weapon blades. Only the Lord and an Aspiring Champion survived long enough to kill the two Warlocks, before fleeing for their lives. The Eldar let them go, intent on the bigger threats still remaining.

Shuriken catapults blazing (or whatever they do), the Dire Avengers charged into the Khorne Berzerkers. Normally this would seem pretty foolish, but the Berzerkers, finally enraged by the Eldar continuously staying out of assault range, had sprinted so quickly towards their enemy that there was simply no more room for the Dire Avengers to fall back. Knowing that they would soon be caught by the frothing, charging Berzerkers, they elected to reverse direction and charge, hoping the element of surprise would bring them victory. This was not to be. They only killed one of the Berzerkers, while three of them fell. Undeterred, they held their ground and the fight would continue.

Meanwhile, the six Wraithguard were unaffected by the loss of their Warlock leader. With the determination of soulless constructs, they managed to beat to death the renegade Techmarine.

Turn 5
The Howling Banshees ran up to the crest of the hill, but were still too far from the Marines in the woods to assault. The Farseer examine the twisting paths of potential futures, and determined that he didn't want to be shot by the two Heavy Bolters and the Autocannon on the nearby Predator. With the psychic power of his Witchblade, the managed to destroy the tank. The Marines in the woods couldn't see the Farseer, and so again fired at the advancing Wraithguard, cutting down three more of them. Elsewhere, the Berzerkers slaughtered the remaining Dire Avengers, and the Terminators easily finished off the few remaining Rangers. The forces on both sides were severely depleted by this point. However, it is not in the nature of the Crusader marines to hold ground long, and the time had come to withdraw.

The Result
The Eldar force destroyed a Rhino and a Predator, wiped out a unit of Thousand Sons and the unit of "Obliterators", and broke the Chaos Lord and a unit of marines for a total of 6 kill points. The Renegade Marines wiped out the Dire Avengers, Rangers, Warp Spiders, and the Farseer's retinue, and broke the Swooping Hawks, which gave them only 5 kill points. A victory for the Eldar, as the Renegades were forced to withdraw, leaving the sacrificial maiden in the hands of the Farseer.
This was a 1500 point standard Warhammer 40,000 game, pitting Eldar against Chaos Space Marines. It used the standard missions and deployment from the rulebook. The objective of the mission was simply to gain more Kill Points than the enemy. Deployment 12" on to the long table edges. The Eldar deployed first and would have the first turn.


The Story
Renegade Space Marines of the Crusaders chapter are assisting a rebellion on an Imperial world, as they are wont to do. Pursuant to such, they have destroyed and then desecrated an Imperial church, along with some other outbuildings. Having done so, they are now occupying the area whilst a Thousand Sons aspiring sorcerer amongst them prepares an arcane ritual. This ritual, like any good arcane ritual, requires the sacrifice of a beautiful, scantily-clad woman. In truth, it probably just requires any old human sacrifice, but given the choice, why not choose the beautiful, scantily-clad woman?
And so the sorcerer has, and said woman is now chained up awaiting her fate. Unbeknownst to all, an Eldar Farseer has taken an unusual interest in the fair maiden (though to any who've seen her, the interest taken is perfectly understandable). The Farseer has examined the threads of future destiny, and decided that he needs to rescue the sacrificial woman. Perhaps saving her life on this day will result in many Eldar lives being saved in the future (probably the lives of all the Eldar he imagines he'll be fathering with her once he rescues her). At any rate, he doesn't have to explain himself to anyone and, furthermore, if he says the future of the Craftworld depends on saving some hussy, then save her they shall.
Turn 1
The Renegade Marines were pretty focused on their pillaging, so the Eldar managed to sneak up pretty close to them before being noticed. Once spotted, however, they were still out of range with most of their short-ranged weapons, so they all moved forward to close the distance. The sole exception was the rangers, who were in a good position and fired with their sniper rifles, but caused no wounds. There must have been a gust of wind.

In response, the Berzerkers in the remnants of the church struggled through the rubble towards the now visible Dire Avengers, not realizing the epic struggle they were about to engage in. Most of the rest of the marines held their ground and fired, with the Predator causing a few casualties in the Farseer's bodyguard of Warlocks. The Thousand Sons, in the Rhino on the right flank, drove up to the other side of the Altar to protect it.


Turn 2
Appearing from out of the warp, a unit of aptly-named Warp Spiders destroyed the Rhino containing the Thousand Sons, forcing them to disembark. They jumped again to add some distance between them and their foes, but return fire from the Thousand Sons and Crusader marines nearby killed several of them. The rangers found their range, and managed to kill a couple of the Crusader marines on the hill by the altar.

In the middle of the battlefield, the ponderous advance of the Wraithguard was held up when two Obliterators (in this case, renegade Techmarines) teleported in directly in front of them. They opened fire with everything they had, aided by the Marines in the woods behind, but after the barrage most of the wraithbone constructs still stood.

On the Renegade Marine left flank, the Dire Avengers fell back while firing at the Berzerkers, killing two of them. That really annoyed the Berzerkers, and they continued their headlong charge at their foe.

Turn 3
With well-practiced precision, the Dire Avengers again fell back, staying just close enough to keep the Berzerkers in range, and felled two more of them. Now the Berzerkers were getting angry. They fired a few bolt pistol shots at the Dire Avengers, but to no effect.

In the center, the Wraithguard all fired on the Renegade Techmarines, but only killed one of them thanks to their powerful force fields. A unit of Swooping Hawks landed, dropping enough grenades to kill a couple of the marines on the hill near the altar. The Swooping Hawks then immediately fled the battlefield upon taking a few casualties from return fire.

Having failed to eliminate the last Techmarine with warp-tearing energy fired from their Wraithcannons, the Wraightuard charged in to beat him to death with them instead. The Warlock leading them was crushed to death by the Techmarine, but the Wraithguard fought on, only managing to wound their adversary.


On the right of the Renegade Marine battle line, the Howling Banshees and the Farseer with his Warlock bodyguards sprinted full speed to assault the Thousand Sons marines near the altar. It doesn't take a powerful Farseer to predict how that turned out. However, one tenacious Thousand Son did survive the initial onslaught, and so prolonged his twisted semblance of life for another few seconds.

Previously, a unit of four Terminators, one with a Heavy Flamer, teleported down in the rear of the Eldar force to take out the pesky rangers. Unfortunately, they arrived far off target. They had, however, drawn the fire of the Rangers, who only managed to take down one of the Terminators. Undeterred by the loss, they advanced to within Heavy Flamer range and roasted most of the Eldar Rangers in an instant. The four remaining Rangers bravely, though foolishly, held their ground.

Turn 4
The Howling Banshees, Farseer, and Warlocks easily put an end to the one remaining Thousand Son, and advanced toward the Crusader Marines on the nearby hill. Sprinting at full speed, both Eldar units charged into combat with the Marines before they could get off a volley. Most of the Marines were cut down in a blur of flashing power weapon blades. Only the Lord and an Aspiring Champion survived long enough to kill the two Warlocks, before fleeing for their lives. The Eldar let them go, intent on the bigger threats still remaining.


Shuriken catapults blazing (or whatever they do), the Dire Avengers charged into the Khorne Berzerkers. Normally this would seem pretty foolish, but the Berzerkers, finally enraged by the Eldar continuously staying out of assault range, had sprinted so quickly towards their enemy that there was simply no more room for the Dire Avengers to fall back. Knowing that they would soon be caught by the frothing, charging Berzerkers, they elected to reverse direction and charge, hoping the element of surprise would bring them victory. This was not to be. They only killed one of the Berzerkers, while three of them fell. Undeterred, they held their ground and the fight would continue.

Meanwhile, the six Wraithguard were unaffected by the loss of their Warlock leader. With the determination of soulless constructs, they managed to beat to death the renegade Techmarine.

Turn 5
The Howling Banshees ran up to the crest of the hill, but were still too far from the Marines in the woods to assault. The Farseer examine the twisting paths of potential futures, and determined that he didn't want to be shot by the two Heavy Bolters and the Autocannon on the nearby Predator. With the psychic power of his Witchblade, the managed to destroy the tank. The Marines in the woods couldn't see the Farseer, and so again fired at the advancing Wraithguard, cutting down three more of them. Elsewhere, the Berzerkers slaughtered the remaining Dire Avengers, and the Terminators easily finished off the few remaining Rangers. The forces on both sides were severely depleted by this point. However, it is not in the nature of the Crusader marines to hold ground long, and the time had come to withdraw.

The Result
The Eldar force destroyed a Rhino and a Predator, wiped out a unit of Thousand Sons and the unit of "Obliterators", and broke the Chaos Lord and a unit of marines for a total of 6 kill points. The Renegade Marines wiped out the Dire Avengers, Rangers, Warp Spiders, and the Farseer's retinue, and broke the Swooping Hawks, which gave them only 5 kill points. A victory for the Eldar, as the Renegades were forced to withdraw, leaving the sacrificial maiden in the hands of the Farseer.

Monday, February 1, 2010
Warhammer 40,000 Battle Report: The Battle of Zagstruk's Head - Part 2
Chaos Marine Turn 3
The Khorne Berzerker unit on the far left flank of the Chaos Marine army was down to one remaining member. And he was mad. After the rest of his unit had been burned to death by the Burna Boyz, he decided it was time for revenge. He charged the five Burna Boyz, screaming in rage, and instantly cut down half of them. The rest of the terrified Orks fled in panic and were shot in the back as they ran. Nearby, the unit of Boyz fighting the remaining Obliterator did a single wound, and the Obliterator killed a couple of them in return.

Back in the middle of the battlefield, the Chaos Marines got more reinforcements. Another unit unit of Obliterators, this one three strong, teleported down right next to the graveyard. They were exactly on target thanks to the nearby Icon of Khorne. With the Obliterators to deal with the Orks in the graveyard, the unit of Crusaders marines and the last remaining unit of Berzerkers were free to come to the aid of their commander, who was surrounded by over 20 Ork Boyz.

The Obliterators opened up on the Boyz in the graveyard with twin-linked flamers, killing every single one and adding many new charred bodies to the carnage.

The Crusaders and the Berzerkers assaulted the unit of Boyz, slaughtering almost all of them as they fought their way in toward their beleaguered Chaos Lord. It was not enough, however. A single remaining Nob with a power claw managed to sneak up on the Lord and bash him apart with a single blow. But with most of his unit gone and now surrounded himself, the Nob tried to flee and was cut down in the sweeping advance.

Orks Turn 3
Seeing an inviting target, the Ork Battlewagan floored it and rammed the nearest Rhino in the side at full speed, but did no damage. The Tankbustas were one again ineffective. The Orks also got some reinforcements, as three DeffKoptas came on from the Ork left, but coming from so far away their weapons were not yet in range.

The Looted vehicle once again managed to miss with its Battle Cannon. The Warboss with his bodyguard advanced on the Crusaders and opened fire. With some uncanny shooting, they managed to gun down both of the Flamer-armed marines before they ever had a chance to fire their brutal weapons. The Stormboyz charged the full unit of eight Khorne Berzerkers, who were just hitting their stride and easily slaughtered all the charging Stormboyz before they could even attack. The Warboss's unit charged the Crusaders, but only a few were able to reach them, so there were few casualties and both sides piled in. The combat with the Obliterator continued, as the Orks couldn't manage to finish him off, and he killed another couple of them.


Chaos Marine Turn 4
The still unscathed unit of Khorne Berzerkers moved up to come to the aid of the three remaining marines of the Crusaders chapter, who were outnumbered in combat more than 5 to 1 and facing the Ork Warboss. The full unit of three Obliterators moved around the cemetery wall to get clear shots at the largely ineffective looted tank. Their well-aimed Multi-Melta blasts caused the vehicle to explode in spectacular fashion, ending the looming threat of the battle cannon.

The Berzerkers charged into the combat with the Warboss and his retinue, killing most of the Orks. Between the remaining Orks and the Warboss, they only managed to kill a single Crusader. The furious charge of the Berzerkers must have had them thinking more about escaping than attacking. They knew they couldn't win this fight and tried to escape, but were cut down in the sweeping advance. Elsewhere, the last remaining, and largely intact, unit of Ork Boyz finally finished off the Obliterator they had been fighting. (We kept track of the total number of attacks it took these Orks to take out the two Obliterators. I don't remember the exact figure, but I think it was somewhere around 200. They took out the first one with their first 71 attacks, so it took around another 125 attacks to finish that second Obliterator) After the combats, the Ork Boyz and the Chaos Marines all consolidated toward the cemetery that lay between them.


Orks Turn 4
The Ork army didn't have many units left, but they did have a completely intact Battlewagon. The large unit of Boyz that had just finished off the Obliterator moved forward, and the Battlewagon drove over towards them ready to pick them up next turn if they wanted a ride. The determined Tankbustas advanced towards the two Chaos Rhinos, but before they could do anything the Mega-Armored Nobz fired their rockets at the immobilized Rhino. Firing at a big, stationary target, they easily hit some vital locations and destroyed the vehicle. The Tankbustas opened fire on the remaining Rhino, but couldn't manage to hit it.


The Tankbustas then continued forward to assault the remaining Rhino. Barely reaching the vehicle as it tried to evade them, a lucky grenade detonation penetrated the ammunition storage and caused the tank to explode, killing all of the Tankbustas. But at least they died doing what they loved. Elsewhere, the DeffKoptas fired their rockets at the three remaining Crusaders, but only one was killed as the other shots exploded against the nearby brick wall.

Chaos Marines Turn 5
Things were moving at a furious pace now. The two remaining Crusaders and the full unit of eight Berzerkers ran at full speed through the graveyard. Struggling over mounds of charred and dismembered bodies, the still managed to reach and surround the crypt containing Zagstruk's head. Or so they assumed, as with all the body parts strewn about, it would be hard to locate Zagstruk's head, assuming they could even discern it from the head of any other Ork. But no matter. The lone remaining Khorne Berzerker from the other squad, still in a rage, charged at the large unit of nearby Boyz, but they proved too numerous for him and he only manged to kill one or two before they dragged him down.
The three Obliterators advanced towards the annoying DeffKoptas and exploded all three of them with well-aimed shots of lethal radiation from the Multi-Meltas.

Orks Turn 5
Seeing that their force had been almost completely annihilated, the Ork Boyz sensed that time was running short and opted for a desperate maneuver to try to save Zagstruk's head from being captured. The mounted up in the Battlewagon and yelled for the driver to plow full-speed through the brick wall and into the cemetery to stop directly over Zagstruk's grave. The Chaos Marines were forced to back off in the face of the insane maneuver and could now not reach Zagstruk's head, so the desperate move had paid off.

(At the end of Turn 5, we rolled for random game length. Had the battle ended then, it would have been an Ork victory, since with the Battlewagon blocking the Ork objective, none of the Chaos Marines were within three inches of it. We rolled, and the result was another turn, giving the Chaos Marines another chance to pull out a draw.)
Chaos Marines Turn 6
Things were getting desperate now, and all could sense that time was running short. The three Obliterators managed to make their way to the edge of the graveyard to get clear shots at the Battlewagon, and fired again with their trusty Multi-Meltas. The Battlewagon exploded violently, killing a few of the Boyz inside. The Crusaders and Berzerkers fired their Bolt Pistols at the remaining Boyz, killing several more. The few that remained weren't going to stick around to be assaulted, and scrambled out of the wreckage to flee away from the battlefield. The Crusaders and Berzerkers had recaptured the objective, though Zagstruk's head was now covered by even more Ork bodies, as well as the flaming wreckage of the Battlewagon.

Orks Turn 6
The only remaining Orks on the battlefield, the Mega-Armored Nobz, called their Truck over to shield them from fire as they collected their spoils. The battle came to an end, with both sides having captured their opponent's objective, resulting in a draw.

This turned out to be an incredibly fun battle, with an extreme amount of carnage on both sides. Out of the two 2000 point armies, all that remained at the end were 4 Mega-Armored Ork Boyz with their truck, 7 Khorne Berzerkers, 2 regular Chaos Space Marines, and 3 Obliterators. The shredded bodies of 16 Chaos Marines are strewn about the Chaos Icon next to the Book of Sorcery, and there are somewhere around 120 bloody or burned corpses in or around the cemetery. The battle also went right down to the wire, and ended in a draw. You can't ask for a better result than that. And considering that it ended in a draw, and that the Chaos Marines need to get their book back, and the Orks (for whatever reason) don't want them to have Zagstruk's head, I hope sometime to do a sequel to this battle.
Monday, October 12, 2009
Work In Progress: Renegade Techmarines
So I recently started working on the first two conversions. I can't do a third yet, because I need to get a third Techmarine model. Unfortunately, if I want a different techmarine base model from the two I already have, I either have to spend over $40 for one that comes with a bunch of servitors that I don't need, or spend almost $50 to get the even nicer one (just because it looks more different from the two I already have) that comes with a Thunderfire Cannon that I don't need. So I'm not sure what I'm going to do about that.
Subscribe to:
Comments (Atom)