Thursday, December 30, 2010
Renegade Imperial Guard Rough Riders
Monday, December 20, 2010
InkBiz 1:200 scale Napoleonic French
I was lucky enough to receive some sample models from a brand new range of miniatures. They are 1:200 scale French Napoleonic infantry. This range is being created by a man who on The Miniatures Page goes by the name InkBiz. The figures aren't for sale yet, but he was nice enough to send out some samples to some of the people on TMP who have shown interest in them, including myself.
His goal with this new range seems to be creating correctly proportioned and scaled figures, which I'm sure is very difficult as such a small size. Most 10mm figures I've seen, and all 6mm figures, are really chunky and thick. GHQ are the only 10mm figures I've seen that look to have roughly human proportions, until I got these samples from InkBiz. So I thought seeing the two ranges side-by-side might make for a good comparison.
Here are some pictures of the InkBiz 1:200 French Napoleonic infantryman next to one of my spare 10mm GHQ American Civil War infantry figures. They are actually not all that different in size, though the InkBiz figure is taller because it is on a thicker base. The GHQ figure does have slightly crisper detail, especially in the face. Being a different scale, the GHQ figure is slightly larger in general. I'm not sure the difference in size or detail would be very noticeable when seeing them at a distance on the gaming table.


The InkBiz figure has a little weirdness going on with the elbow of the left arm, which looks a little strange. This was probably necessary to make it go around the musket without making the arm way too long, and again probably not noticeable on the table. The musket on the InkBiz figure appears to be the only exception to proper proportions, but I think that was a good decision. The thin rifles on my GHQ Civil War figures get bent all the time. Whenever the rifle is touched at all, it bends. The thicker musket on the InkBiz figure is extremely sturdy and likely won't get bent through any normal handling of the figures. It also allows additional details on the InkBiz figure's musket. So a good compromise between realism and practicality.
InkBiz also sent along a few figures that he'd primed and started to paint. Here's a couple pictures of that GHQ Civil War infantry figure between two of the partially painted InkBiz figures. They are obviously not finished, but at least this gives some idea what the figures look like with some paint on them. I'll post pictures of some finished painted figures as soon as I can finish painting them.


I think these pictures show the real strength of these Inkbiz 1:200 figures, which is the mass effect of seeing them all together on a base. I've put 12 of the figures, in 3 ranks of 4 figures, onto a 3/4" square base. Once they're painted and there are several more such bases, that is going to be a splendid looking unit. The fact they they are reasonably proportioned and that you can fit them so close together is going to make the finished units look great.


Getting the figures ready for painting was really easy. Whether by brilliant design or happy accident, the mold lines on these ended up in places where they aren't very noticeable. Even if you are really obsessive about cleaning off mold lines, it won't take much effort. There were two pieces of "flash" on each figure, one on the end of the bayonet that could just be twisted off, and one on the top of the blanket roll that I preferred to trim off with the hobby knife. There are some mold lines along the insides of the legs, which you would hardly even see when looking at them from above (though I removed them anyway). There are mold lines on the outside of the legs that you'd want to remove. The rest of the lines are mostly in places where they don't look out of place, like along the barrel of the musket. It's hard to explain, and even harder to try to photograph, but I was pleased with how quickly and easily I cleaned the mold lines and had these ready to paint.
All in all, this is a pretty nice figure. InkBiz plans to expand on the french range. To quote a post of his on the TMP message boards: "The remainder of the French Line are coming out in a few weeks (volts and grens), followed by command, then French Lights, and mounted command. After that artillery and cavalry will follow." No specific date on this so far, or when the figures might be for sale anywhere. He's also working on another range of even smaller 1:500 Napoleonic figures, which equates to about 4mm. Quite ambitious, but hopefully he continues with it.
As for these 1:200 figures, if the range does expand I will be getting some. If GHQ made any Napoleonic figures that weren't in that "Advancing" pose that I don't really like, it might be a decision about which range to use. As it is, as soon as I can buy InkBiz 1:200 figures for an army I want to collect, I will be getting some. I'll be sure to post again once I have some painted figures to show, or if I have any more information about how to purchase the figures.
Monday, December 13, 2010
Warhammer 40,000 Battle Report: Fortress Antorktica - Part 1
This was a 2000 point Warhammer 40,000 game pitting my Tyranids against two friends playing Orks. We planned a small campaign consisting of three linked battles. The first would represent a surprise attack by the Tyranids on artillery emplacements in the rear of the Ork lines. This would be an attempt to disrupt the artillery from being used in the defense during the main Tyranid attack planned for the same time.
For the game, we used the Reconnaissance In Force mission from the Battle Missions book, with the Tyranids taking the place of the Necrons. The Objectives would represent the artillery pieces of the Orks. As per the mission, the Tyranids had to secretly select a table edge before the Orks deployed their army anywhere on the table 12" from the edge. The Tyranids would then move on from their table edge on the first turn. The game would use Random Game Length, and the player capturing the most objective would be the winner. Also, during the first game turn, units would need to pass a leadership test to shoot or assault, to represent the surprise of the attack and not knowing the positions of the defenders.
Monday, December 6, 2010
Warhammer Fantasy movement trays
I'm trying out a new idea for Warhammer Fantasy movement trays. The existing solutions haven't really worked well. For one thing, when playing on tables with a lot of hills, having to prop up a large movement tray on a hill is difficult, looks silly, and may result in many of the models falling over. In fact with some of the more unbalanced models, just pushing the tray around can result in many of them tipping over. In a big unit, this can cause quite a mess and it can take longer to reposition all the models that it is worth.
The other problem is that movement trays have to be made in specific sizes, so I'd need a lot of them in 15, 20, 25, and 30 model sizes at least, for 20mm and 25mm square models. That's a lot of different options I'd need to make. Not to mention that once a unit starts taking casualties, there's a big empty space at the back of the movement tray that doesn't look good and is a pain when you have to put another unit in that vacated space.
The solution I'm going to try out is to use magnetic sheet and steel bases to make magnetic movement trays. I will cut out magnetic sheet in rectangles, some big enough to fit one rank of five models, some big enough to fit two ranks of five models. I'll then glue thin steel bases to the bottom of the Warhammer bases and attach the models magnetically to the sheet. With plastic models that have the completely empty base bottoms, I'll probably be able to find washers that fit in there. But with the slotta-bases, these thin steel squares work perfectly. I got the steel bases here. The 3/4" x 3/4" bases fit a 20mm Warhammer base perfectly.
With the different sizes of sheet, I'll be able to combine them to make different sized units. So a unit of 25 models will only require moving around three of the magnetic rectangles. The magnetism will also hold the models down, effectively keeping them from tipping when I move the unit or when they need to be positioned on a hill. If I need to reform the unit, the most common widths of 5 or 10 wide will be simple, and I can always make a handful of 2 and 3 model length rectangles of magnetic sheet for adding more files.
Below is a picture of a few Empire Greatswords with the thin steel bases glued to the bottom of their bases. The next picture shows the Greatswords with the two sizes of magnetic sheet I've cut out, one for holding a single rank of five models, the other for two ranks of five models.


Here I've attached the models to the magnetic sheet. The cling on quite nicely. If I wanted to use a unit of 15 Greatswords in the game, I can do it like this, without needing a special sized movement tray that holds 15 models or having extra movement tray hanging off the back of the unit. And when moving them, I only have to push around these two sheets of models. Looking from above, you can barely see the magnetic sheet at the bottom of the base. But I will be painting the magnetic sheet green so that it looks better once a few models have been taken off, exposing the sheet that was beneath them.


As you can see, any sort of incline or other unusual terrain will be no problem for these guys.

I have yet to try this out in a game, but I think it will work pretty well. I'll give an update after I've tried it out. I've you've tried out any interesting ideas for how to move your Warhammer units around the table, I'd be interested in hearing about them.
Monday, November 29, 2010
Painting Renegade Imperial Guard Infantry Unit
Monday, November 22, 2010
Renegade Imperial Guard Veteran/Command Squad Conversions
Thursday, November 18, 2010
Grismeire Valley Campaign Turn 3 - Fate of the Ogres Challenge Game
The Bretonnian forces fighting in the Grismeire Valley had long been expecting some assistance from a band of Ogre mercenaries in the area. Their high Elf allies assured the Bretonnian command that the Ogres had been hired to assist in the campaign. Yet, so far the Ogres had done nothing but eat their way across the valley. Frederic Theobold, sensing the campaign was at a critical point, needed the Ogres to make their move. He sent a small force to find the Ogre encampment and convince their leader that it was time for the Ogres to earn their pay.
After a long day of marching, the Bretonnian force located the Ogre camp. As it was getting late, the Bretonnians made camp themselves, intending to meet with the Ogres first thing the next morning. They didn't know that The Master of the undead invaders had sent a force to make sure the Ogres would stay out of the campaign. In the dead of night, the undead approached the camp silently, zombies and skeletons rising from the ground in the middle of the camp. Driven on by the will of their Vampire leader, the undead automatons murdered the Ogres in their sleep, putting an end to the threat of the Ogre mercenaries.
As dawn broke the undead force, aware of the nearby Bretonnian camp, arrayed themselves for battle. Not expecting any trouble, the Bretonnians broke camp and approached the Ogre camp unprepared for a fight. Only too late did they see the army of undeath arrayed against them.
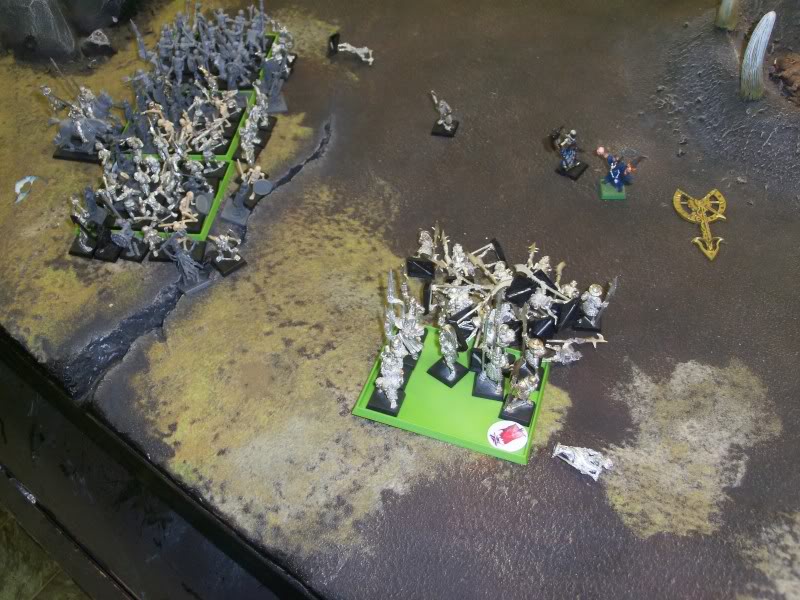
The Undead were deployed just to the right of the Ogre camp in a solid battle line consisting of, from left to right, Grave Guard, Zombies, Grave Guard with Great Weapons, and Skeletons with Spears. Behind the line was a unit of Skeletons with spears, containing two Necromancers and the Vampire leading the force. With the leftmost unit of Grave Guard was a Wight King bearing the army standard.
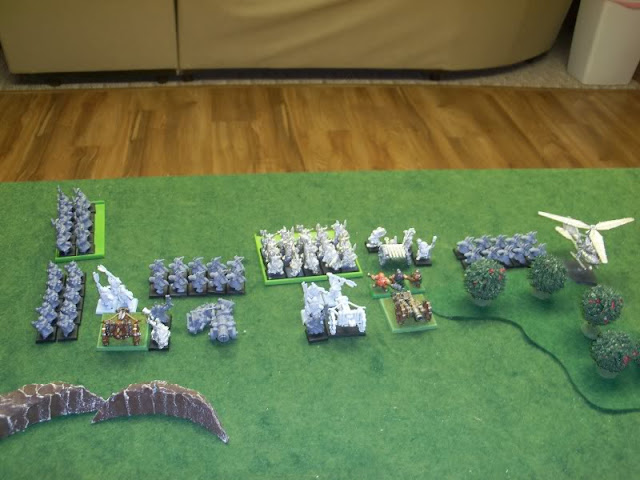
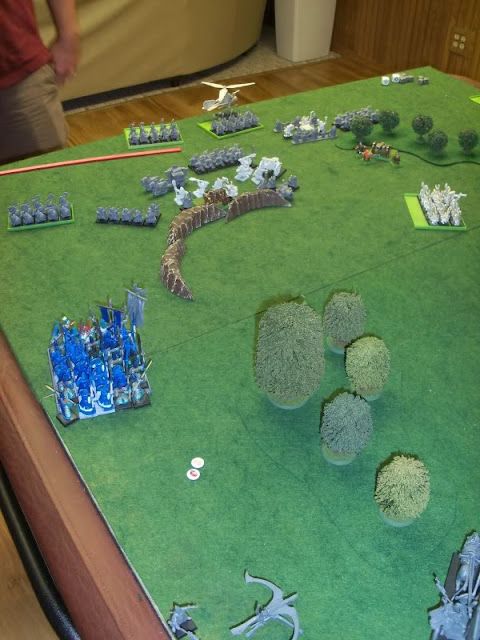
The Bretonnians were not well deployed. The mass of their infantry was clustered up far to the Vampire Count army's left, along with some questing knights, on the outskirts of the Ogre camp. Just across the field from the undead army, but more spread out, were two units of Knights, some peasant bowmen, and a unit of Pegasus Knights.
In the mission we played, each player had to roll for each unit to determine which third of their deployment zone the unit was required to deploy in. As the Vampire count player, I ended up with my entire army deployed in the center, while the Bretonnian player got stuck putting all his men at arms to his far right.


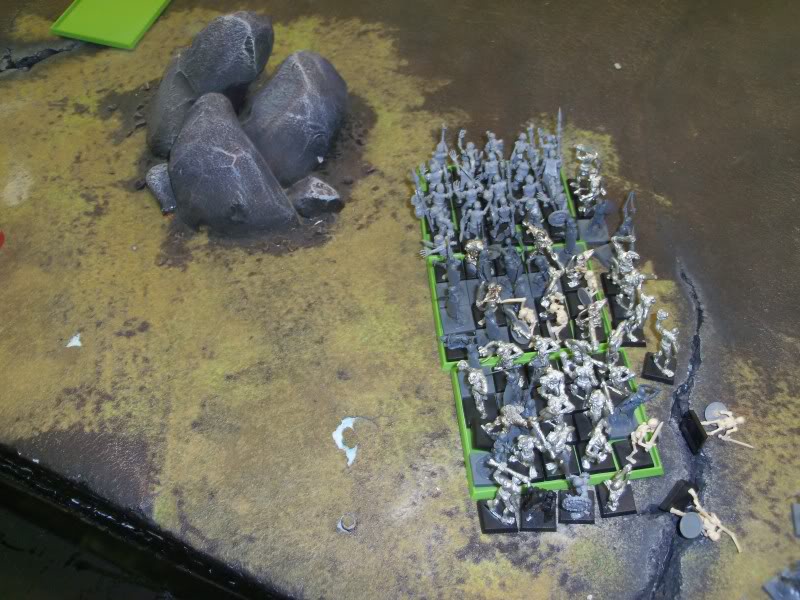
Seeing the predicament they had stumbled into, the Bretonnians wisely opted to pause to pray to the Lady of the Lake for deliverance. The undead took the time to reposition their line, anchoring their flanks between some large boulders on the left on a massive pit on the right. Surrounded by the aura of death created by the long night of slaughter, the winds of magic flowed strong from the Vampire. She raised more and more of the long dead from the ground, easily more than doubling the size of her zombie regiment. Her army was growing in strength every minute.


The Bretonnians were cautious in the face of this sudden threat. Their Knights would not charge off blindly, but would wait for their infantry support to make its way around the edge of the camp and onto the battlefield. The Pegasus Knights did, however, fly forward to begin making their way around into the read of the vampire line. The Bretonnian Prophetess proved to not be as lucky with the winds of magic this day. Perhaps overwhelmed by the power drawn by so much death, she suffered a catastrophic backlash of magical energy that killed nearly a third of the massive horde of men at arms around her.


The Vampire mostly held, biding her time, knowing that her army only grew stronger as the Bretonnians took time to rearrange their army. Through her necromantic magics, she continued to increase the size of her zombie regiment, which was now four times its starting strength. She, and the necromancers accompanying her, were forced out of the skeleton regiment, which turn to its right to guard the leaders of the army from the pesky Pegasus Knights. Meanwhile, the Questing Knights and another unit of Knights began making their way around the boulders that anchored the right flank of the undead army.

Denied the chance to take out the leaders of the undead army, the Pegasus Knights instead charged into the rear of the Skeleton regiment on the undead right flank, just as a full unit of Knights with the army standard bearer charged their front. The combat was swift and brutal, the surrounded and outclassed Skeletons were scythed down or crumbled to pieces as their hold on unlife was broken by the thunderous charge of the Knights. Back to the left flank, the Questing Knights held their position, wary of charging the what seemed to be an endless, and ever increasing, sea of zombies. The other unit of Knights turned around and headed back around the front size of the boulders, just as the Bretonnian Infantry was finally getting into position.


Pulling back on their reins, the Knights on the undead right barely had time to regroup and reform after wiping out the Skeletons before the nearby Grave Guard charged them. The Pegasus Knights turned around to face towards the Vampire and Necromancers, but their Skeleton bodyguard again blocked an attack. The Grave Guard and Zombies on the left flank turned to face the Knights and Questing Knights who threatened their flanks. Meanwhile, the charging Grave Guard with the great weapons overwhelmed the defending Knights, deprived of the advantage of having the momentum of the charge. The Knights turned to flee, but with seemingly supernatural speed the Grave Guard pursued them, hamstringing their horses before hacking apart the fallen riders. In the pursuit, the capture the standard of the Knights as well as the Army Battle standard, earning great glory for the warriors who had long since lost any ability to appreciate such feelings.


The tense, careful maneuvering for the slightest advantage was now at an end. The Grave Guard on the left, with the Army Standard bearing Wight Lord, could no longer avoid a charge. Fortunately for them, the horde of peasant spearmen had second thoughts and refused to charge into their flank. Still, a large unit of Knights with great weapons, including the Bretonnian General, and a small unit of men-at-arms with Halbers charged the Grave Guard in the front. Led by the Wight Lord, no doubt a long dead hero of Bretonnian history, the Grave Guard fought with incredible skill, and the Knights, uncharacteristically, were overcome with fear at seeing their potential fate. The Wight Lord cut down the frightened Bretonnian general, and two more of the Knights were cut down by the glowing Wight blades. Disheartened and afraid, the Knights and men at arms fled for their lives, causing the already skittish peasant spearment to panic and flee.


With most of the Bretonnian force now broken and fleeing, the Grave Guard on both flanks pressed their attacks. On the left, the unit with the Battle Standard charged and drove off the other small unit of men-at-arms with halberds, killing most of them. On the right, the Grave Guard with great weapons charged the bowmen, making their way through a hail of arrows and clamboring over defensive stakes to get at their enemy, but none of it was enough to stop them. They soundly defeated the bowmen, who fled the battlefield and scattered.
Elsewhere, the Vampire general rejoined her unit of Skeleton bodyguards who, thanks to the unholy power of VanHel's Danse Macabre, were able to catch up to and charge the Pegasus Knights. They fought valiantly, their champion (and his trusty mount) managing to cut down the Vampire general, but the result was never in doubt. Overrun by ranks of skeletons, the surviving Pegasus Knights fled the battlefield, soaring high into the air to escape the Skeletons. Adding to the catastrophe for the Bretonnians, the Questing Knights grew impatient and frustrated as the battle turn against their army and, wishing to capture any small amount of glory, couldn't resist charging the massive horde of zombies.


The Grave Guard with Great Weapons returned to the field of battle, having scattered the bowmen to the winds, but there were no more enemy before them. Despite the loss of the general, the fleeing Bretonnian Knights reallied, but there was little they could do.


Though completely outclassed, the massive horde of zombies eventually swarmed, dragged down, and devoured the Questing Knights. All that remained of the Bretonnian force was the rallied remains of a single unit of Knights, and many fleeing peasants who would likely never be seen again. It was a great victory for the Vampire Counts. Not only had the completed their mission to eliminate the Ogre Mercenaries, but they had nearly wiped out a Bretonnian force they had not expected to encounter.


After a long day of marching, the Bretonnian force located the Ogre camp. As it was getting late, the Bretonnians made camp themselves, intending to meet with the Ogres first thing the next morning. They didn't know that The Master of the undead invaders had sent a force to make sure the Ogres would stay out of the campaign. In the dead of night, the undead approached the camp silently, zombies and skeletons rising from the ground in the middle of the camp. Driven on by the will of their Vampire leader, the undead automatons murdered the Ogres in their sleep, putting an end to the threat of the Ogre mercenaries.
As dawn broke the undead force, aware of the nearby Bretonnian camp, arrayed themselves for battle. Not expecting any trouble, the Bretonnians broke camp and approached the Ogre camp unprepared for a fight. Only too late did they see the army of undeath arrayed against them.
The Undead were deployed just to the right of the Ogre camp in a solid battle line consisting of, from left to right, Grave Guard, Zombies, Grave Guard with Great Weapons, and Skeletons with Spears. Behind the line was a unit of Skeletons with spears, containing two Necromancers and the Vampire leading the force. With the leftmost unit of Grave Guard was a Wight King bearing the army standard.
The Bretonnians were not well deployed. The mass of their infantry was clustered up far to the Vampire Count army's left, along with some questing knights, on the outskirts of the Ogre camp. Just across the field from the undead army, but more spread out, were two units of Knights, some peasant bowmen, and a unit of Pegasus Knights.
In the mission we played, each player had to roll for each unit to determine which third of their deployment zone the unit was required to deploy in. As the Vampire count player, I ended up with my entire army deployed in the center, while the Bretonnian player got stuck putting all his men at arms to his far right.


Seeing the predicament they had stumbled into, the Bretonnians wisely opted to pause to pray to the Lady of the Lake for deliverance. The undead took the time to reposition their line, anchoring their flanks between some large boulders on the left on a massive pit on the right. Surrounded by the aura of death created by the long night of slaughter, the winds of magic flowed strong from the Vampire. She raised more and more of the long dead from the ground, easily more than doubling the size of her zombie regiment. Her army was growing in strength every minute.


The Bretonnians were cautious in the face of this sudden threat. Their Knights would not charge off blindly, but would wait for their infantry support to make its way around the edge of the camp and onto the battlefield. The Pegasus Knights did, however, fly forward to begin making their way around into the read of the vampire line. The Bretonnian Prophetess proved to not be as lucky with the winds of magic this day. Perhaps overwhelmed by the power drawn by so much death, she suffered a catastrophic backlash of magical energy that killed nearly a third of the massive horde of men at arms around her.


The Vampire mostly held, biding her time, knowing that her army only grew stronger as the Bretonnians took time to rearrange their army. Through her necromantic magics, she continued to increase the size of her zombie regiment, which was now four times its starting strength. She, and the necromancers accompanying her, were forced out of the skeleton regiment, which turn to its right to guard the leaders of the army from the pesky Pegasus Knights. Meanwhile, the Questing Knights and another unit of Knights began making their way around the boulders that anchored the right flank of the undead army.

Denied the chance to take out the leaders of the undead army, the Pegasus Knights instead charged into the rear of the Skeleton regiment on the undead right flank, just as a full unit of Knights with the army standard bearer charged their front. The combat was swift and brutal, the surrounded and outclassed Skeletons were scythed down or crumbled to pieces as their hold on unlife was broken by the thunderous charge of the Knights. Back to the left flank, the Questing Knights held their position, wary of charging the what seemed to be an endless, and ever increasing, sea of zombies. The other unit of Knights turned around and headed back around the front size of the boulders, just as the Bretonnian Infantry was finally getting into position.


Pulling back on their reins, the Knights on the undead right barely had time to regroup and reform after wiping out the Skeletons before the nearby Grave Guard charged them. The Pegasus Knights turned around to face towards the Vampire and Necromancers, but their Skeleton bodyguard again blocked an attack. The Grave Guard and Zombies on the left flank turned to face the Knights and Questing Knights who threatened their flanks. Meanwhile, the charging Grave Guard with the great weapons overwhelmed the defending Knights, deprived of the advantage of having the momentum of the charge. The Knights turned to flee, but with seemingly supernatural speed the Grave Guard pursued them, hamstringing their horses before hacking apart the fallen riders. In the pursuit, the capture the standard of the Knights as well as the Army Battle standard, earning great glory for the warriors who had long since lost any ability to appreciate such feelings.


The tense, careful maneuvering for the slightest advantage was now at an end. The Grave Guard on the left, with the Army Standard bearing Wight Lord, could no longer avoid a charge. Fortunately for them, the horde of peasant spearmen had second thoughts and refused to charge into their flank. Still, a large unit of Knights with great weapons, including the Bretonnian General, and a small unit of men-at-arms with Halbers charged the Grave Guard in the front. Led by the Wight Lord, no doubt a long dead hero of Bretonnian history, the Grave Guard fought with incredible skill, and the Knights, uncharacteristically, were overcome with fear at seeing their potential fate. The Wight Lord cut down the frightened Bretonnian general, and two more of the Knights were cut down by the glowing Wight blades. Disheartened and afraid, the Knights and men at arms fled for their lives, causing the already skittish peasant spearment to panic and flee.


With most of the Bretonnian force now broken and fleeing, the Grave Guard on both flanks pressed their attacks. On the left, the unit with the Battle Standard charged and drove off the other small unit of men-at-arms with halberds, killing most of them. On the right, the Grave Guard with great weapons charged the bowmen, making their way through a hail of arrows and clamboring over defensive stakes to get at their enemy, but none of it was enough to stop them. They soundly defeated the bowmen, who fled the battlefield and scattered.
Elsewhere, the Vampire general rejoined her unit of Skeleton bodyguards who, thanks to the unholy power of VanHel's Danse Macabre, were able to catch up to and charge the Pegasus Knights. They fought valiantly, their champion (and his trusty mount) managing to cut down the Vampire general, but the result was never in doubt. Overrun by ranks of skeletons, the surviving Pegasus Knights fled the battlefield, soaring high into the air to escape the Skeletons. Adding to the catastrophe for the Bretonnians, the Questing Knights grew impatient and frustrated as the battle turn against their army and, wishing to capture any small amount of glory, couldn't resist charging the massive horde of zombies.


The Grave Guard with Great Weapons returned to the field of battle, having scattered the bowmen to the winds, but there were no more enemy before them. Despite the loss of the general, the fleeing Bretonnian Knights reallied, but there was little they could do.


Though completely outclassed, the massive horde of zombies eventually swarmed, dragged down, and devoured the Questing Knights. All that remained of the Bretonnian force was the rallied remains of a single unit of Knights, and many fleeing peasants who would likely never be seen again. It was a great victory for the Vampire Counts. Not only had the completed their mission to eliminate the Ogre Mercenaries, but they had nearly wiped out a Bretonnian force they had not expected to encounter.

Monday, November 1, 2010
Warhammer Battle for the Cave Multiplayer Battle Report
This was the second in a series of two linked multi-player Warhammer Fantasy games. You can read the results of the first battle in my Warhammer Clash of Scouts Multiplayer Battle Report post. I've also posted the scenario rules for this second game, which was the Battle for the Cave Multiplayer Warhammer Scenario which I created based on a multi-player scenario in the Warhammer Fantasy rulebook.
While the remnants of the Dwarf scout force screened the cave, the Dwarf General decided to send part of his army on a forced march through the night in order to get his artillery deployed as quickly as possible. The Elves, not wanting to be surrounded again, sent half of their army on a flanking maneuver to get around the rear of the advancing Dwarf forces. Perhaps uncharacteristically, the Chaos general decided to play it safe and keep his army together, marching at a moderate pace.
Turn 1
The Dwarf artillery arrived just before dawn and deployed with a field of fire facing the cave opening to deter any of their enemies from approaching it. The remaining scout forces deployed facing the cave but kept their distance. The Dwarfs had a clever plan up their sleeves for capturing the treasure...

Turn 2
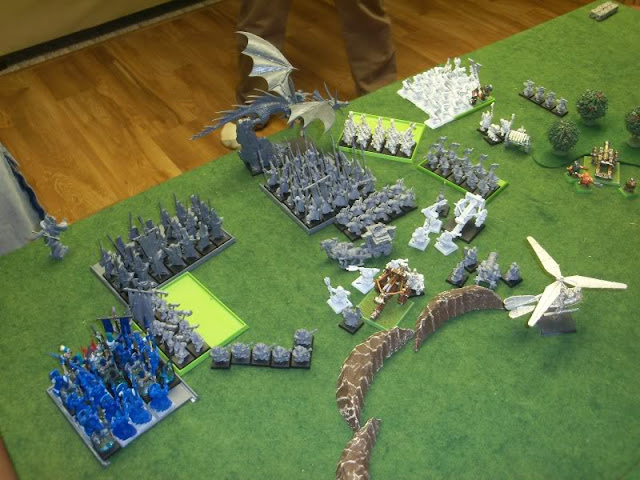
More Dwarfs began to turn up, informing their comrades of the High Elves behind them chasing the rear of the Dwarf army. The Dwarfs spread out their forces covering a lot of area with their many small units, not knowing which direction an attack might come from. The first Elves to show up, however, were to the right of the Dwarf army, and consisted of a large unit of spearmen, a bolt thrower, a lion chariot, and a mighty Mage Lord. Unfortunately, the great wisdom the Mage Lord had acquired over centuries of study did not prevent him from making a foolish mistake and exposing himself to the Dwarf artillery battery. He was quickly and unceremoniously blown to pieces by the Dwarfs, who quickly took advantage of the opportune target.


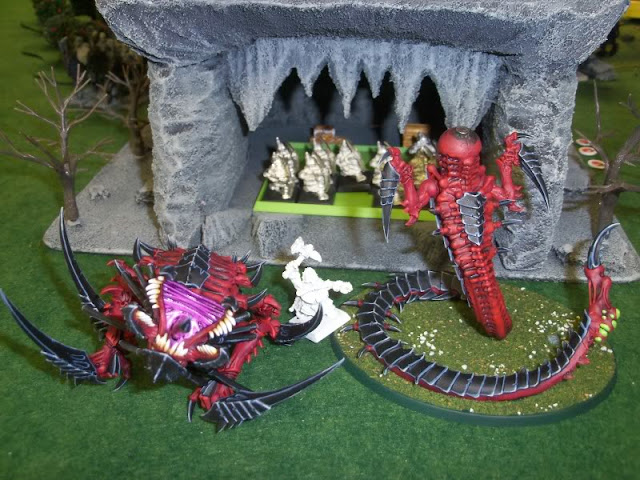
At the same time, the entire Chaos Warrior army arrived on the opposite side of the battlefield from the Dwarfs, facing the back of the cave. They would have a long march ahead of them in order to reach the cave, but their general thought it best to have the large cave between them and the Dwarf artillery. Meanwhile, the clever Dwarf plan was unfolding, as a unit of Miners who had been sent to tunnel into the cave arrived safely at their destination. Having reach the cave containing the treasure horde, they quickly discovered that, of course, it was guarded by a dragon! Though surprised by the unexpected encounter with the ferocious cave dragon, the Miners fought back with courage and ferocity. Four of their number fell, but they severely wounded the strange-looking dragon, and none thought of fleeing.


Turn 3
The entire Warriors of Chaos army advanced in haste, but its right flank was held up by a unit of knights slowing down to traverse the nearby wood. Some of the High Elf flankers sprung their trap, as a unit of Swordmaster and large unit of Spearmen appeared in the Dwarf rear. A few Dwarfs were prepared for the envelopment and got off a few crossbow shots, but it had little effect. The Dwarfs now had three large, imposing, and powerful units of High Elves in their flank and rear. In the cave, the dragon became overwhelmed by the sudden and brutal attack of the Dwarf Miners. It was unable to defend itself from their renewed attack, and the Dwarf Hero leading the miners finished off the monster, smashing it right in half with his hammer. With the treasure's guardian defeated, the Miners consolidated their position in the cave, ready to defend it to the last.


Turn 4
In the Dwarf rear, more units were turning up every minute. A large unit of Dwarfs joined the battle, but so did a Dragon mage, and another High Elf mage on foot. A brave unit of Dwarfs with great weapons, though in a a hopeless situation, decided to go out gloriously and charged High Elf Spearmen, only to be flanked by the Swordmasters. They could only hope that their sacrifice would provide some time for the rest of their army to reorganize. The other unit of High Elf spearmen charged a small unit of Dwarfs with crossbows, the only thing between the High Elves and the Dwarf artillery battery. Meanwhile, the Warriors of Chaos continued their advance, the right flank again slowed by the woods and units getting in each others way.

As a small consolation, the Dwarf artillery battery just barely managed to kill the Dragon mage and his dragon. However, the Dwarfs with great weapons were wiped out, and the Dwarf crossbow unit lost three of their number and fled. As a result, the crew of a nearby Bolt Thrower panicked and fled. The High Elf Spearmen followed through into the heart of the Dwarf artillery battery, charging the Bolt Thrower directed by the Dwarf Master Engineer and army general.


Turn 5
Both the High Elves and Dwarfs found it difficult to maneuver in the hectic scrum that had developed in the midst of the Dwarf battle line. However, the High Elves with their large, powerful units easily bested the mostly small units and war machine crews of the Dwarfs. The Dwarfs still had one large unit and a couple war machines left, but most of the rest of their force was scattering. What little hope remained was no doubt dashed as yet another large unit of High Elves with spears showed up, moving in to finish off the scattering remnants of the Dwarf army rather than trying to reach the cave, which the Dwarf Miners still held. Meanwhile, the Warriors of Chaos continued their long, slow advance towards the cave, so far taking little part in the battle.


Turn 6
The stalwart Dwarfs rallied most of their units, but they were small and spread out, and the Dwarfs struggled to form a coherent defense with the large Elf units in their midst. The Swordmaster drove off a unit of Dwarfs with Greatweapons. The Dwarfs still had one large unit and some artillery in reserve near a wood, and another strong at the base of a nearby hill keeping an eye on the cave entrace. At this point, the Chaos Warriors joined the battle, charging into a combat between High Elf spearmen and Dwarfs with crossbows, killing many on both sides in the three-way combat. The Dwarfs fled, but the High Elves held their ground. A lone, apparently suicidal Marauder Horseman charged another unit of High Elf spearmen and was rewarded with the swift death he was clearly seeking.


Turn 7
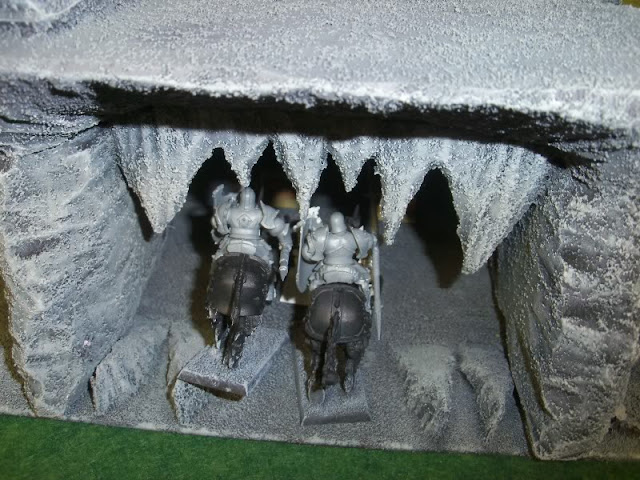
As the battle was nearing its end, the bulk of the Chaos Warrior army finall reached the cave, moving around it on either side. There wasn't much time left, as the Miners had secured most of the treasure by this point, but a unit of Chaos Knights positioned itself for a charge into the cave. The Dwarf unit at the base of the hill was prepared to charge the Knights to prevent them from assaulting the cave, but a spectacular shot from the far-off Hellcannon annihilated the entire unit. The stunned hero who barely survived the blast vengefully fired his pistol at the nearest enemy, the Chaos Knights. His shot took down one of the knights, but with the Knights now free to assault the cave, that shot could make the difference between victory and defeat. Elsewhere, the other unit of Chaos Knights defeated and drove off the High Elf spearmen, and reformed facing the cave opening, giving the Chaos army another unit that could assault the Dwarf-held cave.


Turn 8
The last remaining large unit of Dwarfs was destroyed by the High Elf spearmen and Swordmasters, leaving their army mostly destroyed. The Dwarf gyrocopter bravely sacrificed itself to buy more time to secure the treasure by charging one of the Chaos Knight units, and helpfully a unit of High Elf spearmen also charged them. That left the Chaos army the one unit of four Chaos Knights to assault the Dwarf Miners holding the cave. This was the only chance left to snatch victory from the Dwarfs. They charged in, killing most of the Miners, through the remaining Miners and the hero killed two of the Knights. Despite the heavy losses, the Dwarfs were determined to hold the cave.

Final Battle
The grinding battle at the mouth of the cave continued. The remaining Miners were cut down, leaving only the lone Dwarf hero to defend the treasure. It came down to a single combat between the Dwarf hero and the one remaining Chaos Knight. The Knight fought ferociously, badly wounding the Dwarf. Fighting through the pain, and no doubt motivated by visions of all the treasure he was fighting for, the Dwarf Hero struck a mighty blow that sent the Chaos Knight tumbling to the rocky cave floor, where the Dwarf finished him off.


In the cave, only the Dwarf hero remained able to fight, but the time they spent in the cave was enough to secure most of the treasure horde. Many Dwarfs had been sent through the tunnel the Miner's had dug to transport away the treasure that the Miner's had secured. The Dwarf hero, along with the surviving wounded Miners, went back through their tunnel along with the Dwarfs who had been sent to carry away the treasure, leaving the largely intact High Elf and Chaos armies to fight each other over the remaining scraps. The Dwarf army was mostly shattered, many Dwarf lives and war machines alike had been lost, but the legendary treasure horde was theirs.
While the remnants of the Dwarf scout force screened the cave, the Dwarf General decided to send part of his army on a forced march through the night in order to get his artillery deployed as quickly as possible. The Elves, not wanting to be surrounded again, sent half of their army on a flanking maneuver to get around the rear of the advancing Dwarf forces. Perhaps uncharacteristically, the Chaos general decided to play it safe and keep his army together, marching at a moderate pace.
Turn 1
The Dwarf artillery arrived just before dawn and deployed with a field of fire facing the cave opening to deter any of their enemies from approaching it. The remaining scout forces deployed facing the cave but kept their distance. The Dwarfs had a clever plan up their sleeves for capturing the treasure...


Turn 2
More Dwarfs began to turn up, informing their comrades of the High Elves behind them chasing the rear of the Dwarf army. The Dwarfs spread out their forces covering a lot of area with their many small units, not knowing which direction an attack might come from. The first Elves to show up, however, were to the right of the Dwarf army, and consisted of a large unit of spearmen, a bolt thrower, a lion chariot, and a mighty Mage Lord. Unfortunately, the great wisdom the Mage Lord had acquired over centuries of study did not prevent him from making a foolish mistake and exposing himself to the Dwarf artillery battery. He was quickly and unceremoniously blown to pieces by the Dwarfs, who quickly took advantage of the opportune target.


At the same time, the entire Chaos Warrior army arrived on the opposite side of the battlefield from the Dwarfs, facing the back of the cave. They would have a long march ahead of them in order to reach the cave, but their general thought it best to have the large cave between them and the Dwarf artillery. Meanwhile, the clever Dwarf plan was unfolding, as a unit of Miners who had been sent to tunnel into the cave arrived safely at their destination. Having reach the cave containing the treasure horde, they quickly discovered that, of course, it was guarded by a dragon! Though surprised by the unexpected encounter with the ferocious cave dragon, the Miners fought back with courage and ferocity. Four of their number fell, but they severely wounded the strange-looking dragon, and none thought of fleeing.


Turn 3
The entire Warriors of Chaos army advanced in haste, but its right flank was held up by a unit of knights slowing down to traverse the nearby wood. Some of the High Elf flankers sprung their trap, as a unit of Swordmaster and large unit of Spearmen appeared in the Dwarf rear. A few Dwarfs were prepared for the envelopment and got off a few crossbow shots, but it had little effect. The Dwarfs now had three large, imposing, and powerful units of High Elves in their flank and rear. In the cave, the dragon became overwhelmed by the sudden and brutal attack of the Dwarf Miners. It was unable to defend itself from their renewed attack, and the Dwarf Hero leading the miners finished off the monster, smashing it right in half with his hammer. With the treasure's guardian defeated, the Miners consolidated their position in the cave, ready to defend it to the last.


Turn 4
In the Dwarf rear, more units were turning up every minute. A large unit of Dwarfs joined the battle, but so did a Dragon mage, and another High Elf mage on foot. A brave unit of Dwarfs with great weapons, though in a a hopeless situation, decided to go out gloriously and charged High Elf Spearmen, only to be flanked by the Swordmasters. They could only hope that their sacrifice would provide some time for the rest of their army to reorganize. The other unit of High Elf spearmen charged a small unit of Dwarfs with crossbows, the only thing between the High Elves and the Dwarf artillery battery. Meanwhile, the Warriors of Chaos continued their advance, the right flank again slowed by the woods and units getting in each others way.


As a small consolation, the Dwarf artillery battery just barely managed to kill the Dragon mage and his dragon. However, the Dwarfs with great weapons were wiped out, and the Dwarf crossbow unit lost three of their number and fled. As a result, the crew of a nearby Bolt Thrower panicked and fled. The High Elf Spearmen followed through into the heart of the Dwarf artillery battery, charging the Bolt Thrower directed by the Dwarf Master Engineer and army general.


Turn 5
Both the High Elves and Dwarfs found it difficult to maneuver in the hectic scrum that had developed in the midst of the Dwarf battle line. However, the High Elves with their large, powerful units easily bested the mostly small units and war machine crews of the Dwarfs. The Dwarfs still had one large unit and a couple war machines left, but most of the rest of their force was scattering. What little hope remained was no doubt dashed as yet another large unit of High Elves with spears showed up, moving in to finish off the scattering remnants of the Dwarf army rather than trying to reach the cave, which the Dwarf Miners still held. Meanwhile, the Warriors of Chaos continued their long, slow advance towards the cave, so far taking little part in the battle.


Turn 6
The stalwart Dwarfs rallied most of their units, but they were small and spread out, and the Dwarfs struggled to form a coherent defense with the large Elf units in their midst. The Swordmaster drove off a unit of Dwarfs with Greatweapons. The Dwarfs still had one large unit and some artillery in reserve near a wood, and another strong at the base of a nearby hill keeping an eye on the cave entrace. At this point, the Chaos Warriors joined the battle, charging into a combat between High Elf spearmen and Dwarfs with crossbows, killing many on both sides in the three-way combat. The Dwarfs fled, but the High Elves held their ground. A lone, apparently suicidal Marauder Horseman charged another unit of High Elf spearmen and was rewarded with the swift death he was clearly seeking.


Turn 7
As the battle was nearing its end, the bulk of the Chaos Warrior army finall reached the cave, moving around it on either side. There wasn't much time left, as the Miners had secured most of the treasure by this point, but a unit of Chaos Knights positioned itself for a charge into the cave. The Dwarf unit at the base of the hill was prepared to charge the Knights to prevent them from assaulting the cave, but a spectacular shot from the far-off Hellcannon annihilated the entire unit. The stunned hero who barely survived the blast vengefully fired his pistol at the nearest enemy, the Chaos Knights. His shot took down one of the knights, but with the Knights now free to assault the cave, that shot could make the difference between victory and defeat. Elsewhere, the other unit of Chaos Knights defeated and drove off the High Elf spearmen, and reformed facing the cave opening, giving the Chaos army another unit that could assault the Dwarf-held cave.


Turn 8
The last remaining large unit of Dwarfs was destroyed by the High Elf spearmen and Swordmasters, leaving their army mostly destroyed. The Dwarf gyrocopter bravely sacrificed itself to buy more time to secure the treasure by charging one of the Chaos Knight units, and helpfully a unit of High Elf spearmen also charged them. That left the Chaos army the one unit of four Chaos Knights to assault the Dwarf Miners holding the cave. This was the only chance left to snatch victory from the Dwarfs. They charged in, killing most of the Miners, through the remaining Miners and the hero killed two of the Knights. Despite the heavy losses, the Dwarfs were determined to hold the cave.


Final Battle
The grinding battle at the mouth of the cave continued. The remaining Miners were cut down, leaving only the lone Dwarf hero to defend the treasure. It came down to a single combat between the Dwarf hero and the one remaining Chaos Knight. The Knight fought ferociously, badly wounding the Dwarf. Fighting through the pain, and no doubt motivated by visions of all the treasure he was fighting for, the Dwarf Hero struck a mighty blow that sent the Chaos Knight tumbling to the rocky cave floor, where the Dwarf finished him off.


In the cave, only the Dwarf hero remained able to fight, but the time they spent in the cave was enough to secure most of the treasure horde. Many Dwarfs had been sent through the tunnel the Miner's had dug to transport away the treasure that the Miner's had secured. The Dwarf hero, along with the surviving wounded Miners, went back through their tunnel along with the Dwarfs who had been sent to carry away the treasure, leaving the largely intact High Elf and Chaos armies to fight each other over the remaining scraps. The Dwarf army was mostly shattered, many Dwarf lives and war machines alike had been lost, but the legendary treasure horde was theirs.
Subscribe to:
Posts (Atom)