Monday, December 21, 2009
10mm Union and Confederate Armies
Friday, December 18, 2009
Grismeire Valley Campaign - High Elf Characters
Prince Finduleas Tethelion of Caledor
Prince Tethelion, one of the arrogant and powerful princes of Caledor, found, in the deepest of vaults, what he believes are clues to the location of the fabled Spear of Twilight. Through quick politicking, Tethelion was able to get a Warrant of Quest from the Phoenix King's Court giving him permission to raise an expedition force bound for the Old World. Not wanting to reveal his true goal, the Prince had his most trusted servant, Loriss, make forgeries of the documents he'd stumbled on omitting all clues of the Spear of Twilight. Loriss had no small skill in forgery. The prize had to be Tethelion's alone.
With the new documents, Prince Tethelion was able to draw quite a number of intrigued mages to his entourage, and with them came their guards, the mighty Swordmasters of Hoeth. Many of Tethelion's own kin joined in the hunt as well. In the final days before departure, Finduleas solidified his power by waking the mighty dragon, Mauglissiar.
Tethelion sent envoys to the King of Bretonnia as well as the Duke of Bastonne requesting permission to search 'their' lands for his kin's lost property.
Due to a violent storm at sea, Tethelion's ship had to diviate to the south. Upon making port at Brionne, the Prince learned of rumors of foul beasts raiding the exact area he was heading for. At the large port city, Finduleas hired a large band of ogres to protect his expedition and as soon as the storm broke, set off again for the port of Bordeleaux and then on up the river towards Parravon. Upon the outskirts of Parravon, Tethelion ordered the ogres to travel ahead to the north eastern region of the Massif Orcal to make sure the way was clear and then set up camp near the Black Chasm.
While resupplying in Parravon, Prince Tethelion again heard news. This time, however, it only worked in his favour. An army of High Elves was already in the area! It seemed that the rear guard of Captain Caradryan's army of the Nemesis Crown War was here biding their time until the troop ships returned from Ulthuan. That would give him another two years!
Tethelion's expedition travelled north towards Bastonne and made camp upon the banks of the Grisimire River. Prince Tethelion quickly rode to Bastonne where he met Duke Theodric the Bretonnian general, as well as Commander Cilliriel and Captain Asurai Durnal of the Sylvanusian Silver Helms, the ranking elven officers.
As luck would have it, one of the wretched Vampiric kin had perched in the very area Prince Tethelion's research had marked as the wayward home of what could only be the Spear of Twilight.
Taking upon himself the role of Fearless Vanquisher of All Evil, Tethelion committed his forces to the destruction of such vile monstrosities. The other Elven Commanders were only too eager to commit their forces as well. Very well, the do-gooders were welcome to to front. All distraction from his quest must be quashed...
Loriss Ankgmar
Loriss is prince Tethelion's most trusted servant. He is well learned and a mage of no little power. Though versed in High Magic as well as the lores of all eight winds, Loriss always gravatates and finds the greatest affinity with the winds Shyish and Ulgu.
Captain Asurai Durnal of the Silver Helms of Sylvanus
Asurai is one of the followers of the 'Lost Prince' Raethiel Isildur Tiranoc, prince of Sylvanus. Unlike most Silver Helms, Durnal is not of noble blood. Prince Raethiel saw the promise in him, however, and gifted him with the tools and place in the Silver Helm unit of Sylvanus. As Sylvanus rose in power, so too did Asurai Durnal's own prestige leading eventually to him rising to the place of Captain of Sylvanus' regiment of Silverhelms. Captain Asurai led the troops of Sylvanus under Commander Cilliriel Drachen of the Phoenix Guard as part of Captain Caradryan's army in the War of the Nemesis Crown.
Commander Cilliriel Drachen, Keeper of the Flame of Asuryan
Commander Drachen is one of the mighty champions of the Phoenix Guard. He led the rear guard of his Captain, Caradryan after the War of the Nemesis Crown. As such, his force was left behind in the Old World until the troop ships return from Ulthuan. Though still in technical command of the army, he shares responsibility with Captain Durnal, an elf who has become somewhat of a hero to the elves in his force. The elven force has purchased an elven villa near the Bretonnian fortress of Bastonne to wait out the time until their departure. Only Cilliriel and the rest of his Phoenix Guard know the true reason for their delay and choice of location...
Aldric Quilute
Adric is a young elf who keeps apart from the festivities at Brionne, instead prefering the immediate countryside. His eyes smoulder amber that seems to denote a fiery demeanor. He's charismatic and quite talkative once engaged, upon a vast array of subjects, from subtle lore to the arts of combat, though it's hard to miss during such times that he is prone to (frequently unprovoked) mood swings and an, at times, distracted air about him.
Quint Fellius
Quint is an old and grizzled elf who wears a beautifully crafted silk scarf over his blind, maimed eyes. The loss of sight, however, does not seem to handicap him as he walks the crowded streets of Brionne without the help of a guide or cane. His face is a worn manuscript of scars telling of countless battlefields, heroics, and tragedies. Between his shoulders rests a mighty sword almost as tall as he in the blade alone, in a scabbard of silver and pearl. The veteran is often seen walking amongst the barracks, regaling the younger knights with tales of almost impossible bravery. To look at his ravaged body and hear his screams in the night is to know that every tale is true.
Nayell Glaugeniss
It is a well known among the expedition that Nayell knows everything. The rumor is not that far off. A mage of undisputable power and a warrior of no small ability, Nayell also teaches the young Elflings of Saphrey, is an excellent dancer, speaks 23 languages (2 of which he invented), plays 14 instruments, and is a gourmet chef. Through all of this pompously arrogant genius, Nayell remains an amiable fellow, always willing to tactfully offer a helping hand to those in need. He truly feels the call to help those he finds in need. He alone of the elves of the expedition foresaw the troubles about to come to Bastonne, and for that reason above all others did he and his entourage accompany the expedition.
Monday, December 14, 2009
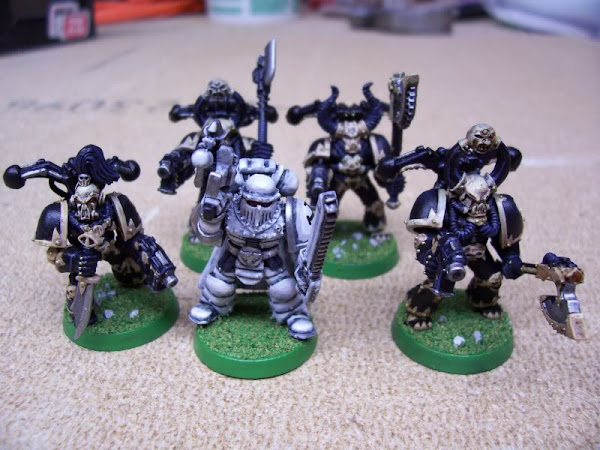
Chaos Space Marines
I've now finished the other half of my first squad of Chaos Space Marines of my custom chapter, The Crusaders. You can see the first 5 of them here.


 Usually when I finish painting miniatures, I give them a coat of spray gloss varnish to protect them well, then a second coat of matte varnish to get rid of the glossy look. With these guys, I liked how they looked after the gloss varnish, so I left them that way. I still haven't decided yet if I'm going to do the coat of matte varnish, since they're pretty shiny. Let me know what you think.
Also, with these five I painted their horns white. With the previous set, I painted their horns black because I didn't want anything to stand out more than the bone colored trim. But I kind of like how the white horns look. So, which do you think looks better? White horns, or black horns?
Usually when I finish painting miniatures, I give them a coat of spray gloss varnish to protect them well, then a second coat of matte varnish to get rid of the glossy look. With these guys, I liked how they looked after the gloss varnish, so I left them that way. I still haven't decided yet if I'm going to do the coat of matte varnish, since they're pretty shiny. Let me know what you think.
Also, with these five I painted their horns white. With the previous set, I painted their horns black because I didn't want anything to stand out more than the bone colored trim. But I kind of like how the white horns look. So, which do you think looks better? White horns, or black horns?
Friday, December 11, 2009
100th Blog Post!
This post will mark my 100th since starting this blog just a little over one year ago. It's quite a milestone, and I thought I'd mark the occassion with a look back at the kind of things I've written about in my first 99 blog posts, broken down by category.
Coming in at number one is the painting category, with 39 posts out of 100. This is a very broad category, since it includes all of the pictures I post of miniatures I've painted. But it does show how much painting I've gotten done in the last year, if you leave out the first several posts of pictures of things I had painted previously. It does show that almost everything I've painted in the last year has been 10mm scale, which has been an interesting change of pace from the Warhammer and Warhammer 40,000 stuff I had been more used to painting. The vast majority of the painting posts are of my growing 10mm American Civil War armies.
A close second on the list of categories is historical with 34 posts. Again, this reflects that my main project over the past year has been painting up 10mm Union and Confederate American Civil War armies. About a year ago is also when I began my initial foray into historical wargaming. So my first 99 posts contain a lot of pictures of my painting Civil War figures as well as impressions of rulesets, a couple of historical battle reports, and just general useful information I was able to find along the way that helped me start into the historical gaming.
The next three categories represent my main gaming interests: Warhammer 40,000 with 29 posts, American Civil War with 26 posts, and Warhammer Fantasy with 23 posts. Most of these posts also fall into some other category. Warhammer 40,000 definitely is the game I have been playing the most lately, so there are several good battle reports in there, as well as some older posts showing off painted miniatures, and one large campaign. The American Civil War posts are mostly showing the miniatures I've painted in the past year, but there are also two good battle reports and some step by step painting guides. I haven't played much Warhammer Fantasy lately, but those posts do include some older painted miniatures that were completed before I started the blog, as well as write-ups for a couple of campaigns, one of which is still in progress.
Speaking of campaigns, you can read all of the battle reports and story lines for a Wharmmaer 40,000 map-based cities of death campaign under the Attraignnor IV campaign heading, which contains 11 posts. The campaign was pretty fun, and generated a lot of great backstory for some of our 40k armies. I've also posted all of the write-ups from my gaming group's participation in the global Nemesis Crown Campaign, which included 9 posts in total. I've also just started posting the rules and background stories for a Warhammer Fantasy campaign that we are slowly working our way through right now, which we're calling the Grismeire Valley Campaign. There are only 4 posts in this category so far, but there will be many more to come.
As for battle reports, that category contains only 18 posts. This is really sad, since it is obvious I don't actually play games nearly often enough. Especially when you consider that some of the battle reports for a single game take up 2 posts, and that many of these battle reports posts are from the Attraignnor IV campaign, which was played over a year ago. So in the past year, I really haven't played anywhere near as much as I would like to. I would like to try and correct this, but since the people I game with don't live very close to me, scheduling more games is difficult.
The rules category contains 13 posts. This could be broken down a little further. First, there are my reviews of rule books I read when looking at historical rules, such as my reviews of Warlord Games's Black Powder, Wargames Foundry's Napoleon, and Warhammer Historical's Great War, as well as a Civil War battle report with my impressions of Piquet's Field of Battle. The others are house rules, such as my Warhammer Fantasy Map Campaign Rules, several custom Warhammer 40k Eldar Special Characters, and a list of Inquisitor house rules.
The fiction category contains 8 posts, and includes background stories written for campaigns, those custom Warhammer 40,000 Eldar Special Characters I created (since they include the background stories of the characters), and a story I wrote about a Warrior Priest Inquisitor character.
There are 6 posts in the terrain category, mostly detailing my efforts to create some terrain for my new 10mm miniatures. It does include some really helpful posts about making hills, making/painting rocks, and making split rail fences in 10mm scale. Still, there is not as much as I'd like in this category. Hopefully the coming year will see far more terrain posts, as I hope to create fiels and town sections for 10mm gaming, and also some city ruin pieces and Planestrike terrain for Warhammer 40k.
The smallest categories, with fewer than five posts at the time I write this, are: Great War, Napoleonic, Inquisitor, Roleplaying, Warmaster, Battlefleet Gothic, and modelling. I won't summarize what's in each of these categories. They're small enough that if you're at all interested in the subject, you can read for yourself. For some of these categories, I find it unfortunate that they are so poorly represented. I enjoy Battlefleet Gothic, and only got in a single game of it all this year. Warmaster seems like a really fun game, but I've never gotten to actually play it. I had a lot of fun running an Inquisitor campaign for my gaming group, with each group member playing a character, and I played in another similar campaign, but we haven't done anything with it since then. I've tried to get people together to continue the story using the Rouge Trader rules, or get a group together to play Warhammer Fantasy Roleplay, but there isn't enough interest and it's so hard to get more than 2 or 3 people from the group together at once. So, unfortunately, I don't see most of these smaller categories growing much in the future.
So there you have it. A summary of my first 100 posts, which should give a pretty good idea of what this blog has been all about. When I wrote my first post for this blog, way back in November of 2008, I laid out three purposes for the blog. First, it would contain only content related to miniature gaming, which I seem to have achieved easily enough. Second, that it would have posts that would be useful to other gamers out there, not just of interest to the people I game with. Well, between google followers and other subscribers, it would appear that at least 45 people have shown in interest in viewing my blog, so hopefully I have been succeeding in that respect. Finally, I wished to chronicle my start into historical wargaming, which I was just discovering. With about a third of the posts so far falling into the "historical" category, I hope I've done an admirable job there. So far the blog seems to be a moderate success by those terms, and hopefully will continue to be so for the next 100 posts!
Now that you've seen the breakdown of posts by category, if there's anything you want to see more of (or less of), or any advice on how I can make the blog better, please leave a comment and let me know.
Monday, December 7, 2009
Major General James Longstreet
Friday, December 4, 2009
Grismeire Valley Campaign - Beastmen Story
Banebeast Banedrom has led a long, gruesome campaign to earn the favor of Tzeenth and to assemble one of the most terrifying forces to strike from the heart of the charred lands from whence he came.
Born from blue flame, the Banebeast was clearly destined for greatness. Life among beasts made him tough, cunning. Rather than beat the stupid savages to death with a stone or club, the Banebeast would toy with his foe, leading him in with seeming slow wit. All too late it becomes clear that the Banebeast has led you to your grisly fate.
Wielding a massive war axe, the Banebeast is a fearsome warrior who has been blessed with cunning and the power to command the winds of Chaos themselves. Aided closely by his war council, Wargor Khorghur and Ghurgor the Bray, the Banebeast's herd is surrounding by an atmosphere that registers as an overbearing dread as the Banebeast fills the foe's mind with horrific visions.
Joining the Banebeast is a herd of frightening caliber. Followed by his minotaurs and beasts whom he has blessed with the influence of the great Sorcerer, the Banebeast is eager. The Ancient Ones have been awakened in the greatest storm in centuries and there are rumors that the Banebeast has been coercing a Monster to join him in his righteous campaign for the great Sorcerer.
Monday, November 30, 2009
Confederate 4th Tennessee Cavalry Dismounted
Monday, November 23, 2009
Warhammer 40,000 Planetstrike Battle Report: Bridge Over The River Morbus - Part 2
Friday, November 20, 2009
Grismeire Valley Campaign - Bretonnian Story
As day broke, the sunlight played amongst the rolling waves of the Great Ocean. From her window in one of the taller towers in the castle of Brionne, Lady Aleena could see the elven ships at port. Apparently, a storm had driven the elves off of their course, but she had no doubt that it was the Lady that had brought them to Brionne. One would normally be awestruck by the sight of the elegant ships. Some might consider themselves lucky to have seen one in their lifetime. However, as Aleena gazed out of the window she thought about the events of the past few days since the elves arrived. Her eyes were fixed upon the banner displayed on the vessel. She had seen the heraldry of the dragon before. It was the sign she had been waiting for.
For years Aleena had been troubled by visions of a particular Bretonnian knight that she only recently knew as Sir Edwin. She had seen Edwin in countless circumstances; soaring through the air on a mighty Pegasus, slaying Bretonnian’s invaders, standing over the graves of fallen friends, or locked in mortal combat with powerful enemies. She had seen him lead great victories and suffer crushing defeats. He had been portrayed as an errant knight, a grail knight, and every stage of knighthood in between. She had even seen his death in several visions, all of which were different. Every time her mind was opened to the knight, an incredible feeling of sorrow overcame her, often bringing her to tears. The visions had ranged so much in content that she had no idea what their purpose was. Were they real? Did this knight actually exist? She could not escape the feeling that this unknown knight had a destiny that was important to realm of Bretonnia, and that she was somehow tied to his fate. The most recent vision granted to her by the Lady had finally revealed the identity of the noble knight.
In the vision Aleena was walking along the shores of Brionne when the Lady of the Lake revealed herself from the depths of the Great Ocean. The spectral image of the Lady raised her arm and pointed off to the north east as she spoke. “Sir Edwin needs you” she said simply. Though this was the first time that she had heard the name, Aleena knew exactly of whom she spoke. The image of the Lady opened her arms, and as she faded back into the Otherworld an elven ship could be seen just off shore. Just before she woke from the dream, Aleena focused on the ship and noticed the heraldry of the dragon.
Until the elves arrived, she remained unsure of exactly what it was she was supposed to do. When she received word that high elf ships were driven off course and forced to make port in Brionne she immediately looked out of her window to the port. The fact that she knew what she was going to see did not prevent her from having to see it with her own eyes. Aleena immediately sent Victor, her servant, to summon the Duke of Brionne. The arrival of the elves was going to lead her to Sir Edwin.
Aleena was amongst Duke Theodoric’s most trusted advisors and one of the more powerful prophetesses in the land of Brionne. When Aleena inquired about the business of the high elves, the Duke explained that they were granted permission by both Duke Bohemond of Bastonne and King Louen himself to lead an expedition of importance to the elves in the lands of Bastonne. While the details of the expedition where not given, Theodric would never question the authority of the King. The high elves offered some aid in return for the Bretonnian cooperation. It seems that the northern regions of Bastonne have been experiencing increased raids by the foul beastmen from the Forest of Arden. Duke Bohemond’s nephew, Frederic Theobold, was mustering an army to head north to crush the beastman warbands. As they would be operating in Bastonne, the high elves offered their military support.
Aleena knew that following the high elves into Bastonne would bring her to Sir Edwin. She explained to Theodoric that the Lady had chosen her to go to Bastonne to aid in the upcoming battles, and requested permission from him to leave Brionne. She had no need to ask permission; as a living embodiment of the Lady’s will, the Duke had no authority over her. She would not, however, dishonor such a noble hero by flaunting her ability to operate outside of the hierarchy of Bretonnia. Certainly, he did not want to see her leave. Not only fearing for her own safety but also not wishing to give up her council. The Duke did not question her about her leaving Brionne, if it was the Lady’s will, he would see to it that it was fulfilled. He did, however request that she give him a few days to assemble an army to escort her and aid Bastonne in the upcoming war.
This was the third morning since her conversation with the Duke. The army was assembled and they were preparing to set off this morning. Lady Aleena awaited Sir Augustine Beaumont to inform her that the army was ready to march. Sir Augustine, a mighty grail knight, was chosen to lead the army as well as serve as Lady Aleena’s champion and protector.
As Aleena waited she recalled the grand feast that was held the night before in honor of the high elf visitors. She had dealt with elves before; in her role as advisor to the Duke she had diplomatic experience with most races. Still, she did not particularly enjoy the politics of such festivities. She much preferred to observe the parties involved and leave the conversation to the other more political individuals. She met the high elf leaders and had a brief polite conversation with each of them before fading into to background of the festivities where she could observe. Sir Augustine spoke with some of military leadership, no doubt familiarizing himself with their strengths and weaknesses, as well as coordinating the timeline of their arrival in Bastonne. The stoic knight struggled to think about anything other than his duty. The arrogance of the elves had shown itself subtly a few times throughout the night. As Duke Theodric told tales of his deeds, she watched Prince Tethelion pretend to be impressed; the look on Loriss’ face as he sampled the Duke’s finest wines. The attitude of elves was well known, and to be expected. For the few instances she had noticed it, they were quick to cover it. Whether this was out of politeness or meant that they were gifted liars, she could not decide. Either way, one thing was certain; the elves where very good at making themselves likable. No one within the festivities seemed to notice these things, and the conversation and laughter continued. She thought she was blending in quite well when an elf named Aldric startled her by posing a question about her enjoying these events as much as he did. She had not been aware that anyone was near her, let alone observing her. She spoke with Aldric for quite some time. He did not seem interested in the festivities at all, and mentioned that he had adventured around the countryside since they had arrived, and intended to do so again before they left. She recommended a few locations that she felt he ought to see, places of particular natural beauty. Aldric seemed to appreciate it, and for once she felt as if she actually had an honest conversation with an elf.
Aleena’s thoughts were interrupted when she heard the door to her quarters creak open followed by heavy armored footsteps entering the room. Sir Augustine rarely spoke, but when he did, his voice carried a tone that demanded attention. “My Lady. We await you”.
Shortly thereafter the army was marching through the gates of Brionne, met by the usual throng of peasants cheering on their knightly lords. Even after the crowds dispersed, Duke Theodric watched from the gate tower. He was always enthralled by the sight of the Bretonnians marching to war. His duties as Duke prevented him from joining this particular host, and as he thought about that fact he realized that his hand was tightly gripping the handle of his sword. He released his grip and continued to watch until the army had disappeared over the horizon. Surly, none could stand before the might of Bretonnia.
Sir Edwin awoke suddenly, his hand scrambling at his side to find his sword. As he found it he rolled into a crouch, ready to strike. His eyes darted around his camp, but there was nobody there. He realized that he was alone, and it was a dream. Not a day had gone by that he didn’t think about that battle years ago, but it had been a long time since he had such a vivid recollection of the undead hordes.
He relaxed his posture and stabbed his sword into the ground as his body began to remember its pains. Edwin could not remember the last time he slept in a proper bed. As a Bretonnian questing knight he was oath bound to never sleep two nights in the same place. He began to rotate his shoulders and massage his arms to relieve his aching body from the skirmish late yesterday. The commoners on the eastern borders of Bastonne had recently been victim of a few raids on the livestock. While it was certainly not his duty to investigate this, he did so anyway. After all of these years he still had respect for the low born peasants of Bretonnia. Besides, if he was not meant to be here, the Lady of the Lake would not have placed him here. It was not long before the thieves showed themselves, a small band of oddly garbed goblins. A strange mockery of human clothing, Edwin imagined they were attempting to blend into the human village. He dispatched the unworthy enemies with relative ease, but the goblins did manage to land a few blows he felt still today. As he began the process of cleaning his blade, Edwin cleared his mind and lost himself in his thoughts.
Edwin found the dream of the battle with the Vampire rather odd. Was it a sign, or simply a memory? It mattered very little; he had stopped trying to interpret visions long ago. He assumed that every decision that he made was not in fact his choice, but rather the will of The Lady. It had not served him wrong yet. Since he began living in that fashion, life had been a series of adventures. Every day seemed to lead into the next chapter of his story as he moved through the old world. He had recently reentered Bretonnia for the first time since he left so many years ago. While his life was that of a questing knight, his humble approach was slightly different, in that he did not yearn to find the grail. If and when the Lady of the Lake found him worthy to drink from the grail, he would do so. Until then he would perform the will of The Lady, and concern himself with very little else.
Edwin wondered where The Lady would guide him next, and as he packed up his few belongings onto his warhorse, he heard an unmistakable sound. He crept to the crest of the hill where he made his camp to observe. Just as he suspected, he watched a large group of Bretonnian knights, twenty or so, gallop from the horizon. They were still a good distance away, heading off to the west, but if he got going right away he would be able to cut them off. He mounted his warhorse and made off to do just that. When the knights spotted him, one of them broke off from the group and headed straight for him. Edwin halted a reasonable distance away as a sign of peace. When the knight got close enough, Edwin could tell by his heraldry and armament that he was also a questing knight.
He spoke of a war in the northern regions of Bastonne that this group had gotten word of. As they rode to aid in the upcoming battles they had gathered more numbers along the way, Edwin being the most recent addition to the group. Certainly it was the will of The Lady that he join the reinforcements. As he rode off with the band of knights he said a prayer to the Lady of the Lake, thanking her for choosing him to be an instrument of her will.
As he retired to his quarters, Frederic Theobold considered the military council that had just concluded. As he looked around the room he noted the things that were inadequately done by his servants. Though he could not remember his name, the head of the staff would receive the list in the morning. While he did not expect the comforts of his home in the small fortress that was acting as the launch point for the campaign, he did deserve better than this.
The reinforcements from Brionne had arrived at the small fortress a day earlier than expected, a much welcome surprise. A small part of his pride was stung by the amount of aid he was receiving in the upcoming campaign, but things had changed quite significantly from the original plan. Messengers from their high elves allies, operating to the east, had just yesterday brought word that there was undead forces located in the area around Tharravil. Nothing was yet known about the fate of the town, but the news had made this into a two front war. Evidently the high elves had seen it fit to hire honorless ogre mercenaries as bodyguards, a decision that Frederic despised. The ogres were well known to work for the highest bidder, and could not be trusted. It was not a pressing issue, certainly not worth upsetting the alliance with the elves. Given the current circumstances he supposed the ogres were a useful ally. However, Frederic noted that when the high elves concluded their expedition into Bastonne, the ogres would have to be closely watched and probably eradicated. Allowing them to operate in Bastonne was not an option.
As he settled into the uncomfortable bed, Frederic thought about the strategies and tactics that had been decided upon in the council. He was launching the attack early the following morning, and wanted to be well rested for the long days ahead of him. Everything was sound, and they had more forces available than he had originally anticipated. Surly leading this victory would bring him much glory. Though he was well aware of what people thought about his position, he did not care. Simply because of his family name he felt he was judged by a different standard. He viewed it as jealousy, but nevertheless, he would answer his critics with a swift powerful victory in the war. Frederic forced the thoughts from his head and instead focused on the glory he would achieve in the following days and weeks, as he drifted into sleep.
Wednesday, November 18, 2009
Black Powder Command Rolls
I brought it up because the expected results of this mechanic seem strange, in that you are often less likely to get two move segments than either getting one or three. It seems like the intention should be that when your command value is modified to be lower than normal, you should be more likely to get no moves than to get one, more likely to get one than two, and more likely to get two than three. By the same token, when you have positive modifiers so that your command value is high, you should be very likely to get three moves, less likely to get two, even less likely to get one, and unlikely to get zero.
Monday, November 16, 2009
Warhammer 40,000 Planetstrike Battle Report: Bridge Over The River Morbus - Part 1
Setup
I was the defender, and had 2000 points of Tyranids. Attacking me was 1000 points of Ultramarines, and 1000 points of Space Wolves. Since we had played the first standard Planetstrike mission a few times, we decided to try a different one. I had already picked out a nice looking table to play on, which happened to have a nasty looking river running through it, with a bridge right in the middle. So we decided to play the mission where the attacker must capture the single, central objective.
Friday, November 13, 2009
Warlord Games's Black Powder Rules
Monday, November 9, 2009
Grismeire Valley Campaign - Vampire Counts Story
The Nemesis Crown had eventually been found and destroyed by the Dwarfs. The mysterious magical crown that had captivated the great powers of the world had turned out not to be the Crown of Nagash, much to the disappointment of Byron Manfred. Though he had learned much, attained many victories, and gained power and influence through his fighting in the Nemesis Crown Campaign, he felt no closer now than ever to his ultimate goal of being reunited with his only love.
Though somewhat discouraged, Byron continued to study the necromantic arts under his master, the Butcher of Bergendorf. Byron’s continuing exposure to the soul-warping influence of dark magic conspired with his despair and desperation to drive him towards the brink of sheer madness. His mind and soul suffered the ravages of overexposure to the winds of magic as he took greater risks in his desire to advance his knowledge and power too quickly. The Butcher was only too happy to encourage this reckless behavior in Byron as well as his other apprentices. But Byron was the quickest to advance, for he was the most willing to risk all for the slightest scrap of necromantic knowledge.
Eventually, the Butcher was made into a vampire by his own mysterious master, a figure spoken of only rarely and reluctantly. The Butcher’s transformation into a creature of undeath only increased his already considerable morbidity and callous disdain for life. He spent more and more of his time performing twisted and seemingly pointless experiments on human captives, always with grotesque results. The Butcher also amused himself by having his necromancer apprentices compete with each other in perverse feats of necromancy, with the loser often becoming the next victim of his experiments. Eventually, Byron was left as The Butcher’s lone apprentice, but the souls of the others would never rest in peace.
In the course of his studies, Byron came across some evidence that he thought might point to the location of the mighty Crown of Nagash. An ancient scroll told of events from nearly a thousand years in the past, when an evil sorceror secreted away an artifact, awesome in power and priceless in value. The sorceror smuggled the artifact across the grey mountains and into Eastern Bretonnia, going into hiding in the valley of the Grismeire river. The dark wizard was eventually found and slain by a small group of brave knights, but the artefact was never recovered.
Based on the descriptions of the sorcerer, the time period of the event, and the account’s emphasis on the incredible power of the artifact, Byron thought it was possible it referred to the Crown of Nagash. The Butcher found out about Byron’s research, and informed his own shadowy master of Byron’s theory. Their Master decided that the possibility of discovering the Crown of Nagash, or some other powerful magical artifact of Nagash’s reign of terror, was worth looking into.
The Master brought together several of his vampiric minions, including the Butcher of Bergedorf, for an expedition into Bretonnia’s Grismeire River Valley to search for the artefact. In the meantime, the Beastman warband of Banebeast Banedrom had moved through the mountains into the Forest of Arden, intent on raiding the small Bretonnian towns in the forest. Having experienced their fury firsthand during the Nemesis Crown war, Byron knew he wouldn’t want to come up against the Beastmen during their search. The Master sent an envoy to the Beastmen, offering them some ancient pieces of sacred Herdstones in exchange for a truce. The Beastmen would leave the vampires alone while they conducted their search. Plus, the Beastman raids on Bretonnian settlements would hopefully distract any Bretonnian forces and keep them from discovering the Vampire expedition.
The vampire knight Vlad Tepes also joined with the Master’s expedition. Ever since the Nemesis Crown war, Vlad had been searching for the Bretonnian knight who had managed to wound him in single combat. The impudent mortal knight had escaped before Vlad could finish him off. Now, Tepes wants to find the knight and finish the duel they had started, to find out once and for all who is the superior warrior. The expedition is glad to have his skill on their side, but Vlad’s only desire is finding his foe and finishing him off in single combat.
The vampires snuck across the Grey Mountains and into Bretonnia and came upon a small mountain village. They killed every resident of the village, raising them as zombies and using them as undead laborers to construct a camp. This would be their base of operations while they conducted their search. They hoped that if they kept a low profile, the Bretonnians would be busy enough with the Beastmen that they could search for the magical artifact without interruption. Unfortunately, they did not know that the High Elf force that Byron and The Butcher had defeated in several decisive battles during the Nemesis Crown war was still in the Old World.
The High Elf army of Commander Cilliriel Drachen, though it had been beaten and forced to retreat, had not returned to Ulthuan. In addition, another High Elf force under Prince Finduleas Tethelion arrived in Bretonnia. Unknown to the vampires, Tethelion was also looking for a powerful magical artifact, what he believed to be the Spear of Twilight. Unfortunately, Tethelion believed this artifact was in the same area the Vampires were searching. As Tethelion’s advance scouts scoured the area, they discovered the Vampire expedition. They had hoped to find the Crown of Nagash before anyone had discovered their presence in Bretonnia, but now they would likely have Bretonnian and High Elf armies to contend with. It wouldn’t be easy, but The Master wasn’t going to give up without a fight.
Monday, November 2, 2009
Chaos Space Marines


After going renegade, the Crusaders changed their colors and heraldry so they would not be recognized. The Imperium believed their chapter to have been wiped out, and the Crusaders preferred it that way. But having such great respect for artifacts of the past and their ancestors who used them, they could not bring themselves to make any changes to the ancient suits of power armor. So they retain the Crusaders' old colors, and are now lent out to the most promising aspiring champions as signs of the favor of their lord.
At some point, I'll write up a more comprehensive background for the Crusaders chapter. For now I'm working on getting the paint scheme figured out. It's pretty simple, but I always find it difficult to paint anything white. And I'm not sure I'm happy with the trim color on the other ones. I was going for a kind of weathered bone look. The idea being that they typically attack at night, and it gives them a psycological advantage that the enemy will see a bunch of skull-looking helmets floating towards them through the darkness. But I didn't want to use pure white, since I think a black and white color scheme would look boring. I've heard that using a white or slightly off white color with a sepia wash gives pretty good results, so I may have to try that once I get some of the GW washes.
Monday, October 26, 2009
Grismeire Valley Campaign - Initial Positions
My gaming group and I are currently in the middle of a Warhammer Fantasy map based campaign, using the Mighty Empires map tiles with campaign rules I came up with myself. You can read my map campaign rules in a previous blog post here.
The campaign ended up having four players (at least until recently, when one had to drop out). The campaign map below shows the positions of each player's base of operations, their armies, and all of the towns and villages in the area with their names labeled. Click the picture for a larger version.

The Green flags you can just make out in the upper left of the picture are the Beastman armies. The Red flags in the upper right are the Vampire Counts armies, played by me. In the lower left are two of the Blue flags, representing Bretonnian armies. In the lower right are three Purple flags for the High Elf armies, as well as the third Blue Bretonnian army.
In the coming weeks I'll be posting the background we wrote up for the campaign for each of these factions. After that, I'll start posting updates on how the campaign has progressed so far and continue to its conclusion.
Monday, October 19, 2009
Warrior Priest Character Story
Before there was a Warhammer 40,000 Roleplaying game, we used to sometimes use the Inquisitor rules to do some action heavy roleplaying campaigns. At one point, a friend of mine was going to adapt the rules to do a similar action roleplaying campaign based in the Warhammer Fantasy setting. He never got around to actually running the game, but I did write up a story for the insane warrior priest character I was going to play as. So I figured I'd post it here for posterity.
The character was a normal warrior priest in the Empire, until he found himself trapped in a quarantined settlement that had fallen to Nurgle, the god of decay. Eventually, everyone in the settlement except for the priest succumbed to Nurgle's rot, and upon their death from the horrible disease, became plague zombies. Being locked in the settlement, the warrior priest has to single-handedly fight off the diseased corpses of all the former residents of the settlement, who had been his congregation. The horrifying experience left him a little unbalanced, and now wherever he perceives moral corruption, he sees physical decay and insists on destroying it.
He thrashes in his sleep, rolling around on the cold hard ground. Father Raleigh, or rather the man who used to be Father Raleigh, is haunted by vivid nightmares. He sees visions of horror beyond description, of madness beyond imagination. He sees the world engulfed in the terrifying shadow of Chaos. An unstoppable, festering decay consuming all in its path. Not only the realms of men, but the entire world is turned into a hellish nightmare of hopelessness. All is consumed. All is lost. Even life itself becomes nothing more than disgusting, rotting filth, a sick and twisted mockery of its true potential. The gift of life is but fleeting glimmer of light stamped out by the eternal darkness of evil, and all that is left is emptiness, nothingness, and the slow agonizing death of eternal decay. The Earth itself rots away, now nothing more than a barren rock drifting through a lifeless universe conquered by Chaos.
He awakens suddenly, but the nightmare continues. The maddening visions still grip him, as vividly as in his dreams. As vividly as if they were real. He lets out a scream he can’t even hear, frantically trying to force the visions out of his mind. They are too powerful for him to ignore. He begins to wonder if he is still asleep, still dreaming. Or, is he even still alive? Perhaps this is hell. What else could this be? He quickly grabs the short knife from his belt and presses it hard against his forearm. His hand shaking, he slowly drags the blade across his flesh, leaving a deep, jagged cut spewing blood. The sharp, intense pain briefly distracts him from the visions. The pain is all he has. It takes his mind off the terrible visions. It reminds him that he is still alive. It proves to him that he is real. That the world is real. That he even exists.
He continues to carve uneven cuts into his arm. Now he can think clearly. Now it all makes sense. All is pain. His mind is filled completely with the pain, pushing his nightmares into the deep recesses of his subconscious mind. He now moves the knife up to his forehead, plunging the sharp tip into his skin. He makes several straight cuts. He presses the knife so hard to his head that it scrapes ruts into his skull. Blood flows over his face as he brings the knife back down. Without any conscious thought to do so, he has carved the word “SIN” into his forehead.
He puts the knife back away and stands up in one motion. He immediately begins to walk. Blood is now dripping from his chin with every step. His face is hard and determined. His eyes are wide and wild, peering maniacally even though they see nothing but the desolate wilderness before them. His muscular body would be almost pure white from the cold if it were not covered entirely in bloodstains and massive bruises. His Book of Sigmar hangs from a chain attached to a metal collar, and sways back and forth as he walks. With each step he takes, he drags behind him three heavy warhammers. One chained to each leg, and another chained to a metal bracelet on his right arm. The hammers dig up snow and earth, leaving deep bloodstained ruts in his wake.
He keeps walking at a constant pace. All around him, in every direction, things look the same. There is nothing but snow and thin, bare trees. From time to time he passes some corpses frozen stiff in the woods. The corpses of those who fled for their lives from the outpost. Though the cold has kept their bodies from decomposing, he sees them only as rotting carcasses. Rotting, festering corpses, just like everything around him. He pays them no mind and continues his journey. He is on no path. He walks where Sigmar guides him, and trusts that he will find his way to where he needs to be. Just as he did the day before, when he walked nonstop until nightfall and then collapsed in exhaustion. His limbs could carry him no farther.
When he woke up, his whole body was sore. Only through incredible force of will was he able to convince his limbs to move. As soon as he stood up, his legs burned in agony and fatigue. But yet he continues to walk. He welcomes the constant pain. He keeps his mind sharply focused on the pain to the exclusion of all other thoughts. This wards off the visions while he walks. But the strain on his body becomes too much. When his legs start to give out on him, he pulls on the chain attached to his right arm. He drags the chain until he is able to pull the hammer up into his hands. And then, while he continues walking, he viciously beats his thighs with the hammer. He beats them into submission, refusing to allow them to give out on him. He continues to trudge through the snow. His bare feet are nearly frozen as he comes near to the end of his second straight day of walking through the frozen wilderness. But somehow, frostbite has not yet set in on his swollen, bruised feet. If it did, he would simply beat the evil decay out of them.
This is his punishment, and he shall accept it. The world has sinned against Sigmar. The world has turned their back on Sigmar and become corrupt. The moral decay of mankind has caused Sigmar to turn his back on the decaying world. That is why Sigmar would allow it to be destroyed by Chaos. It does not deserve to survive in its state of moral weakness. He realizes now that he has sinned, as well. He has not done as much as he could have to change things, to make the world better. To eliminate those who are corrupt and redeem those who can be saved. Yes, he is guilty of this sin. Perhaps the greatest sin of all. Complacency. He has failed in his duty to Sigmar. He has not done everything in his power to seek out and destroy the festering evils of the world. Now he repents for his sin, and now he pays his penance. He continues plodding through the freezing cold, dragging the massive war hammers behind him. His suffering is his penance to Sigmar. His suffering is his redemption. Soon the world of men will repent and find redemption. Soon the world of men will pay its penance. He will see to that.
Monday, October 12, 2009
Work In Progress: Renegade Techmarines
So I recently started working on the first two conversions. I can't do a third yet, because I need to get a third Techmarine model. Unfortunately, if I want a different techmarine base model from the two I already have, I either have to spend over $40 for one that comes with a bunch of servitors that I don't need, or spend almost $50 to get the even nicer one (just because it looks more different from the two I already have) that comes with a Thunderfire Cannon that I don't need. So I'm not sure what I'm going to do about that.
Friday, October 9, 2009
Attraignnor IV Campaign: Epilogue
I played a game of Warhammer 40,000 recently up at the Battle Bunker in Downer's Grove, Illinois. They have tons of space there, and a lot of really great tables to play on that are definitely an interesting change of pace from the tables and terrain I am used to playing on.
The game was a Planetstrike, with 1500 points of my Chaos Space Marines as the attacker, and 1500 points of Orks defending. We played on a great looking table of an Ork camp with lots of destroyed vehicles and debris all over the table, and several ramshackle Ork buildings. It was my second game of Planetstrike, and my opponent's first. He placed one Bastion on the table to represent an overrun former Imperial defensive position that the Orks captured and built their camp around. This we didn't make an objective. Instead, we selected three of the Ork buildings to act as objectives. We assigned them an armor value of 12, because they didn't look very sturdy. The buildings already had some defensive weapons built into them, and we added a few others. We played the first mission in the Planetstrike book.
Because it was my Chaos Space Marine army facing Orks, I decided I should tie the story into the Attraignnor IV campaign storyline. It takes place right after the conclusion of the campaign. The Orks that had infested Attraignnor IV had been driven from the capitol city, at great cost, by the planetary defense forces shortly before the beginning of the campaign. The remnants of the Ork force congregated outside the city walls and were mostly ignored while the civil war raged in the capitol city. During this time, the Orks mostly squabbled amongst themselves, but eventually one of them managed to gain dominance over the bickering groups and become Warboss of the remaining Orks.
The new Warboss created an Ork base camp outside the capitol city constructed of the leftover junk from the war and began preparing his forces to attack the human defenders once again. With its defense forces so completely depleted by the original war with the Orks, followed by the brutal civil war in the streets of the capitol, defending the city from a renewed Ork attack might prove difficult for the exhausted planetary defense force. So just before leaving the planet, the Crusaders chapter of Chaos Space marines decided to help the world out once more by decapitating the Ork threat. They located the base camp where the Warboss was located, and sent in an elite force to eliminate it.
The spear tip was led by Lord Agramon himself, barely recovered from his previous wounds during the campaign for the capitol city. He would drop into the middle of the camp with two units of 6 Terminators, a unit of 7 Raptors, and a unit of three obliterators. Unfortunately, during the campaign several members of the chapter succumbed to the warping, corrupting influence of chaos and became mutated possessed marines. These would drop in with the initial force as well, in hopes that they would redeem their disgrace by dying gloriously. To support the attack, two units of Khorne Berzerkers mounted in Rhinos would approach the camp at full speed along a road leading from the city, and plow headlong into the fight. It was hoped that they would arrive just as the rest of the force teleported down into the center of the camp. The timing was slightly off, however. One unit arrived slightly late, and the other was delayed by mechanical trouble and never arrived at all!
There was actually only one unit of Berzerkers in the army list, but I took the strategem that allows you to select a unit of troops, and once they are eliminated from the game, an identical unit shows up the next turn. I choose the Berzerkers, as they were my only troops, but since they never got wiped out, their replacements never arrived.
The Orks had a pretty elite force of their own, since the camp was mostly occupied by the Warboss's personal bodyguards. He had with him three units of nobs, all of them drugged up so they could shrug off all but the most severe wounds. There were also two large units of boyz defending the camp and some grot artillery as well as a weirdboy, who was probably the warboss's spiritual advisor/seer. They also had a dreadnaught and a battle tank next to one of the buildings. The Orks were not expecting an attack, and were mostly in or on top of the ramshackle buildings. The artillery was on the roof of the highest building to provide fire support in case of an attack, though they were mostly concerned with an attack from other Orks trying to usurp the new warboss.
Just before dawn, the chaos fleet fired a single barrage at the Ork camp. One of the buildings was destroyed by the barrage, which also killed several Orks and stunned the Dreadnaught. In the resulting confusion immediately following the barrage, the spear tip force teleported into the midst of the camp, taking the Orks completely by surprise. Considering the darkness, the teleportation was fairly accurate. However, one unit of Terminators which was attempting to land close enough to capture the tallest building, went a little off course. Too far away from the destroyed building to assault its inhabitants, they fired on the nearest unit of Ork boyz outside a second building. But their exposed position left them vulnerable to a charge from the Warboss and his retinue. The fighting was fierce, but the ferocity of the Orks with their power klaws who were nearly impervious to harm overwhelmed the Terminators.
A second unit of Terminators and Lord Agramon landed near another building. As he swooped down on his daemonic wings, Lord Agramon was targeted by the automated quad-interceptor autocannons. The uncannily accurate defensive fire from these batteries managed to inflict two serious wounds on the commander before the battle even began. He landed on the battlefield in a fury, looking for revenge.
The terminators fired on the same unit of boyz the other unit had fired on, since they were the most immediate threat. They killed several, mostly with their heavy flamer, but many remained. The terminators charged the survivors, killing many and losing two of their own, but the Orks were still numerous enough to stay and fight. After another round of brutal melee another Terminator had fallen, but most of the remaining Orks were killed. The few survivors fled the battle.
Upon landing, Agramon immediately charged at the middle building, wanting to get at the Orks inside. With all of his might he kicked down the large steel front door. The door went flying through the inside of the building, taking out several structural supports, before blasting out the back wall, destroying a bank of automated lasguns. The damage caused the building to collapse, pinning the unit of Nobz inside it.
The Obliterators landed on a hill in the far corner of the battlefield near the third to give them the best line of sight. They opened fire on the building in front of them, which had a large unit of Ork boyz on the roof. The building also contained the Ork ammunition stores, which the multi-melta shots hit, causing the building to explode in spectacular fashion. Many of the Orks on the room were killed in the blast, and the rest slowly pulled their way out of the rubble to fire off a few ineffective shots back at the Obliterators.
The raptors landed right on target behind the tank and the dreadnaught, who were next to the third building. The dreadnaught had been stunned by the orbital bombardment, and was therefore no immediate threat. So the raptors targeted the tank with their melta gun and a plasma pistol, and managed to blow up the main cannon. They followed up by charging at the rear of the tank, pelting it with krak grenades while the champion placed a melta bomb on the tracks. The shower of grenades took out the twin-linked big shootas, and the meltabomb blew off the tracks immobilizing the weaponless tank. The crew hunkered inside the now harmless vehicle.
The long range artillery and defensive weapons the Orks had were largely ineffective the entire battle. Due to the darkness, the Orks and their automated weapons had difficulty picking out the black armored Chaos Marines.
The disgraced Possessed Marines made their way out of the pile of rubble they had dropped into, and suicidally charged towards the Warboss and his retinue, hoping to redeem themselves in death. They only managed to kill one nob and wounding the Warboss before being slaughtered by the fury of the massive Orks, their daemonic protection completely failing them as they were smashed apart by flailing power klaws. The Warboss's unit had now massacred his way through two units without slowing down, though the casualties to his retinue were beginning to mount.
The three remaining Terminators near the second building advanced on the pinned nobz in the building's wreckage. The fired on them, their heavy flamer particularly effective, but the drugged up nobz shrugged off the worst of it. The Terminators then charged in to finish them off. One more of the Terminators was cut down, but the rest killed most of the nobz, with the single survivor retreating from the battle. Just as the two final Terminators were regrouping from the combat, the Warboss charged them. Both the Warboss and the Terminators were exhausted from fighting their way through two enemy units as they readed to do battle again. Power fists and power klaw struck home, and the result was both terminators and the Warboss being taken out of the fight with grievous wounds. Several nobz and the painboy remained, demoralized at the loss of their leader.
After knocking down the building, Lord Agramon turned his attention to the recovering dreadnaught. He furiously pummeled the walking tin can with his gauntleted fists, but could manage no more than to shake and stun the vehicle, which hardly affected its ability to fight back. He Ork pilot inside held his ground, eventually smashing Lord Agramon to the ground with the dreadnaught's massive fist.
Thinking Lord Agramon would take care of the Dreadnaught, the Raptors flew over to the wreckage of the third building. They fired flamer and bolt pistols at the Ork boyz tangled up in the wreckage, and followed up by assaulting the survivors. The ferocious onslaught was too much, and the Orks were completely wiped out. At the same time, the first unit of Khorne Berzerkers arrived on the battlefield, tearing down the road that ran down the length of the battlefield at full speed, towards the middle building which now contained the remnants of the Warboss's retinue.
After more ineffective defensive fire from the Ork automated weapons, dawn finally began to show itself. They Raptors saw Lord Agramon lying unconscious before the Dreadnaught and came immediately to his aid. Their meltagunner fired at the machine at point blank range, and it exploded in a magnificent fireball, which luckily didn't injure any of the Raptors.
The Berzerkers continued at full speed towards the middle Ork building, while in the growing daylight the obliterators poured fire into the remaining Nobz inside it. Two more were killed, and without their Warboss to lead them, the rest lost their will to fight and retreated.
The three Obliterators moved up to capture the third building, and the Berzerkers disembarked from their rhino to capture the middle building. The Raptors moved at full speed towards the remains of the tallest building, which had been destroyed by the initial bombardment. It was now only guarded by a handful of grots, with the weirdboy and one nob remaining outside the building. But they saw that the battle was lost, and retreated as well.
With the Warboss dead and the camp captured, the Orks surrounding it scattered to the winds to once again fight amongst themselves until a new boss could emerge to unite them by conquest. The Crusaders marines turned the area over to the people of Attraignnor IV, who would station all of the planetary defense forces they could spare in the ruined areas outside the capitol city walls to try and fend off any future attack from the remaining Orks. But Orks can be rather hard to get rid of, and the people of Attraignnor IV had not yet seen the last of the invaders.
Monday, October 5, 2009
3rd Arkansas Infantry Regiment
In the future when I have larger forces to draw from, I can always remove this unit from the Texas Brigade as appropriate and use it as some other infantry regiment, as there is nothing about them that specifically identifies them in any way as the 3rd Arkansas. I did give the colonel a light colored beard, so I have no idea if he even looks like the commander of any particular regiment. That was just a stylistic choice to make him different than the other ones I had painted.
Monday, September 28, 2009
10mm Miniatures Transport Solution
For a long time, I've been looking for a safe way to store and transport 10mm miniatures, particularly the 10mm American Civil War miniatures I've been painting. There are a lot of companies out there who make storage cases and foam trays specifically for storing miniatures. I have several of the Games Workshop miniature cases, and those work great for 28mm miniatures, but for my 10mm figures I had different needs. Even though there are many companies out there making carry cases for miniatures, after searching the internet for months, I couldn't find a single case that would work for my purposes.
First of all, nobody makes foam trays with cavities that would be useful for me. For my Civil War miniatures, I'd want to store a single unit together, which for infantry would be 3/4" wide by almost 4" long, and for cavalry 1" wide by 4" long. Nobody had foam trays with spots in them that would fit what I wanted. That wasn't such a big deal, because several of the companies have what is usually called a "pick and pluck" foam tray. These are trays filled with perforated squares, and you can remove the ones you want and leave the others. Since I only need rectangular shaped areas to put my units in, this would work out great for me. Most of these kinds of trays have 1/2" squares, which would result in some wasted space, but would work.
The bigger problem was the cases. I wanted to store my miniatures so they would remain upright. Many of the Civil war miniatures have their rifles sticking up, and they are extremely fragile. I didn't want these being pressed up against anything. Especially since the thinnest foam trays are for the most part 1" tall. This left plenty of room above the miniatures when stored upright. Unfortunately, every single maker of miniature transport cases I could find online has it's handle on the side of the case. By that I mean, you put the foam trays in upright, then when you carry the case around, the trays are on their sides. This wouldn't do, because as soon as I picked the tray up, the miniatures would lay on their sides and likely press up against the top, bending all of those bayonets that are sticking out.
I really needed a case with the handle on the top, so you would put the trays in upright, close the lid, then carry the case in the same orientation. This does not seem to exist in the world of miniature carrying cases. In addition, most carry cases are made of some soft material, and I really wanted something rigid. If the case ever got accidentally kicked or stepped on or had something dropped on it, a soft case wouldn't protect the models at all.
Fortunately, most of the companies that sell these carry cases also sell foam trays separately. So, I wrote down the dimentions of all the foam trays I could find for sale that were 1" high with "pick and pluck" foam. Whenever I was out shopping somewhere that might sell any kind of case, I'd bring a tape measure along and try to find one that had dimensions that would fit any of the dimensions I had listed, and that would also be carried upright, so the trays would stay with the same side up.
This took a lot longer than you might think. I ever searched online endlessly for any kind of cases or boxes to try and find one with dimensions that would work that was also carried in the proper orientation. I never imagined it would be so difficult to find such a thing, but it took months. Finally one day at an Office Max, I found a file storage box that seemed like it would work. It would just fit the foam trays made by Battle Foam, and was carried upright. It did require two hands to carry, while I would have preferred one with a single handle on top. And it was much taller than I needed. But after searching for so long with no luck, I was willing to give it a try even if it was less than ideal.
One other issue is that the file storage box I got had these railings on the inside along the top on all four sides. These were to hang file folders on, but they were definitely going to get in the way of getting foam trays full of miniatures in and out of the box. I decided to remove them, which turned out to be another thing that was much more difficult than I assumed it would be. The railings were riveted on through the outside of the box. It wasn't easy to detach the railings from the rivets, and afterward I had to pound the rivets down even further so that they wouldn't fall out or move around with the extra slack. The first railing didn't go so well, but after that I got the hang of it and the other three came off without too much trouble.
Next up was the foam. I placed an order with Battle Foam for five 1" tall pick and pluck foam trays, and five foam tray toppers. They trays are 15.5" x 12", which is just slightly less than the interior space I had in the case, so they would fit fairly snugly but with enough room to get them out. Battlefoam, at no extra charge, allows you to add customized test or logos to the trays and toppers. I had no particular need for this, but I figured I might as well have it done. I was paying quite a bit for these trays, after all, at $17 each for the 1" pick and pluck trays. I only went with Battle Foam trays because those are the ones that fit the case I found, so I didn't have any choice. And it would be kind of nice to have each topper labeled with what was in the tray below it when unpacking my miniatures.
It took a few weeks for my order to arrive, I suppose since they had to customize the trays with my text. I assumed the text they added was painted or written on or something, but it is actually etched into the foam, which looks pretty cool. And they didn't misspell anything, so I was pleased with the custom text. On the other hand, based on the dimensions listed for the trays, and the assumption of a 1/2" border around the outside, I assumed there would be an area of 14.5" x 11" for the pick and pluck section, and had planned how I would lay out my units based on this. When the trays arrived, I discovered that the bottom border is actually 1" rather than 1/2", to make room for the custom text I didn't really want. Therefore the actualy useable area of pick and pluck foam is really 14.5" x 10.5". It wasn't a big deal to rearrange some things in my planned layout and get it to work, but for anyone considering buying there foam trays, you should be away of this so you can plan accordingly.
As for the quality of the Battle Foam trays, I wasn't impressed. They aren't terrible I guess, but nowhere near as nice as the Games Workshop foam trays I have that came with the GW carry cases. And considering how expensive the Battle Foam trays are, I assumed I was going to get a pretty high quality product. But I suppose when you buy their stuff, you aren't really paying for quality, you are paying for the customizability. So if you need a custom layout for your foam trays, or you really want the etched writing for some reason, they might be worth it. But if you just want good quality foam trays, there are probably plenty of better ones out there.
First of all, the Battle Foam trays had some wet, still very sticky glue coming out from between the pick and pluck tray and the base it was glued to. I noticed it right away and left them sit out to dry for a while before putting any miniatures near the trays, but others might not be so lucky. Also, some of the bottoms were glued on a bit crooked or off-center, so that was kind of sloppy. The bigger issue was with the pick and pluck foam sections. The ones around the outside of the trays, which had gotten excess glue on them sticking them to the bottom, were almost impossible to pluck out. In fact, they all left little mounts of glued down foam behind them. On top of that, many of the other squares, not around the edges, were extremely difficult to pluck out due to the perforations not going all the way through the tray, or not being there at all. I used an x-acto knife to cut through where I wanted to separate the blocks. Even then some were still very difficult to pull out, and several times while trying to pull out a tenacious block, I accidentally disconnected an adjacent one that I wanted to leave. So the quality control at Battle Foam is obviously not very good, and their pick and pluck foam is very difficult to use without accidentally removing blocks you wanted to leave in place. Again, I wouldn't really recommend them. The Games Workshop pick and pluck foam was much better.
Another issue I ran into was that so such a large number of pretty small spaces, I found I was removing a large percentage of the foam. Since the foam blocks aren't attached to the bottom at all (except the ones around the edges that got accidentally glued to the bottom), what remained was not very stable. The walls in between sections weren't sturdy and moved around a lot, and that caused two problems. First of all, I didn't think it would support the units and keep them still as well as I'd like. Also, that instability makes it much more likely for one of the perforations I left in place to be inadvertently torn, which would make the whole thing really useless.
This, combined with the few perforations I mentioned that I had accidentally torn while trying to pull out others, made me try out gluing the foam together. I first tried some good old Elmer's glue. That didn't work at all. It just soaked into the foam, and took forever to start to dry. I then tried out some super glue and some plastic model glue on some test pieces. The plastic model glue worked the best by far. It was able to hold two foam pieces together really tightly. So I glued back together the mistakes I had made and, once I had the foam pieces I wanted plucked out, glued the remaining foam down to the base. It seems to be holding pretty sturdy now.
So, after that epic saga, I now have a pretty good way to store and safely transport my 10mm American Civil War miniature collection. Below are some pictures of the results of all this effors. Hopefully this article will be helpful to other people tyring to come up with customized storage solutions for different kinds of miniatures. If you have any tips for others, please leave a comment.
Monday, September 21, 2009
Tyranid Terrain
Monday, September 14, 2009
Warhammer Fantasy Map Campaign Rules
Here are some rules I've come up with for playing Warhammer Fantasy map based campaigns using the Mighty Empires map tiles and accessories. I'm trying them out right now with my gaming group in a multi-player campaign, and they seem to work well so far. Let me know if you have any comments or suggestions for improvements.
Set Up
Set up a randomly generated hex map to represent the region being fought over. Each allied force gets one side of the map opposite the other force. Each player selects a single hex that is one hex away from his edge. This is where his Fortress is. There will have to be markers made for each player that can be placed on hexes to show that he controls them. To start with, these markers are placed on the fortress hex that the player starts on. As players capture or lose castles, cities, and towns, markers will be placed on or removed from the map hexes containing them.
Each player starts with the same number of Armies, usually three. They will all represent a Warhammer army of an agreed upon points value, usually 2000. Armies are represented by a flag of a different color for each player. Each player places his armies on his Fortress hex or within one hex of it. Two armies of the same side can never occupy the same hex.
Each player will be allowed only one lord level character in the campaign, representing the commander of his army. This Lord choice is essentially a special character, and he will not change from game to game. If he is used in a battle, he must be taken with exactly the same magic items, mount, etc. Each player will need a token to represent which of his armies the Lord is currently with. It can start with any of his armies, and during a player’s movement phase, he can move his Lord to any of his armies. Otherwise, the character moves along with the army he is with. If the army the Lord is in gets into a battle, the player may choose to use the Lord character in the game if he wishes. If the character is used, points are paid for him as normal, and he uses up a character slot. If the character is with an army that gets completely Massacred, the character is captured or killed and can no longer be used in the campaign. If the character is killed in a battle in a challenge, then the character is killed and can no longer be used.
Features such as towns and villages are placed randomly on the map.
Turn Phases
If there are multiple players on each side of the war, all players on the same side take their turn at the same time. Each turn is broken into the following phases:
- Move Armies
- Fight Battles
- Battle Results
Move Armies
Armies are allowed to move a maximum of D3 hexes during their turn. They subtract one from the roll if they start their move adjacent to a hex with an unbroken enemy army, to a minimum of 1. Each army is rolled for and moved one at a time, so you will not know how far the rest of your armies will be able to move. You can not move through a hex with an enemy army in it or an enemy controlled settlement. You may pass through a hex with a friendly army in it, but may not end your move in the same hex as a friendly army. You may end your move in a settlement (Town, Village, City, or Fortress) controlled by an allied player, provided there is not another army already there.
An enemy controlled settlement without an enemy army in the hex can be captured by an army ending its move on the hex. Mark that the capturing player now controls the settlement. Enemy controlled locations that have an enemy army on them can be captured, but in order to do so the attacker must first win the battle with the enemy army. An army can move into a hex that an enemy army is occupying, in which case it must halt there even if it has more movement. The two armies will do battle.
Fight Battles
After movement is complete, a Warhammer battle will be fought anywhere there are armies from both sides occupying the same hex on the map. Each player selects an army up to the points value agreed upon for the armies.
The two players proceed to fight the Warhammer battle with their selected armies. The attacker is the player whose turn it is. The defending player deploys a unit first in the game and the attacking player gets the first turn. Roll off for choice of deployment zones as normal. At the end of the game calculate victory points to determine the results.
Instead of always fighting a pitched battle, you can determine the scenario you fight by rolling on the following chart:
1-3: Pitched Battle
4: Supremacy
5: Flank Attack
6: Last Stand
If a Pitched Battle is being played, both players randomly select a special objective and reveal it to the other player. (Note it is possible to get a blank special objective, which means you have no special objective for the battle). For either side, completing the objective gives that player bonus victory points equal to 10% of the size of the game. So for 2000 point games, it would grant 200 bonus victory points.
As an alternative, instead of fighting a Warhammer battle, the result of the battle can be determined by dice rolling as follows. Each player rolls a die. A player subtracts one if his army suffered a minor defeat in the last turn, or two if the player’s army is broken as a result of a major defeat. Subtract one if attacking an enemy on a special location. The results are compared, and if one player gets a higher result than the other, the difference determines the level of his victory according to the following chart:
Difference: Result
0-1: Draw
2: Minor Victory
3: Major Victory
4-5: Massacre
Battle Results
Draw
If the result of the battle is a draw, the attacking army is moved back one hex to the hex it came from.
Minor Victory
If the result of the battle is a minor victory, the loser moves back 1 hex. If the attacker lost, he must move back in the direction he came from or one of the two adjacent directions from the hex where the battle was fought. If the defender lost, he must move in the direction opposite the one the attacker came from, or one of the two directions adjacent to that one. A losing army is not allowed to retreat into an enemy controlled settlement. In addition, the losing army is shaken. This means that for one full turn, the army suffers the following effects in any battles it fights: his opponent is allowed to choose a deployment zone, he must begin deploying first, and his opponent may choose whether to go first or second.
Major Victory
If the result of the battle is a major victory, the loser moves back 1 hex as described in the Minor Victory section above. In addition, the losing army is now considered broken until it can rally. A broken army cannot attack another army, and if it is attacked it suffers the following effects in the battle: the army gets 10% fewer points, the opponent is allowed to choose deployment zone, the entire army must be deployed first before the opponent’s army being deployed, and the opponent can choose to go first or second. Broken armies can rally by ending their regular move (not retreat move) on a hex with a friendly settlement. Once they do this, the army returns to normal.
Massacre
If the result of the battle is a massacre, the losing army is removed from the game permanently. The winning army stays where it is. If this happens to an army containing the player’s Lord character, the character is captured and takes no further part in the campaign.
Surrounded
In the case of a Minor or Major victory when the losing army is compelled to make a retreat move, cases may occur where it is impossible for the army to make the required move, due to enemy armies or the edge of the map or mountains blocking all the possible destinations. If this happens, the army is trapped, and is wiped out as if the result of the battle was a Massacre. If the army is blocked by a friendly army, they may move one extra hex through them if possible and if there is no other possible place to move.
Ending the Game
The game is played until one side has no armies remaining, or one side has lost all their fortresses. The other side is the victor.
Special Locations
Towns, villages, hills, bridges, and other features of the landscape can be used by a clever general to gain tactical advantages over his opponent. The following are some special locations that may be placed on the hex map. Special locations grant certain benefits to armies on or near them. Unless otherwise specified, benefits of special locations apply to an army occupying the hex the terrain feature is on. If a battle takes place on a hex with a special location, unless otherwise specified the benefit applies to the defender. In cases where the player is allowed to place terrain, it is placed after all normal terrain has been set up for the game, and deployment zones have been chosen.
Village: Defender can place up to 12” of linear obstacle in his deployment zone. He gains +50 bonus victory points for each of his starting table quarters that he controls at the end of the game. An army that starts its turn on a Village, it gets +1 movement.
Town: Defender can place up to 18” of linear obstacle and one building (up to 2 stories) OR one special terrain feature in his deployment zone. He gains +100 bonus victory points for each of his starting table quarters that he controls at the end of the game. An army that starts its turn on a Town, it gets +1 movement.
City: Defender can place up to 24” of linear obstacle and up to two buildings (up to 3 stories) OR one such building and one special terrain feature in his deployment zone. He gains +150 bonus victory points for each of his starting table quarters that he controls at the end of the game. An army that starts its turn within 1 hex of a friendly controlled City gets +1 movement.
Fortress: Play a siege game. The defender gets 75% of the point value of the attacker. Both armies get 25% of the point value of the attacker to spend on siege equipment. If the attacker wins, it counts as a massacre. If the defender wins, it counts as a minor victory. An army that starts its turn within 1 hex of a friendly controlled Fortress gets +1 movement.
Hill: Defender can place a hill of any size in his deployment zone. The attacker is not allowed to place any hills in his own deployment zone. The Defender adds +1 to his roll to determine deployment zones, and +1 to his roll to determine who goes first.
Bridge: It is difficult to attack and retreat across a narrow bridge. If the attacker loses a battle on a hex with a bridge, the loss is counted as one level more severe. So a minor victory for the defender becomes a major victory, a major victory becomes a massacre.
River: Fighting in the area of a river with no bridge makes it hard to escape if an army gets surrounded. Both armies fighting a battle in a river hex gain double victory points for controlling table quarters. If there is a bridge in the hex, use the rules for a Bridge location instead.
Subscribe to:
Posts (Atom)