Showing posts with label modelling. Show all posts
Showing posts with label modelling. Show all posts
Monday, November 13, 2017
Kingdom Death Screaming Antelope Armor Survivors
Monday, October 30, 2017
Kingdom Death White Lion Armor Survivors
Another issue I had is that the big collars make it impossible to fit many of the heads on these bodies. The major issue, however, is those little claws at the wrists of all the arms. They make it very difficult to fit some of the weapons, and this is compounded by some of the weapon hands being awkwardly positioned and difficult to make look natural to begin with (such as the cat fang knife and the katars). In retrospect, I should have just cut those little claws off at least half the models so I would have at least one male and one female who could hold pretty much any weapon without them getting in the way. Honestly, I may eventually go back and cut them off (maybe all of them) and just touch up the paint job. It would probably be worth it.
The painting on these was pretty straight forward. I just tried to paint them pretty much how I painted my White Lion. I tried to make sure there was enough difference between the flesh color of the survivors and the color of the lion skin so that they stood out from each other. I gave the one head orange hair because I thought he looked like Lion-O from Thundercats.
Unlike the other armor kits, this one came with five sets of body/legs. Two of the pairs of female legs were identical, so one of them I posed leaning way forward to make look different from the other one. The problem with that is that her head is facing down and she's not looking where she's running. I wish I had thought of that before hand and put the magnet in at a different angle to have her looking straight ahead.
Monday, July 11, 2016
Warhammer Quest Custom Warrior Priest - Martel
Friday, June 3, 2016
Kingdom Death Survivor Magnetizing Tutorial
I talked in my previous post about why I went with the approach I did. Magnetizing the models at the shoulder looks terrible, and also there aren't enough arms for you to have all of the weapon options available. There are way more weapons than arms. So magnetizing at the wrist, though trickier, allows for all the options to be available, and allows for you to fill in the gaps at the shoulder joins, which looks a lot better. Magnetizing the heads allows you to use the same head for different armor sets, so you can use the same head for your character as their armor and weapons change in the course of the campaign.
I considered magnetizing at the waist, but didn't think it would be worth the effort. The armor sets have full set bonuses, so normally you will be trying to have a survivor with armor all of one set. It seemed unlikely that I'd want to have a survivor with chest and hand armor from one set, but waist and leg armor from another. Plus, it seemed like some of the body/leg combinations of different sets of armor might look pretty strange together. So it didn't seem worth the extra effort. I just use the body that most closely matches the armor the survivor has, which usually will be at least a few pieces from the same set. If you are looking to do yours the same way, just follow the steps below.
Monday, January 11, 2016
Magnetizing Kingdom Death: Monster survivors
Monday, February 18, 2013
Chaos Space Marine Apothecary Conversion
Monday, May 2, 2011
Renegade Imperial Guard Conscript Conversions
Thursday, December 30, 2010
Renegade Imperial Guard Rough Riders
Monday, December 6, 2010
Warhammer Fantasy movement trays
I'm trying out a new idea for Warhammer Fantasy movement trays. The existing solutions haven't really worked well. For one thing, when playing on tables with a lot of hills, having to prop up a large movement tray on a hill is difficult, looks silly, and may result in many of the models falling over. In fact with some of the more unbalanced models, just pushing the tray around can result in many of them tipping over. In a big unit, this can cause quite a mess and it can take longer to reposition all the models that it is worth.
The other problem is that movement trays have to be made in specific sizes, so I'd need a lot of them in 15, 20, 25, and 30 model sizes at least, for 20mm and 25mm square models. That's a lot of different options I'd need to make. Not to mention that once a unit starts taking casualties, there's a big empty space at the back of the movement tray that doesn't look good and is a pain when you have to put another unit in that vacated space.
The solution I'm going to try out is to use magnetic sheet and steel bases to make magnetic movement trays. I will cut out magnetic sheet in rectangles, some big enough to fit one rank of five models, some big enough to fit two ranks of five models. I'll then glue thin steel bases to the bottom of the Warhammer bases and attach the models magnetically to the sheet. With plastic models that have the completely empty base bottoms, I'll probably be able to find washers that fit in there. But with the slotta-bases, these thin steel squares work perfectly. I got the steel bases here. The 3/4" x 3/4" bases fit a 20mm Warhammer base perfectly.
With the different sizes of sheet, I'll be able to combine them to make different sized units. So a unit of 25 models will only require moving around three of the magnetic rectangles. The magnetism will also hold the models down, effectively keeping them from tipping when I move the unit or when they need to be positioned on a hill. If I need to reform the unit, the most common widths of 5 or 10 wide will be simple, and I can always make a handful of 2 and 3 model length rectangles of magnetic sheet for adding more files.
Below is a picture of a few Empire Greatswords with the thin steel bases glued to the bottom of their bases. The next picture shows the Greatswords with the two sizes of magnetic sheet I've cut out, one for holding a single rank of five models, the other for two ranks of five models.


Here I've attached the models to the magnetic sheet. The cling on quite nicely. If I wanted to use a unit of 15 Greatswords in the game, I can do it like this, without needing a special sized movement tray that holds 15 models or having extra movement tray hanging off the back of the unit. And when moving them, I only have to push around these two sheets of models. Looking from above, you can barely see the magnetic sheet at the bottom of the base. But I will be painting the magnetic sheet green so that it looks better once a few models have been taken off, exposing the sheet that was beneath them.


As you can see, any sort of incline or other unusual terrain will be no problem for these guys.

I have yet to try this out in a game, but I think it will work pretty well. I'll give an update after I've tried it out. I've you've tried out any interesting ideas for how to move your Warhammer units around the table, I'd be interested in hearing about them.
Monday, November 22, 2010
Renegade Imperial Guard Veteran/Command Squad Conversions
Thursday, October 14, 2010
Renegade Guard Question
I discovered that the backpacks from the French Grenadiers fit almost perfectly on the Shock Troops. Here are some pictuers of a couple of my painted Shock Troops with the unpainted Victrix backpacks tacked on them.
Monday, October 11, 2010
Black Powder casualty markers
There are a few problems with this system that make it impractical. First, it is inconvenient to have to switch out bases in a game as units take casualties and rally to remove them. Second, it isn't that easy to tell at a glance how many casualties a unit has, not to mention how easy it is to miss the base and forget to move it with the unit. Finally, it requires creating a huge number of bases, since theoretically for each unit I make I'd need three wound bases (since the standard stamina of a unit in Black Powder is 3).
I finally came up with another solution that I think will work much better. Initially I thought it would be nice to have round wound bases with a dial in them that can be rotated to show a different number of wounds. Unfortunately, I couldn't find dial bases anywhere that were thin enough to not look ridiculous next to my units on their thin metal bases.
Thursday, August 19, 2010
Renegade Imperial Guard Infantry Squad
Below are some pictures of the first primed infantry squad.
Monday, August 9, 2010
Renegade Imperial Guard Conscript Conversions
I plan to use the Victrix Limited plastic "Napoleon's Old Guard Grenadiers" for the bodies and arms of my conscripts. I'll do my best to try to replace the weapons with some spare Lasguns to give them something of a futuristic look. This will likely prove difficult, however, because of how some of the figures are holding the muskets, and because the hands and arms are typically closer together on these figures than on Games Workshop ones, making it difficult for them to hold the Lasguns.
Thursday, August 5, 2010
Renegade Imperial Guardsman Conversion
The concept behind the army is that it started out as an Imperial nobleman's palace/household guard. The power-hungry nobleman fell in with a chaos cult, and began plotting a coup with their support. He spent his considerable wealth building up his household guard until he had his own personal army. He then used it to stage a coup, overthrowing the Imperial ruler and taking over control of his home planet for himself.
Because of their origin as royal palace guards, I want the uniforms of the soldiers to be fancier and a little more ostentatious than the typical Imperial Guard uniform. They would have to look good standing at attention in an opulently furnished palace as visiting nobility walked by.
Monday, July 26, 2010
Tyranid Termagants with Stranglewebs
Monday, June 21, 2010
Tyranid Trygon/Mawloc
Monday, June 14, 2010
Shrine of The Aquila
I have assembled my Warhammer 40,000 Shrine of The Aquila terrain kit. I think it turned out pretty well. After assembling it I attached it to a base. You'll want to make sure the pieces are sitting on a completely flat surface when you glue them together, otherwise they'll end up crooked and not sit flat on the base. I glued some leftover pieces, cut up sprue, and small ballast to the base as rubble.
I basecoated the whole thing in black, and then sprayed a coat of grey, trying not to completely cover everything so that a little of the black showed through. This gives it a bit of a textured look. Here are some pictures.

 Having never painted a building before, I'm now realizing that I have no idea of how to go about it. Does anyone out there have any suggestions? Should I get a really big brush and a bigthing of light grey paint and give the whole thing a dry brush? Should I make all the beams, rivets, and floor pieces a metallic color, or leave them grey? I'll do the details like the lamps and tubing at the end, but I'm not sure where to begin.
I basecoated the whole thing in black, and then sprayed a coat of grey, trying not to completely cover everything so that a little of the black showed through. This gives it a bit of a textured look. Here are some pictures.


Monday, March 15, 2010
Mantic Games Plastic Skeletons
I've purchased and assembled some of the Mantic Games Plastic Skeletons to hopefully use in my Vampire Counts army. For anyone else who might be interested in these, here are my thoughts on them.
Like Mantic's other stuff, the Skeleton Regiment comes in a reusable thin plastic box that resembles a VHS tape box. Inside are two thin sheets of foam, two sprues of Skeletons (one a troop sprue and one a command sprue), 20 20mm square bases, and two sheets of stickers (not water slide transfers, but regular stickers). Each sheet of stickers has 2 banners, shield designs, and a mantic point. When you save up some ridiculous number of Mantic points, you can redeem them for some limited edition stuff or something.
Most of them have shields, and many can be given either spears or single-handed weapons like swords or axes. It might be tricky if you want to arm the whole unit with spears, for a couple of reason. Each sprue of 10 skeletons only has eight spears. On top of that, three of the bodies on each sprue of 10 have a weapon already modeled in the hand. Two of them would be easy to remove and replace, the one holding the axe would be a little more difficult. So if you want to give them all spears, you'll have a little extra work to do and will need to come up with some extra spears.
You'll also probably notice there are some fun little extras included on the sprue, such as a severed Dwarf head, a skeleton bursting from the ground, and even a little skeleton dog. Those are neat, and I plan to use the bursting skeleton and the dog as just extra members of the unit. Unfortunately, they don't come with bases so you'll have to supply two extras if you want to use them in such a way. Otherwise you could add the dog as a decorative element to the base of one of the skeletons, and use the bursting guy as a marker to represent something. The other little extras can also be used for terrain pieces or objective markers or just base decorations.
While assembling them, I noticed that they did tend to have some significant mold lines. Some of these can be very difficult to get to with a hobby knife or file because they are in cramped spaces, like between a leg and the cloth hanging down between the legs. Also, some of the mold lines can be really hard to remove without removing some of the detail of the miniatures, like on the rib bones. Plus, many parts of these models are very slim and delicate, so you have to be pretty careful not to snap off an arm or weapon while you're preparing them for assembly. As a result of all that, these take a long time to prepare. This does remove some of the advantage they seem to have been going for with having few parts so they can be assembled quickly.
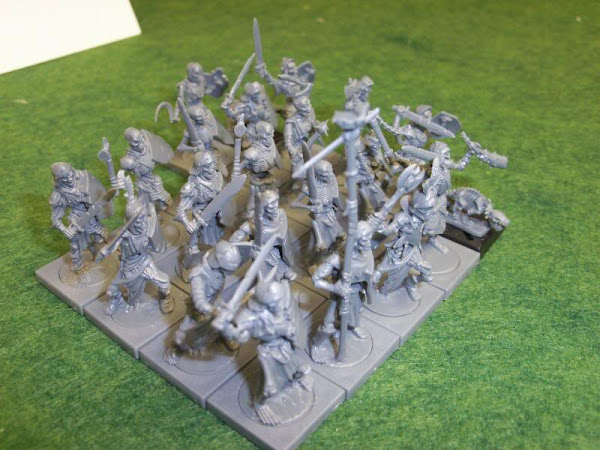
However, once the parts were cleaned of mold lines and ready to go, they were pretty quick and fun to assemble. Out of a regiment of 20, 12 of the figures don't have much customization. You have three different types of lower body, and you stick one of the corresponding upper bodies on. Some of these already have weapons attached, so you're done. Others have empty hands, so you pick a weapon to put in them and you're done. Or give one a horn, bell, or standard pole. By having different combinations of upper and lower body, you can have quite a variety of differences and probably have a unit of 30 without repeating any of the upper body/lower body combinations. But you don't have any way to pose them differently, aside from maybe angling them differently on the base. They are quick to assemble.
The remaining eight out of the 20 are more fun to put together. These have bodies in more dramatic poses with empty hands, or some with separate right arms that you can attach in different positions, and separate heads. This works out well, since you can get a lot of standard-looking guys put together quickly, but still have a few unique poses that are more fun to assemble and will stand out in the unit. There are extra weapon arms and heads, so you have some choices in which ones you'll want to use.
If you're like me, you may have initially been scared off from wanting these by the first pictures they had up on the Mantic website, where it looked like the whole unit was dancing. Once I saw the sprue pictures I was relieved to see that you aren't required to assemble them that way. So rest assured that you don't have to make all your skeletons look like they're dancing. There's really only one or two of them that have to look like they're dancing. I don't know what Mantic assembled theirs that way, or choose to use that terrible picture to show off their product.
Anyway, moving on, another weird thing I didn't notice at first is that these models have eyeballs modeled on them. That seems a little strange to me. But I suppose if you just paint them as glowing orbs of magical energy or something, they'll look okay.
So you might wonder, as I did, if these would work well in games of Warhammer as cheaper substitutes for the Games Workshop skeletons, or for people who prefer the style of these skeletons. In some way they seemed clearly designed for this purpose. They come with the same size bases, they have the same weapon options and the continually expanding Mantic range of undead contains a lot of unit types that are similar to the kinds of units in Warhammer undead armies.
On the other hand, these models are significantly smaller than Games Workshop miniatures. They are a little shorter for one, and in addition are much more realistically proportioned, so they don't have extra large hands, heads, and weapons. This combines to make them look much smaller than most Games Workshop miniatures. The pictures below show, from left to right: very old Games Workshop plastic skeleton, Mantic skeleton, old metal Games Workshop skeleton, another Mantic skeleton, and the previous version of the Games Workshop plastic skeleton.


Unfortunately, I do not have any of the newest Games Workshop plastic skeletons to include in the comparison pictures. I don't really like the style of them, so I haven't bought any. I have seen them in person, and they are much smaller and way more reasonably proportioned than the previous version, so I think they would likely fit in okay with the Mantic skeletons. The older Games Workshop plastic skeletons, as you can see, don't match well at all. You definitely can't mix parts between them for conversions as they'd be way out of scale, and mixing the models in the same unit would look bad due to the different styles and proportions. It might look okay to have them in different units in the same army. You could always argue that the Games Workshop skeletons are undead mutant ape-men or something.
Here are some pictures of my first completed regiment of Mantic skeletons. There are 22 of them, including the skeleton dog that I based separately, and the one bursting out of the ground.


Finally, here are a couple pictures of the re-usable storage box they come in with the foam inserts. This might work okay for storing plastic models, even once painted, as they won't be heavy enough to chip each other if they move around in there. I wouldn't store any painted metal models this way.


I do have a bit of a dilemma in putting together the rest of my Mantic skeletons. There are enough of the standard swords to give all of them such a weapon, except for those that have a molded on hammer or axe. I could arm almost all of my skeletons with the swords and make them look more uniform, but I really like the variety added by some of the other weapons. So, do I make one unit all with swords, and other unit all with completely mixed weapons? In this case, one would have been an organized military unit in life, the other more of a band of warriors that used whatever weapons they could supply themselves. Or do I have most of them with swords, and a few with other weapons to represent those raised during the course of a battle, which would therefore be armed differently because they were originally part of the unit when it was alive? Or do I just mix them any way I want, figuring a vampire general would just reorganize units however was convenient? Or am I just putting way too much thought into this? Let me know what you think.
Like Mantic's other stuff, the Skeleton Regiment comes in a reusable thin plastic box that resembles a VHS tape box. Inside are two thin sheets of foam, two sprues of Skeletons (one a troop sprue and one a command sprue), 20 20mm square bases, and two sheets of stickers (not water slide transfers, but regular stickers). Each sheet of stickers has 2 banners, shield designs, and a mantic point. When you save up some ridiculous number of Mantic points, you can redeem them for some limited edition stuff or something.
Most of them have shields, and many can be given either spears or single-handed weapons like swords or axes. It might be tricky if you want to arm the whole unit with spears, for a couple of reason. Each sprue of 10 skeletons only has eight spears. On top of that, three of the bodies on each sprue of 10 have a weapon already modeled in the hand. Two of them would be easy to remove and replace, the one holding the axe would be a little more difficult. So if you want to give them all spears, you'll have a little extra work to do and will need to come up with some extra spears.
You'll also probably notice there are some fun little extras included on the sprue, such as a severed Dwarf head, a skeleton bursting from the ground, and even a little skeleton dog. Those are neat, and I plan to use the bursting skeleton and the dog as just extra members of the unit. Unfortunately, they don't come with bases so you'll have to supply two extras if you want to use them in such a way. Otherwise you could add the dog as a decorative element to the base of one of the skeletons, and use the bursting guy as a marker to represent something. The other little extras can also be used for terrain pieces or objective markers or just base decorations.
While assembling them, I noticed that they did tend to have some significant mold lines. Some of these can be very difficult to get to with a hobby knife or file because they are in cramped spaces, like between a leg and the cloth hanging down between the legs. Also, some of the mold lines can be really hard to remove without removing some of the detail of the miniatures, like on the rib bones. Plus, many parts of these models are very slim and delicate, so you have to be pretty careful not to snap off an arm or weapon while you're preparing them for assembly. As a result of all that, these take a long time to prepare. This does remove some of the advantage they seem to have been going for with having few parts so they can be assembled quickly.
However, once the parts were cleaned of mold lines and ready to go, they were pretty quick and fun to assemble. Out of a regiment of 20, 12 of the figures don't have much customization. You have three different types of lower body, and you stick one of the corresponding upper bodies on. Some of these already have weapons attached, so you're done. Others have empty hands, so you pick a weapon to put in them and you're done. Or give one a horn, bell, or standard pole. By having different combinations of upper and lower body, you can have quite a variety of differences and probably have a unit of 30 without repeating any of the upper body/lower body combinations. But you don't have any way to pose them differently, aside from maybe angling them differently on the base. They are quick to assemble.
The remaining eight out of the 20 are more fun to put together. These have bodies in more dramatic poses with empty hands, or some with separate right arms that you can attach in different positions, and separate heads. This works out well, since you can get a lot of standard-looking guys put together quickly, but still have a few unique poses that are more fun to assemble and will stand out in the unit. There are extra weapon arms and heads, so you have some choices in which ones you'll want to use.
If you're like me, you may have initially been scared off from wanting these by the first pictures they had up on the Mantic website, where it looked like the whole unit was dancing. Once I saw the sprue pictures I was relieved to see that you aren't required to assemble them that way. So rest assured that you don't have to make all your skeletons look like they're dancing. There's really only one or two of them that have to look like they're dancing. I don't know what Mantic assembled theirs that way, or choose to use that terrible picture to show off their product.
Anyway, moving on, another weird thing I didn't notice at first is that these models have eyeballs modeled on them. That seems a little strange to me. But I suppose if you just paint them as glowing orbs of magical energy or something, they'll look okay.
So you might wonder, as I did, if these would work well in games of Warhammer as cheaper substitutes for the Games Workshop skeletons, or for people who prefer the style of these skeletons. In some way they seemed clearly designed for this purpose. They come with the same size bases, they have the same weapon options and the continually expanding Mantic range of undead contains a lot of unit types that are similar to the kinds of units in Warhammer undead armies.
On the other hand, these models are significantly smaller than Games Workshop miniatures. They are a little shorter for one, and in addition are much more realistically proportioned, so they don't have extra large hands, heads, and weapons. This combines to make them look much smaller than most Games Workshop miniatures. The pictures below show, from left to right: very old Games Workshop plastic skeleton, Mantic skeleton, old metal Games Workshop skeleton, another Mantic skeleton, and the previous version of the Games Workshop plastic skeleton.
Unfortunately, I do not have any of the newest Games Workshop plastic skeletons to include in the comparison pictures. I don't really like the style of them, so I haven't bought any. I have seen them in person, and they are much smaller and way more reasonably proportioned than the previous version, so I think they would likely fit in okay with the Mantic skeletons. The older Games Workshop plastic skeletons, as you can see, don't match well at all. You definitely can't mix parts between them for conversions as they'd be way out of scale, and mixing the models in the same unit would look bad due to the different styles and proportions. It might look okay to have them in different units in the same army. You could always argue that the Games Workshop skeletons are undead mutant ape-men or something.
Here are some pictures of my first completed regiment of Mantic skeletons. There are 22 of them, including the skeleton dog that I based separately, and the one bursting out of the ground.
Finally, here are a couple pictures of the re-usable storage box they come in with the foam inserts. This might work okay for storing plastic models, even once painted, as they won't be heavy enough to chip each other if they move around in there. I wouldn't store any painted metal models this way.
I do have a bit of a dilemma in putting together the rest of my Mantic skeletons. There are enough of the standard swords to give all of them such a weapon, except for those that have a molded on hammer or axe. I could arm almost all of my skeletons with the swords and make them look more uniform, but I really like the variety added by some of the other weapons. So, do I make one unit all with swords, and other unit all with completely mixed weapons? In this case, one would have been an organized military unit in life, the other more of a band of warriors that used whatever weapons they could supply themselves. Or do I have most of them with swords, and a few with other weapons to represent those raised during the course of a battle, which would therefore be armed differently because they were originally part of the unit when it was alive? Or do I just mix them any way I want, figuring a vampire general would just reorganize units however was convenient? Or am I just putting way too much thought into this? Let me know what you think.
Monday, March 8, 2010
Tyranid Hormagaunts and Weights
Subscribe to:
Comments (Atom)