I've had a lot of interest in and questions about how I magnetized my Kingdom Death: Monster survivors, based on my
previous post. So while I worked on magnetizing the leather armor kit, I took some pictures and created a step-by-step tutorial to show the entire process. This should help out anyone else intending to magnetize there survivors, as there are quite a few tricky parts where you can hopefully benefit from my experience and prior mistakes. If you intend to do some magnetizing with your survivors in order to get the most utility out of them, have a look below to see how I went about it. And if you've discovered any tips or tricks of your own, please leave a comment and let me know!
I talked in my previous post about why I went with the approach I did. Magnetizing the models at the shoulder looks terrible, and also there aren't enough arms for you to have all of the weapon options available. There are way more weapons than arms. So magnetizing at the wrist, though trickier, allows for all the options to be available, and allows for you to fill in the gaps at the shoulder joins, which looks a lot better. Magnetizing the heads allows you to use the same head for different armor sets, so you can use the same head for your character as their armor and weapons change in the course of the campaign.
I considered magnetizing at the waist, but didn't think it would be worth the effort. The armor sets have full set bonuses, so normally you will be trying to have a survivor with armor all of one set. It seemed unlikely that I'd want to have a survivor with chest and hand armor from one set, but waist and leg armor from another. Plus, it seemed like some of the body/leg combinations of different sets of armor might look pretty strange together. So it didn't seem worth the extra effort. I just use the body that most closely matches the armor the survivor has, which usually will be at least a few pieces from the same set. If you are looking to do yours the same way, just follow the steps below.
 |
| Gather your tools. You will need files, hand drill with 1/16" (or slightly bigger) drill bit, toothpick, super glue, and 1/16" diameter by 1/32" thickness magnets. You could also use 1/16" diameter by 1/16" thick magnets in the forearms that are big enough to hold that size. Some of the more top-heavy weapons may not hold in place with the smaller magnets. |
 |
| Assemble the legs, bodies, and arms together. You need to put some thought into how to attach the arms so that they will look reasonable when holding a variety of different weapons. I made sure that each survivor had one arm pointing down at about a 45 degree angle, so that they could hold the lantern from the unarmored kit and have it hang down convincingly. |
 |
| File the bottoms of each neck just enough to create a flat surface for drilling. The top one hasn't been filed yet, the bottom has, so you can see the difference. |
 |
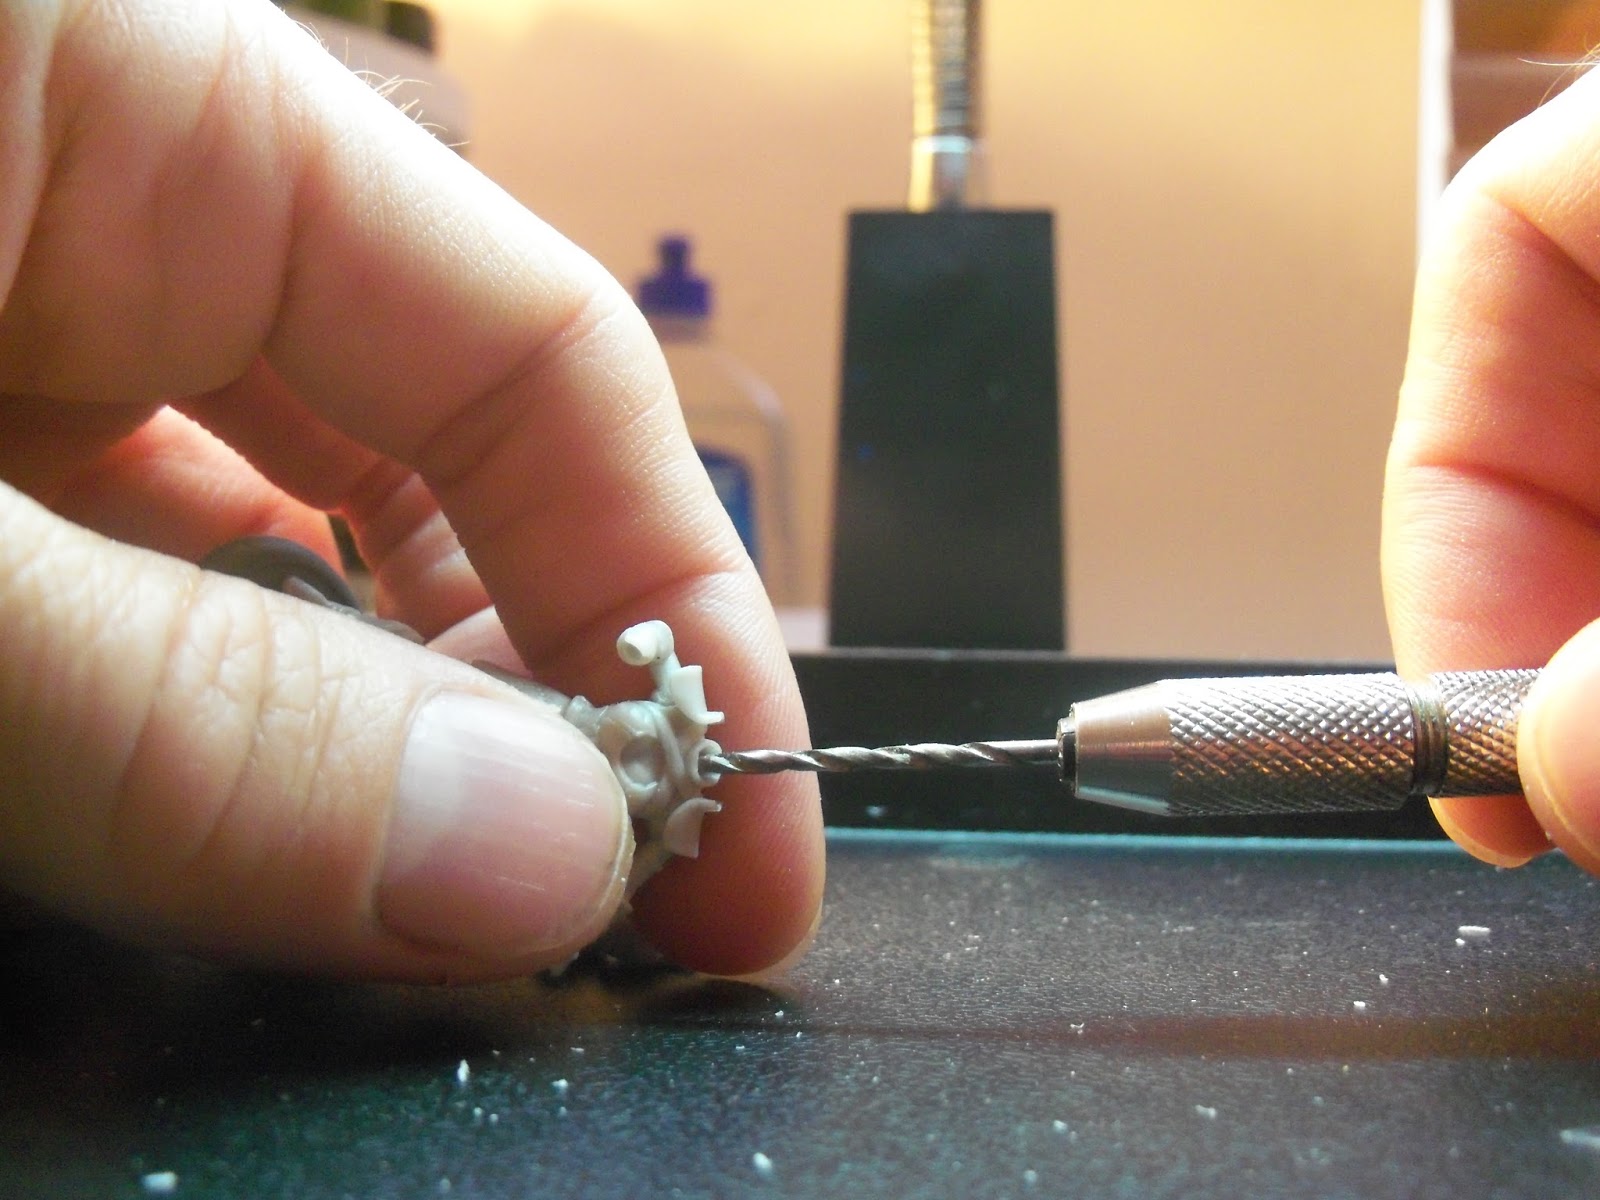
| Drill the neck exactly in the center just to depth of the magnet, so the magnet will sit flush with the bottom of the neck. |
 |
| Glue a magnet into male neck with super glue. For the first one, the polarity won't matter, but from now on it will. |
 |
| Drill the female neck in the same way, but make sure to drill exactly in the center because the female neck is thinner. |
 |
| Here you see the hole drilled in female neck. There is not much margin for error. |
 |
| Give time for the glue in the male head to completely dry. Then attach (not glue) a magnet to male neck to determine which way to glue into female neck. I like to have the male and female heads opposite polarity so they can be stored attached to each other. Here you can put some glue in the hole in the female neck, then hold the male head and push them together, then slide the male head off while holding the magnet in the female head. |
 |
| Drill down into the center of the neck opening of each body, to depth of one magnet (1/32"). Make hole a little wider than magnet diameter so you can dry fit to get the depth correct. |
 |
| Attach (not glue) a magnet to a head so you can dry fit into the body. Dry fit often to determine when you've drilled to the correct depth without going too deep. Make sure the hole is a little wider than the magnet so the magnet doesn't get stuck. |
 |
| Neck hole drilled in body. You want it just deep enough so the magnet sits flush, since the one on the neck doesn't stick out below the neck at all. |
 |
| Scrape or file out neck opening in body to widen it after drilling. You may also need to file down the outside of the neck. If you don't, after you prime and paint everything, the neck will no longer fit down into the opening due to the extra thickness. |
 |
| Attach (not glue) a magnet to the magnet on the female head. Mark the bottom using permanent marker to show which side will go into the body. |
 |
| Put some super glue into the hole in the female body. Use tweezers to set the marked magnet magnet from female head into the female body, with the mark down (not visible). |
 |
| Push the magnet down into body with a toothpick or something else non-magnetic and hold while it sets. |
 |
| Repeat the process for the male head and body. Use tweezers (or anything metal) to hold the magnet from male head and set into male body, mark down. |
 |
| Use your finger to slide the magnet off the tweezers into the opening in the body, then push down with toothpick. This was the easiest way I came up with to handle getting the tiny magnet down into the hole facing the right direction. |
 |
| Pick a weapon hand to start with. |
 |
| Slice off or cut with clippers most of the little "nib" that forms the wrist, then file it down flat. It should be about the same diameter of the magnets. The magnet will take up the space that was occupied by that nib. |
 |
| Use a metal file or hobby knife to scratch up the flat surface where the magnet will be glued. Also scratch up one flat side of a magnet. This helps the glue hold better. Then super glue the magnet to the hand. This requires a lot of patience to hold the magnet in place until it sets. It helps to leave the magnet magnetized to the stack of magnets (or something metal) to give you something to hold on to. Just be careful not to accidentally glue your magnet to something else. |
 |
| Once you have one weapon hand done, use it to hold the magnet while you glue it to the opposite hand. Make sure you always do this with opposite hands (one left and one right). I cheated here and used an already completed hand to glue this one, because the first one is such a pain to do. Even so it takes a lot of patience to hold the magnet still until the glue sets, but it's easier when you have something bigger to hold on to, like one of the larger weapons. Use a very tiny amount of glue or it will take too long to dry. |
 |
| Two opposite weapon hands magnetized together while the glue dries. Give it plenty of time to completely dry. Doing the polarities this way means you can conveniently store them magnetically attached to each other (so a right hand with bone axe with a left hand with bone axe, etc). It also means that only left hands will attach to left arms, and right to right. |
 |
| Drill straight into the wrist opening in the arm to the depth of two magnets (1/16"). Make sure to drill a little bigger than the magnet diameter so you can dry fit without the magnet getting stuck in there. You can also sort of mark with your thumb nail where on the drill bit it meets the outer rim of the arm, pull it out, and hold it up to two magnets to see if you've got the depth right. |
 |
| Holes drilled in the male arms. |
 |
| Attach (not glue) an additional maget to the magnets on each of the hands (one left hand and one right hand). |
 |
| Left hand with extra magnet attached to it. At this point, you can do a little dry-fit into the forearm to make sure you drilled to the correct depth, and make it a little deeper if you need to. Make sure the hole was drilled a little bigger than the magnet, or it might get stuck when you try to dry-fit. I'd do the male arms first, as they are a little bigger. When you drill into the female forearms, there will be only the tiniest bit of plastic left around the hole. |
 |
| Dry fit hand with extra magnet into arm hole. You want both magnets to be within the opening, or as close as possible. This way both magnets will be covered up by the forearm. Be careful not to get the magnet stuck while you are dry fitting! If you do, you might be able to get it out using an entire stack of magnets to get a stronger grip on it. |
 |
| As with the head and body, mark the end that will go into the hole with permanent marker. |
 |
| Put some super glue into the left arm hole. Hold the magnet from the left hand weapon with tweezers and slide into the left arm, with the mark not visible (facing in). |
 |
| Push the magnet in with a toothpick. On the female arms, there will be almost no thickness left to the forearm, and pushing might cause the forearm to split where it was glued together. Just push back together and put some extra super glue on the outside if you need it to hold the forearm back together. Repeat the process with the right hand weapon and forearm. |
 |
| I made contraptions like this from paper clips and jumbo Popsicle sticks to hold the heads and hands for spray priming and varnishing. While painting, it also helps hold things while the paint is drying. |
That's about it. Just do the magnets in the rest of the bodies and forearms the same way you did the first ones. Then you have to do all the magnets on the weapon hands, which is the difficult part. Once you've gotten the first few done, it's easier to do more at a time, because you can use the existing hands with magnets to hold the new magnets you are gluing. Just make sure, like before, you match up a left hand with a right hand. Attach them to the paper clip frames for priming and painting and you're ready to go.
I hope this tutorial is valuable and helps other people get the most out of their Kingdom Death survivor kits. Let me know what you think, and if you try out my process let me know how it goes or any lessons you learn along the way.


Great write up! I think we will be doing the same thing with our set. The pieces will be stored in tin boxes with clear lids so that they will stay put but be visible
ReplyDeletehttps://smile.amazon.com/gp/product/B00M0UV8Z4/ref=oh_aui_detailpage_o00_s00?ie=UTF8&psc=1