Friday, January 29, 2010

Warhammer 40,000 Battle Report: The Battle of Zagstruk's Head - Part 1

Story
All across the planet, battle raged between the invading Ork horde, and the defense forces of the renegade Imperial world, supported by Chaos Space Marines from various chapters. In one small area of one of these battles, an ambitious Aspiring Sorceror of the Thousand Sons legion prepared for an arcane ritual he hoped would summon dark forces from the warp to eliminate the Ork threat. In the midst of battle he set up an area to perform the ritual that included a willing virgin to sacrifice to the Chaos gods, a massive icon of chaos on which to sacrifice her, and most importantly the ancient tome that contained the neccessary incantation. As he was finishing his preparations, some of his human followers were in a nearby cemetary unearthing the final necessary component for the dark ritual: the head of an Ork warboss. And not just any Ork Warboss, but Warboss Zagstruk in particular. Why the spell required the head of a specific Ork is something of a mystery. Sorcery is funny like that.

Just as the workers unearthed the severed head of Zagstruck, the nearby battle spilled over into the cemetary. Some Orks saw the humans stealing the head of an Ork, and decided they wanted it back. They slaugthered the human workers and returned the head of Zagstruck to its sarcaphogus. Seeing the trouple, the Aspring Sorceror called in reinforcements, led by a bloodthirsty Champion of Khorne riding a Juggernaught. By the cemetary, a Warboss and Weirdboy showed up to take charge of the gathering swarm of Orks. The Weirdboy saw the arcane rigual being prepared across the battlefield, and wanted the book of sorcery being used. The Warboss really wanted the girl, or the book, or whatever it was the Chaos Marines were trying to defend, since he assumed it must be valuable. Come to think of it, since Orks aren't able to read, or reproduce sexually, he probably just wanted that fancy chair. There is some precedent for that, as can be seen here. Perhaps that same Warboss was back for another try. In addition, the Orks wanted to protect the head of Zagstruk from being defiled by the Chaos worshipers. The Chaos Marines needed to retrieve the Head of Zagstruk to complete the ritual, while defending the book from falling into enemy hands. And thus a battle that could decide the fate of the world began.

Setup
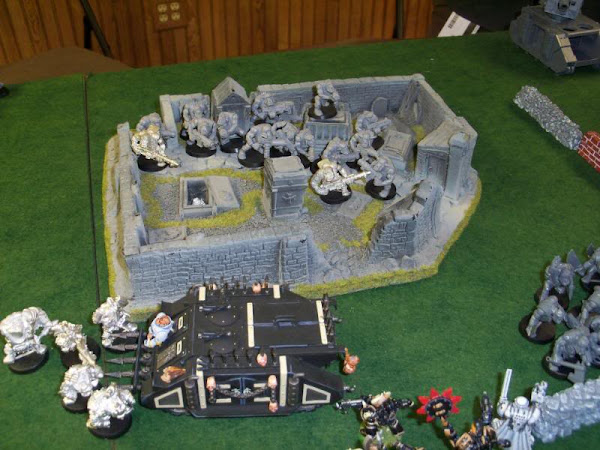
Here is a view of the entire battlefield, from the Ork side. Near the center of the Ork side of the battlefield is the graveyard containing the Head of Zagstruk. One the opposite side of the battlefield to the left of the picture is the area being set up for the arcane ritual to be performed, including the ancient book of sorcery.
Chaos Marines vs Orks Warhammer 40k battle report

The arcane ritual was being set up on the Chaos right flank. Defending the area was a squad of 5 Havoks with one missile launcher, one lascannon, one heavy bolter, and one plasma cannon, along with a squad of 11 plain Chaos Marines led by an Aspiring Champion with a power fist. To their left can be seen a squad of eight Khorne Berzerkers joined by the Khorne Chaos Lord riding his Juggernaught. To their left is another squad of eight Khorne Berzerkers behind some primitive ruins.
Chaos Marines vs Orks Warhammer 40k battle report

On the far Chaos left, another squad of eight Khorne Berzerkers lurk amongst some trees. To their right is a Rhino containing a squad of Thousand Sons marines, led by the Aspiring Sorceror who was to perform the ritual. To their right is another Rhino, this one containing a squad of renegade marines of the Crusaders chapter, with two flamers, an icon of Khorne, and an Aspiring Champion with a combi-flamer.
Chaos Marines vs Orks Warhammer 40k battle report

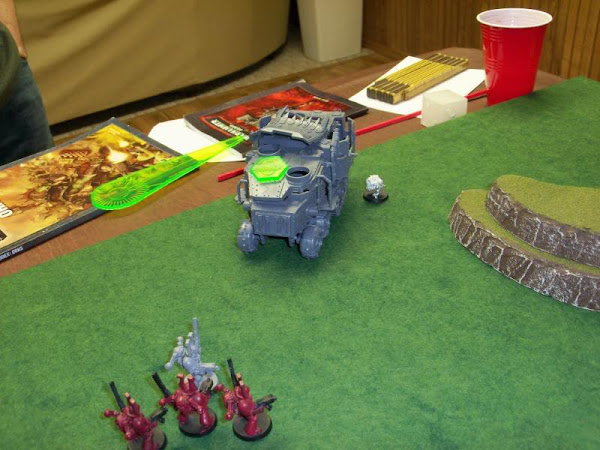
Facing them across the battlefield on the Ork right was a Battlewagon containing Burna Boyz and a unit of Tankbustas with a couple of quig bombs hiding behind a hill. Closer to the center of the Ork army there was a large unit of Ork boyz guarding the Weirdboy behind the cemetary, another large unit of boyz in the cemetary, and another large unit of boyz to the left of the cemetary. This army had a lot of Orks.
Chaos Marines vs Orks Warhammer 40k battle report

To the far Ork left was a unit of Stormboyz, a unit of mega-armored Nobz in a truck, and another large unit of Orks (maybe Nobz?) with the Warboss. They also had a looted tank for some serious marine killing firepower. It looked like, as usual, the Chaos Marines were severely outnumbered, and would have their work cut out for them.
Chaos Marines vs Orks Warhammer 40k battle report

Below is a shot of the entire battlefield just before the beginning of the battle, showing the deployment of both armies.
Chaos Marines vs Orks Warhammer 40k battle report

Chaos Marine Turn 1
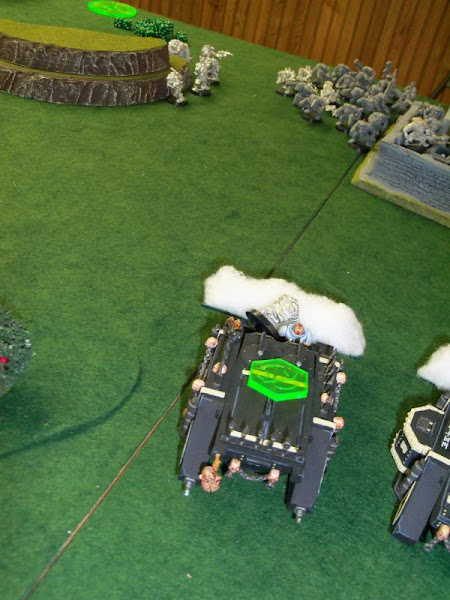
The Chaos Marines made the first move. The Khorne Berzerkers at their far left ran forward at full speed out of the forest. The two Rhinos also moved forward at full speed and fired their smoke launchers to give them some cover. The unit of Khorne Berzerkers led by the Khorne Lord also ran forward quickly, but the remaning unit of Berzerkers got bunched up trying to all rush through the old ruined building at the same time, and didn't manage to advance very far. The two units defending the objective held their ground, and the Havoks fired on the quad of Nobz containing the Warboss, only killing a few of them with their long-ranged shots. (Had I known that there were mega-armored nobz in the Ork Truck, I probably would have fired at that, but I forgot to ask what was in the Truck and so didn't realize it was such a big threat.)
Chaos Marines vs Orks Warhammer 40k battle report

Ork Turn 1
The Orks responded swiftly. The Truck on their far left zoomed forward 18" at full speed, and the Storm Boyz nearly kept up with them with their supercharged rocket packs. The Warboss and his retinue of Nobz also moved forward to get some shots on the closest Berzerkers.
Chaos Marines vs Orks Warhammer 40k battle report

The three huge units of Ork Boyz in the middle all moved forward a little and took what shots they could. I think it was some lucky Rockit Launcer shots that shook and immobilized the Rhino with the unit of Crusader marines in it. The wind must have blown their smoke away pretty quickly, because it didn't seem to help at all.
Chaos Marines vs Orks Warhammer 40k battle report

The Battlewagon moved forward at cruising speed, and all of the Burna Boyz inside opened up with their flamers at the nearby unit of Khorne Berzerkers. (In retrospect, I believe this is illegal, since I don't think you are allowed to fire from a vehicle if it moves more than 6") Amazingly, all of them manage to fire their flame throwers out the exact same opening in the front without burning each other at all. (To be honest, I've always thought the rules about shooting from a vehicle were pretty stupid) The massive gout of overlapping flames torched 4 of the Berzerkers.
Chaos Marines vs Orks Warhammer 40k battle report

The Tankbustas fired, as they are copelled, at the closest vehicle, but failed to harm it. They then unleashed their quig bombs, which caused no actual damage, but managed to shake the crews of both the nearby Rhino, and their own Battlewagon.
Chaos Marines vs Orks Warhammer 40k battle report

Fire from several Ork units, including the Nobz with the Warboss, managed to take out four of the eight Khorne Berzerkers accompanying the Khorne Lord. The looted vehicle didn't manage to hit anything with it's battle cannon, but overall it was a pretty effective turn of Ork shooting.
Chaos Marines vs Orks Warhammer 40k battle report

Chaos Marine Turn 2
Stunned by the stiff resistence from the suddenly appearing Orks, the Chaos Marines didn't have much of a response. The Khorne Lord and the four remaining Berzerkers with him moved up behind a rock wall and took a few pistol shots at the Boyz in front of them, killing a couple. The other unit of Berzerkers moved up behind them. The unit of Crusaders disembarked from their immobilized Rhino and advanced, getting off a few shots at the same unit of Orks with little effect, since they were still too far away to make use of their flamers. Dramatically, the other Rhino drove right up to the cemetary walls, and the unit of Thousand Sons disembarked, some leaping directly from the top of the Rhino to the top of the wall, ready to pour fire into the Orks there. Unfortunately, they must have been surprised by the sheer number of Orks hiding out in the cemebary, because between the Aspiring Sorceror's Wind of Chaos attack, and all the bolter shots, they managed to kill hardly any of them.
Chaos Marines vs Orks Warhammer 40k battle report

The Chaos Marine squad near the book of sorcery moved up to get some shots at the swiftly approaching Stormboyz. The Havoks also fired at the Stormboyz, and between the two units they killed about half of them, but they didn't break. (Again, had I known the truck was full of mega-armored Nobz, I would have been firing at it instead. This was a mistake I would soon pay dearly for.)
Chaos Marines vs Orks Warhammer 40k battle report

One thing did go their way, as two Obliterators (in this case, the falled Techmarines of the Crusaders chapter) showed up, teleporting right behind the Ork army, close enough to open up with twin-linked flamers on the unit of Boyz with the Weirdboy. They killed around 10 or 12 of them, but there were still enough left in the unit to make them unbreakable. The Chaos Marines hadn't caused much damage, and they were about to face a brutal counter-attack.
Chaos Marines vs Orks Warhammer 40k battle report

Ork Turn 2
On the Ork left, the Stormboyz flew far enough to get get behind the unit of Havoks. The Truck drove right up to the hill and the previously unseen Nobz in Mega-armor disembarked onto the hill directly in front of the other Chaos Marine squad. Suddenly surrounded, the marines stoically steel themselves for the coming onslaught. At least, the few of them who aren't having sudden doubts about their path in life.
Chaos Marines vs Orks Warhammer 40k battle report

In the Ork center, some reinforcements arrived in the form of another large unit of Boyz, who immidately fired at and then assaulted the two Obliterators. The Ork unit with the Weirdboy, possibly disturbed by the smell of their still smoldering comrades, fell back behind the cemetary to reassess the situation. The other two Ork units in the center moved forward to engage the many enemies advancing quickly in front of them.
Chaos Marines vs Orks Warhammer 40k battle report

The battle cannon on the looted vehicle managed to hit something this turn, but only killed two Thousand Sons. Last turn it had missed completely. Meanwhile, the Weirdboy concentrated so hard trying to unleash the psychic power he wanted that the psychic energy he summoned began overloading the nearby Orks, causing five of their heads to explode in a spectacular light show of green energy. The rest of the Boyz decided they rather not suffer the same fate, and fled the battlefield dragging the out-of-control Weirdboy with them to safety.
Chaos Marines vs Orks Warhammer 40k battle report

The remaining Thousand Sons marines were forced to endure an incredible hail of fire from the unit of Orks Boyz in the cemetary. The concentrated fire took out three of them, including the Aspiring champion, all of them falling from the wall to be impaled on the Rhino's spiky decorations. Nearby, the Burna Boyz had disembarked from the Battlewagon to roast another three of the Khorne Berzerkers with their burnas. The Tankbustas failed to harm the Rhino right in front of them.
Chaos Marines vs Orks Warhammer 40k battle report

The already depleted unit of Khorne Berzerkers led by the Lord took fire from the Ork unit directly in front of them, and the Warboss's retinue. Another two were gunned down, and the Lord wounded. The Orks in the cemetary charged the five remaining Thousand Sons, and the other unit of Boyz nearby scrambled over the stone wall to assault the Lord and the two remaning Khorne Berzerkers with him, though many of them were too far away to take part in the fighting.
Chaos Marines vs Orks Warhammer 40k battle report

Back by the book of sorcery, several of the Mega-armored Nobz opened up with their burnas, amazingly killing about half of the Chaos Marine unit. The Stormboyz fired at the Havoks, but it had no effect. The Nobz then assaulted the five remaning Chaos Marines, including the Aspiring Champion, and the Stormboyz assaulted the Havoks.
Chaos Marines vs Orks Warhammer 40k battle report

The Chaos Marine Aspiring Champion managed to kill one of the mega-armored Nobz before he and his unit were easily wiped out by an abundance of Power Klaw attacks. The Havoks should have been able to easily fight off the seven or so remaining Stormboyz, but perhaps the sounds of the other Chaos Marines being ripped apart behind them unnerved them a bit. They only managed to kill two of the Stormboyz, and lost three of their own due to some spectacular failures in their armor. (I believe I failed three out of five armor saves, due entirely to me having to roll them all individually because they all had different weapons.) To top it off, the surviving two Havoks attempted to flee and were cut down, trapped between the Nobz and Stormboyz. The Stormboyz and Nobz then followed up to consolidate their position near the objective. And because the Orks were led by a Warboss, the Nobz were taken as a Troops choice and could therefore hold objectives. So the Chaos Marine objective, the book of sorcery, was now solidly in the hands of the Orks. And 16 torn apart Chaos Space Marine bodies were strewn over the massive Chaos Icon where the arcane ritual was to take place.
Chaos Marines vs Orks Warhammer 40k battle report

Elsewhere, the Thousand Sons marines were easily wiped out by the Ork Boyz assaulting them, who then consolidated back into the cover of the cemetary. Not shown, but in the other combat the two Khorne Berzerkers with the Lord were killed, but the Lord did several wounds and won the combat. The Orks, however, were still numerous enough to be fearless.
Chaos Marines vs Orks Warhammer 40k battle report

The final remaining combat was the newly arrived unit of Boyz assaulting the two Obliterators. They would have a total of 71 attacks. I think that may be the most attacks I've ever seen for a single assault. One of the Ork players decided he would roll all 71 attacks at once, and I took some pictures to document the event. Here is a picture of his hands holding all 71 dice for his Boyz's attacks.
Chaos Marines vs Orks Warhammer 40k battle report

And here is the to-hit roll. I'm not sure if all 71 dice made it into the picture. They were pretty spread out. But there is the biggest single roll I've ever seen made.
Chaos Marines vs Orks Warhammer 40k battle report

And the results from those 71 attaks: 2 wounds. One of the Obliterators is slain, and the other one kills a single Ork and continues to fight on.
Chaos Marines vs Orks Warhammer 40k battle report

At the end of Turn 2, things were looking bad for the Chaos Marines. The Book of Sorcery was solidly in the hands of the mega-armored Ork Nobz, and the Chaos Marine force didn't anything left that could stand up to that unit to take it back. Not to mention that even if they had the book, the Aspiring Sorceror was probably dead, or at least badly wounded and lying impaled on a Rhino. The Thousand Sons, the Havoks, one squad of Chaos Marines, and one squad of Berzerkers had been wiped out, with a second squad of Berzerkers down to one remaining. Things weren't looking good.

The battered remnants of the Chaos army had only one hope now, which was to capture the Head of Zagstruk from the Orks, and force a draw. But the Khorne Lord leading them was out for blood and not about to give up. Check back for Part 2 of the battle report to find out of the Chaos Marines managed to pull out a draw, of if Ork forces could hold on to their advantage to be victorious.

Part 2

Wednesday, January 27, 2010

10mm Civil War Casualty Bases In Action

I took some pictures of my recently finished 10mm American Civil War Casualty bases next to some of my existing Infantry units. I've already made other posts where you can see close-up pictures of the Union Casualty Bases and the Confederate Casualty Bases. Here I wanted to show what they look like when in action and being used for their intended purpose.


First, here are some of the Confederate casualty bases photographed next to one of my Confederate Infantry units.
10mm American Civil War Confederate Casualties

Here are some of my original Union casualty bases pictured next to one of my existing Union Infantry regiments.
10mm American Civil War Confederate Casualties

I originally only used three total figures per base when I did the Union casualty bases, but I liked how the four figure bases looked when I tried it out on the Confederate casualty bases. I had a few extra painted Union figures left over, so I modified a few of those original casualty bases to add an extra figure. So, for comparison, here are a few four-figure Union casualty bases next to an Infantry regiment.
10mm American Civil War Confederate Casualties

I think the four figure casualty bases do look a bit better, especially next to my densely packed regiments, but even they look a little sparsely populated. My regular Infantry unit bases have eight figures each, but I suppose the casualty bases are supposed to look a little more ragged than the regular bases. I also don't know if it looks better enough to be worth the effort of re-basing those three figure Union casualty bases I've already made. So, let me know what you think. Do you like the three figure bases or four figure bases better? Or do you think I need even more figures on these bases for them to fit in with my Infantry regiments? And is it worth rebasing the ones I've already finished?

Monday, January 25, 2010

10mm Confederate Infantry Casualty Bases

I have now finished some Confederate Infantry casualty bases to use with my 10mm American Civil War armies. I've already posted pictures of my Union casualty bases here. I used GHQ N-Scale miniatures. I made these casualty bases from a combination of the "Skirmishers in Action Poses (CSA)" pack, and the "Casualties & Tabletop Markers" pack, plus some extra figures I had left over from other things, mostly the "Standing Firing in Shell Jacket & Slouch Hat (CSA)" pack.

Friday, January 22, 2010

Grismeire Valley Campaign Turn 1

We rolled randomly for which side would go first, and the Vampire Counts/Beastman side won.

The Vampire Count 2nd Army moved just East to capture the town of Poussenc. The Vampire Count 1st Army, containing their Lord, moved South to capture a bridge, and the 3rd Army moved up behind them.

The Beastman 3rd Army captured the important town of Soude. The Beastman 1st Army, with the Beastlord, occupied the village of St. Mer-Eglise, while their 2nd Army moved South to support the 1st.

The forces of good mobilised quickly in their response to the invasion. The High Elf 3rd Army hung back to occupy the village of Aix En Provence and the High Elf 2nd Army moved north to create a supply base in the village of Nice. The High Elf 1st Army, led directly by Prince Tethelion on his mighty dragon, moved far to the Northwest to support the Bretonnian advance.

The Bretonnian 1st and 3rd Armies moved together to consolidate before their advance. The Bretonnian 2nd Army, clearly well-prepared for war and eager to take the fight to the enemy, stormed Northwards to attack the Beastman 2nd Army on the plains outside St. Mer-Eglise.


The Beastmen were caught unprepared and surprised by the swift response of the Bretonnians, and their 2nd army was massacred.

Wednesday, January 20, 2010

Maelstrom Games review - Poor Customer Service

I placed an order in December from a website called Maelstrom games, which operates out of the UK. Since I am in the US, it might seem strange that I would order from them, but they did sell the combination of products from different companies that I wanted to purchase. So I could get the few different things I wanted from one place, and since they have free shipping, the fact that it was being shipped from the UK wouldn't make much difference, except taking a little longer. Also, their prices are decent, and that combined with the exchange rate made what I was ordering a little cheaper than ordering it from any US websites I could find.

Well, that turned out to be a mistake. I placed my order, and my credit card was charged for the order, on December 22nd. Everything I ordered was listed as in stock at the time I ordered it, but I didn't hear anything from them for several days about my order. On their website, it said the following:

"Orders placed before noon will be processed and (stock willing) sent out the same day; orders placed after noon will be processed and sent the day after."
"However, it is inevitable that some items could be out of stock when you place your order. In such cases we will order your item from the relevant manufacturer on the same day, which will usually take 2-3 working days to fulfil"
"Whatever happens, we will keep you informed by e-mail as to what is happening with your order. "


Well, I did order right before Christmas, and figured they must be pretty busy, and would take time off for the holidays and everything. So I waited the whole week after Christmas, and still had heard nothing from them about my order. If there was some kind of delay, according to their website, they should have informed me by e-mail, so I knew what was happening with my order.

So, a little impatient, on January 3rd I sent an e-mail to them asking why I hadn't heard anything about my order and why it was being delayed, especially since I had already been charged for the order almost 2 weeks before. I much prefer websites that only charge you when they actually send you the order. It turns out some of the items I ordered actually were out of stock, even though the website did not indicate that when I ordered. And they were having trouble getting them back in stock with the UK mail and the supplier being shut down for Christmas, and with Maelstrom having a backlog of orders to get through because they were closed for the holidays.

Okay, that's fine, but I should have been told sooner that the items were out of stock and that they would be delayed. Actually, they should have shown up as out of stock on the website when I ordered to begin with, but I can understand having some technical glitches sometimes. They did show up as out of stock when I checked back at this point, so there's probably just a delay in updating. So I waited a little longer and checked back on their website every few days to check my order status.

One day I checked the status, and happened to notice that all of the items in my order were now showing up as in stock again, with specific numbers available being listed. That seemed like a good sign, but my order status still had not changed. This was three weeks since they had taken my payment for this order. So I wrote another e-mail to ask why there was still a delay if everything was in stock. I was told my order would ship in the next couple of days.

It shipped five days later. They must have still had quite a backlog to work through for it to take that long to pack up three items, but still they should have been honest about how long it would take. Incredibly, the package arrived only two days later, so I am quite impressed with the speed of the Royal Mail. But in the end, it took a month from when I ordered and paid for the merchandise to when I received it. Of course, a large part of that is no doubt due to the holidays and people taking time off combined with an increased number of orders around the same time.

Still, I was not impressed with the customer service given by Maelstrom games in not at all living up to the claims on their own website of the service they provide. Perhaps if their site hadn't claimed such good customer service, I wouldn't be so disappointed, but clearly they do not live up to their claims. I did save some money, but the extra time and hassle was probably not worth the few bucks I saved on the free shipping.

The other thing that really grates is that a few days after I placed the order, and over 3 weeks before it shipped, they sent me their e-mail newsletter announcing a 15% off sale. Had I known that some of the items were out of stock when I ordered, I could have waited a couple days to place the order and saved some money, and it wouldn't have taken any longer. Or if I'd known it was still going to take so long, I could have canceled the order and placed it again later, but my credit card had already been charged, and I'd probably be out the currency conversion fee. So that was pretty annoying.

Anyway, if any of you out there have had dealings with Maelstrom games and their customer service, let me know what your experience was like.

Monday, January 18, 2010

Wargames Factory Vikings review and using them in Warhammer Fantasy

I've had my eye on Wargames Factory for a while now, mostly because of the Liberty and Union League, where the public at large could suggest future products. It was an interested idea, and some of the suggestions proved popular enough to make it to the production line, with some other interesting projects in the works.

Unfortunately, none of their products had interested me much because I don't do any historical gaming in 28mm. But I still liked following their progress as a very young miniature company with some interesting ideas. Recently I finally got around to ordering some of their figures, since I couldn't resist the nice looking vikings. Wargames Factory seems to have both very strong supporters, and very strong detractors, on various message boards, so I was looking forward to seeing for myself what they are like. The next three paragraphs detail my ideas of how I might use the figures in Warhammer Fantasy, so if you have no interest in that, feel free to skip them. I won't be offended.

Now, as I said, I have no use for 28mm historical figures. However, when I first heard they were working on plastic Vikings, I thought they might be worth picking up to use as Warhammer Fantasy Chaos Marauders. After all, they're pretty much supposed to be the Warhammer Fantasy version of Vikings, and it would be nice to have some Chaos Marauders that don't look so... over the top. Unfortunately, I quickly realized that the slighty smaller, and much more realistically proportioned, Wargames Factory Vikings would look scrawny next to my existing Chaos Marauders.

If I didn't already have some of the plastic Games Workshop Chaos Marauders, I'd really consider using the Wargames Factory Vikings as my Marauders, since they look more reasonable. That would have the added bonus of making the Chaos Warriors look more intimidating. As it is, the Chaos Marauders look like they are actually bigger and much stronger than the Chaos Warriors, who under that huge armor must actually be pretty small. And the marauders would look more in line with their stats. They are statwise the same as an Empire Swordsman, but they look way bigger and stronger, which seems silly. But since I already have some of the plastic Chaos Marauders I didn't want to go to waste, that wasn't an option.

Then I figured maybe they'd be good to use as Empire Militia or Free Company or even bowmen. As I said, the Games Workshop Empire figures are much smaller than the huge Chaos Marauders, so they'd probably fit in better in terms of size. And they could always represent some hired mercenaries from the north to explain their different style of dress and weapons. So that's pretty much how I talked myself into buying some Viking figures that I had absolutely no need for. Luckily for you, my compulsion to buy new toys is your gain.

And... we're back. I ordered 3 of the Viking Sampler Pack directly from Wargames Factory, for a total of 24 Vikings, 12 unarmored and 12 in chain mail. I believe, when the figures are released as a box set, the intend to offer separate boxes of armored and unarmored. At any rate, the order was processed, shipped, and arrived fairly quickly, so no troubles there.

Each set is three separate sprues. One with 4 unarmored bodies and 24 arms, one with 4 armored bodies and 24 arms, and one with 12 heads, swords, spears, shields, axes, and some other extras. There are good close-up pictures of the sprues on the Wargames Factory website, which is nice of them. If you're too lazy to go there, here are a couple pictures I took of two of the sprues.
Wargames Factory Vikings

One pretty minor, but kinda cool, thing about the Wargames Factory sprues is that they are designed to stack on top of each other and stay together. Not a huge deal, but really makes it easy to keep the assembly area tidy.
Wargames Factory Vikings

So I did some cutting out and assembling. The figures are pretty nice, with a huge variety of options in putting them together. As I said, for each set of 4 bodies there are 24 individual arms, plus the weapon sprue include two sets of arms to use for holding two-handed weapons. So there are tons of options, and you'll have plenty of arms left over, which you can try to think of some suitably gruesome use for. The weapons are all separate from the hands, which is good for customization, but it does require that the thumbs be sticking up in an awkward way so the weapon handles can be slid in. With the next ones I assemble, I'll probably try bending the thumb a little before gluing the weapon in place, or cutting and repositioning it, or just removing it and making a new one out of putty.

When preparing the figures, I noticed that the mold lines were extremely slight and hardly noticeable in most places. This is good, though, because some of the parts were arranged so that it was hard to scrape the mold lines without messing up some of the finer details. There were also some pieces that were attached to the sprues in places that made it hard to clip off and clean the bit left without damaging some detail. Then again, this is the case with most plastic sprues, since you have to attach them somewhere. But there is some room for improvement in the sprue layout, I think.

One complaint I have read is that the detail on the Wargames Factory miniatures is not very crisp. This may have applied more to the earlier sets, as I understand this has been greatly improved over time, and the Vikings are their most recent set and the only one I have seen in person. Still, it may be a fair criticism. Some of the detail, especially on the front of the body with the quilted pattern, is very shallow. I'm sure it will look fine once it's painted, but the shallow detail might make it harder to paint than if it was more defined. Oddly, the back of the body with the quilted pattern has much better definition, so they are clearly capable of getting good, crisp definition. I'm not sure why the front isn't as good. They are obviously trying to make the figures more realistically proportioned than most other figures, which is part of the reason they don't have as dramatic of lines, but I think some things need a little exaggeration to make the painting easier.

Another complaint I had read was that the figures look awkward or that it is hard to get them to look right or have good poses. I don't think that's true at all. Honestly, I think those complaints might be from people who are only used to assembling metal miniatures that don't allow any posing or customization. If you don't have any experience at all trying to pose multi-part miniatures correctly, I could see how it might take some practice to get the hang of it. But I think anybody that is used to multi-part plastic kits will have no trouble getting some great looking poses out of these.

Overall, I think they are nice figures and they are great fun to assemble with all the different options you have. And for the money, they are an exceptional value. And considering how much they seem to have improved in the short time they've been around, I expect and look forward to some really great stuff from Wargames Factory in the future. Hopefully I will be able to review some of their future offerings, if they release anything else I can think of an excuse to buy.

Now, back to my original idea. Can these be used in an Warhammer Fantasy Empire army? Well, look below for some comparison photos of the Wargames Factory Vikings and some Games Workshop Warhammer Fantasy figures. First, a picture of some of the separate pieces. On the far left, we have a column of Empire Spearmen and Empire Free Company bodies/legs. The next column in the Wargames Factory Viking bodies. The next column to the right has two Chaos Marauder heads, followed by two Chaos Marauder arms holding weapons. The next column over to the right has two Wargames Factory Viking heads, followed by two of the Viking arms and separate weapons. The column farthest to the right shows two Empire Free Company Heads, followed by three Free Company arms, two holding weapons.
Wargames Factory Vikings Warhammer Comparison

As you can plainly see, using the Wargames Factory Vikings as Chaos Marauders isn't going to work. At least, not if you want to have any of the Games Workshop Chaos Marauders in the same army. The Chaos Marauder arms and heads are huge in comparison to those of the more realistically proportioned Vikings. I didn't bother to compare the bodies, but the difference there is equally large. However, the Empire bodies are actually pretty close to the Viking bodies. The Empire heads are a little bigger, and the arms and especially the weapons of the Empire figures are much larger. First I thought I'd see if it was possible to share pieces between the Vikings and Free Company to make a conversion. I just used to blue tack to hold them together so I didn't have to glue them. Here's how they turned out.
Wargames Factory Vikings Empire Free Company Conversion

Those are Viking bodies with Empire Free Company arms, weapons, and heads. They don't look too bad, actually. The arms are a little big compared with the body and legs. And the weapons are huge, but that's true of the regular Free Company figures. So I think some limited conversion between these and some of the Games Workshop Empire kits might be possible. You obviously wouldn't want to use one Viking arm and one Free Company arm, of course.

What I was really after, though, was just to have a unit of Free Company made out of the Viking figures to use in my Empire Army. So I just needed to find out of these figures would look okay, or out of place, if they were in separate units in the same army as my existing Empire figures. So I put together one of the Vikings and took some pictures comparing it to some of my existing Free Company. Note that I used the two-handed swing set of arms to show that it can look pretty good if done right. I had seen some complaints about those arms being impossible to get to look right, but I think mine turned out pretty well.

Wargames Factory Vikings Empire Free Company Comparison

So, they look pretty close. I probably wouldn't want them in the same unit next to each other, because it would just draw attention to how different the proportions are, and the different sculpting style. But as a separate unit of Free Company mercenaries in my existing Empire army, I think they'll work great.

As of writing this, I hadn't been able to find anything online with good size comparison shots of Wargames Factory stuff next to Games Workshop stuff, or any reviews of the Wargames Factory stuff that focused on the possibility of using them in games of Warhammer. Believe me, I looked quite a bit for some before ordering these vikings, since I didn't want to waste the money if they'd be completely incompatible. So hopefully anyone thinking about getting some Wargames Factory stuff to convert for use in Warhammer will be able to find this post and get some use out of it.

By the way, it looks like you can get a bit of a discount on the Wargames Factory Miniatures on Amazon. And, of course, you can always find a lot of Games Workshop stuff.