Setup
I was the defender, and had 2000 points of Tyranids. Attacking me was 1000 points of Ultramarines, and 1000 points of Space Wolves. Since we had played the first standard Planetstrike mission a few times, we decided to try a different one. I had already picked out a nice looking table to play on, which happened to have a nasty looking river running through it, with a bridge right in the middle. So we decided to play the mission where the attacker must capture the single, central objective.
Basically, I had to split my army in two, and my opponent could pick which half I started with. We decided that I'd just number the two groups and they'd pick without knowing what was in them, but I'm not sure if that is the intention or not. In any case, I had pretty even forces in each group. The starting group I could deplly anywhere as normal, but the rest of my army would have to come on in reserve. And not only that, but I would be at -2 to all reserve rolls for the entire game! So my initial half would have to hold its own for a while. I did get two extra points of building strategems to use on the bridge, though they never came into play in the game. And those strategem descriptions assume you are getting them for a building, not a bridge, so most didn't make any sense anyway.
The attackers would arrive as normal for planetstrike, each unit turning up on 3+ on turn 1, and any could deep strike if they wanted. On the plus side, in order to win the attackers had to have the only units in base contact with the bridge at the end of the game. If I had a single model touching the bridge when the game ended, it would be a victory for the defenders. We figured that after the Tyranids over-ran the area, a counter attack was mounted, but in order to press the attack they'd need to capture the bridge so they could move troops and supplies forward.
Story
Since their initial landing on Planet No-Name, the Tyranid forces have taken over a large area of the planet. Planetary Defense Forces had dug in to mount a defense in the populated areas around the River Morbus. The PDF Forces were completely over-run. The Tyranid invasion stalled slightly as they paused to hunt down and devour all the remaining civilians in the area. The Imperial forces too the opportunity to organize for a counter-attack. But to get at the main body of the Tyranid invasion force, they would need to cross the River Morbus, and the Tyranids controlled the only remaining bridges in the area, and crossing further up or down river is more difficult as the river was much wider. In order to sustain an attack that would require moving a lot of men and supplies, they would have to capture that bridge.
Luckily for the people of Planet No-Name, unbeknownst to them, their planet contains something of incredible importance, which very few know about. A secret installation in the middle of the wilderness, which the Tyranids had already captured. It would have to be retaken. So important is this facility, that two different Space Marine chapters sent squads to help defeat the Tyranids so that it could be recaptured. The Ultramarines and Space Wolves each sent several squads, about a half company all told, for the mission. It was decided that the Space Marines would work together to capture the bridge intact and defend it, while Imperial Guard and PDF forces remained ready in armored columns to rush across the bridge and take the offensive right into the heart of the enemy!
Pre-Game
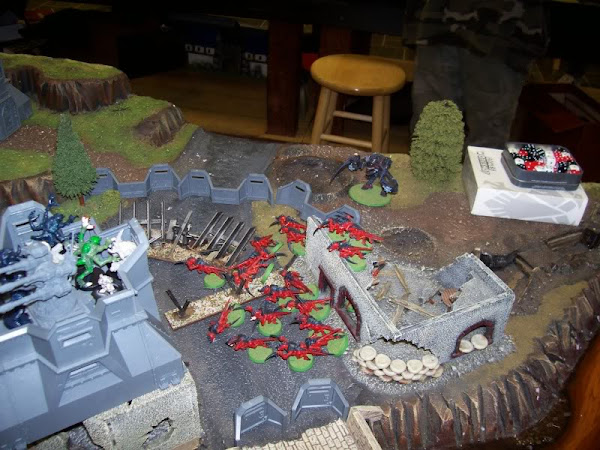
Here are the initial positions of the Tyranids. Roughly from right to left in the pictures are: a Carnifex with barbed strangler hiding in a ruined building, a unit of 20 hormagaunts in another ruined building, a unit of 10 genestealers with extended carapace in a bastion, the lonely Zoanthrope on the bridge that was the objective, a Hive Tyrant with lash whips, bone sword, and venom canon with 3 guard in the trenches, and a unit of 6 Ravenors in the tall Bastion. The rest of my army was in reserve.


Space Marine Turn 1
The Space Marines had decided not to deep strike anyone, and to move their entire army on from their board edge. Perhaps not knowing what kind of counter attack they would face made them cautious. Rollling the reserve rolls, the Space Wolves had everything show up on the first turn, and the Ultramarines got everything but two 5-man combat squads.
The Space Wolves anchored the flanks, with a unit moving along the street on the right flank towards the other bridge (which was presumably too damaged to support vehicle traffic, and therefore not an objective). The rest of the space wolves advanced on the far right flank, a alrge unit with their commander moving up the street, and another unit moving into the woods. A Lone Wolf with lightning claws came down the trench and hopped out towards the Carnifex in the ruined building.
The Ultramarines deployed between the Space Wolves, with one unit on their far right moving down their trench line, and another on their far left taking up firing positions behind some sandbags, and everyone else between (including a unit of 5 Terminators with Assault Cannon led by a Terminator Librarian) advancing up the middle. Most of the army ran forward at full speed. Some of them, most notably the Space Wolves on the left flank, were slowed significantly by the difficult terrain. The Terminators stopped to fire at the lone Zoanthrope defending the bridge, but to no effect.


On my first turn, I rolled for my reserves, needed 5+ for each unit to show up. Still, I managed to suceed with three of them! Then came the roll to randomly determine which board edge they would arrive on. Considering that we were playing on an 8' wide table, and the only objective was right in the middle, arriving on one of the short edges wouldn't be very helpful. Naturally, two of my three units did just that. Luckily, they were two fast moving units, a unit of 16 Gargoyles, and my flying Hive Tyrant. Both moved onto the board on my left side as far as they could while landing in a clear area. I intented to have the Gargoyles run into the trenches, but they had other ideas and I only rolled 1" for their run movement.

The Space Marines got one of their reserve units on turn 2, a unit of 5 Assault Marines, one a sergeant with a power fist. He landed next to the ruined building with the Carnifex. The nearby marine unit advanced in the trench and got a meltagun shot at the Carnifex, wounding it. The Assault Marines and the Lone Wolf then charged the Carnifex, the sergeant and Lone Wolf each wounded the Carnifex, leaving it with only one wound remaining. The Carnifex managed to miss with all of it's attacks. On the Marine's far right flank, the Space Wolf unit moved up to get some meltagun shots on the flying Hive Tyrant, which I foolishly did not screen with the Gargoyles. They managed to wound it once.


Another unit of Tyranids arrived from nearby, this time 10 Genestealers, which also arrived on the short table edge to the Tyranid left. They moved up as far as they could behind the Gargoyles, who flew into the safety of the nearby trenches. The flying Hive Tyrant, on the other hand, was a little more aggressive. He flew towards the Space Wolf unit that had wounded him and charged into them in a fury of slicing chitin, butchering 5 with his scything talons and trampling several more as they panicked at the intensity of the attack.


Awesome battle report ... nice looking board and nids ... the space marines made me sad as they aren't painted and that interrupted the spectacle for me. Again cool post ... thank you!
ReplyDeleteThank you, Lord of Excess. They do have some really nice looking tables up at the Battle Bunker. I agree it is a shame that some of the Tyranids and Ultramarines, and all of the Space Wolves, Bastions, and Barricades were unpainted. If everything had been painted, it would have been quite a spectacular looking battle!
ReplyDelete