The Setup
This was another game played at the Battle Bunker using my Tyranid army, this time against a friend's Imperial Guard at 1750 points. It would be a continuation of my previous several battles, following the exploits of my Tyranids as they continue to devour Planet 18-D93. We decided this battle would take place on the continent already conquered by the Tyranids, and involve a small Imperial Guard force that had been left behind and somehow survived the scouring of the doomed continent.
We decided to play a Battle Mission, selected randomly from the Tyranid and Imperial Guard missions as normal. However, we agreed that regardless of the mission rolled, we would again treat all area terrain as dangerous, representing the fact that the continent is breaking apart and spewing up hot gasses, magma, jagged rocks, etc. The mission we rolled was a Tyranid one, called, ironically, First Contact.
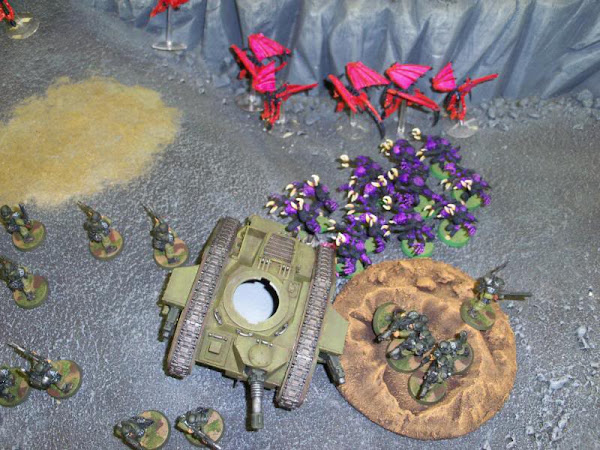
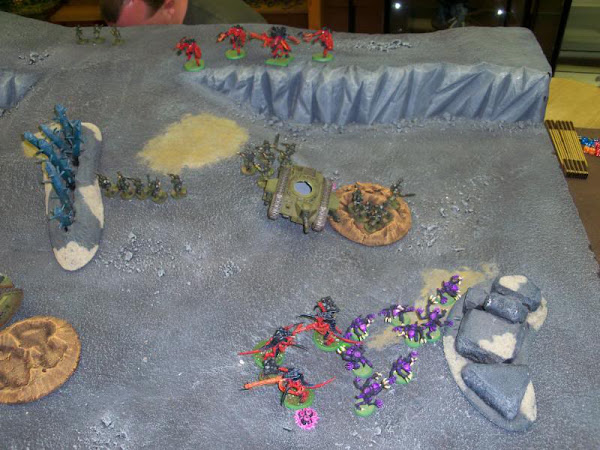
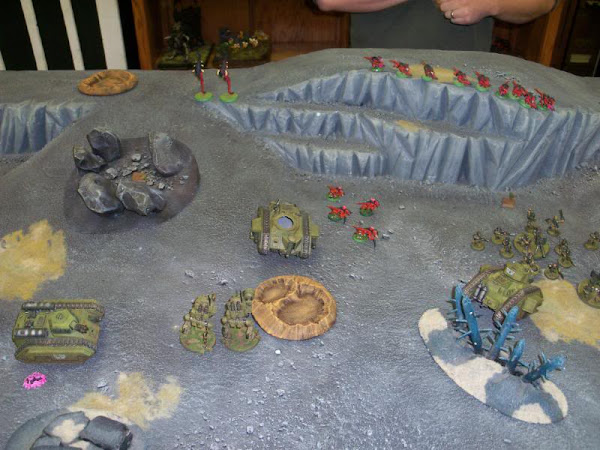
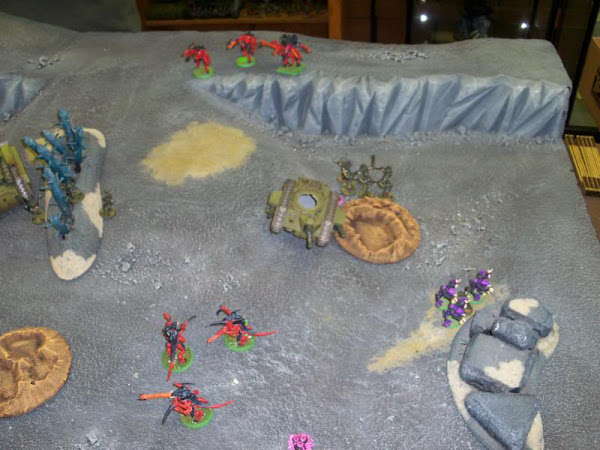
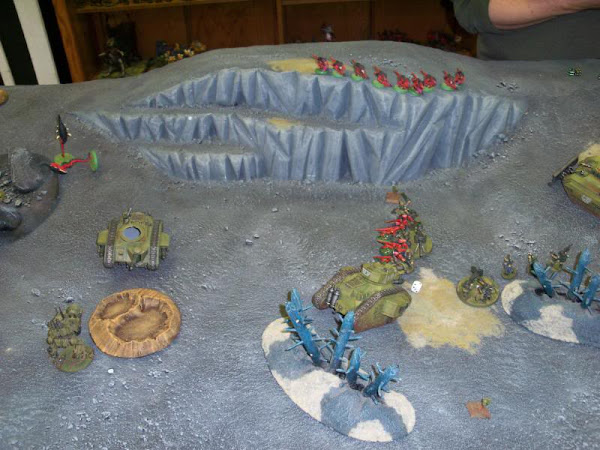
The board was split into six equal parts, with an objective in the center of each part. The Guard deployed their entire army first, rolling for each unit to determine which part of the board it had to deploy in. The Tyranid army would move onto the board on the first turn, also rolling randomly for each unit to see which part of the board it had to move onto. For this mission, all non-vehicle units counted as scoring units, and the army with the most objectives at the end of the game would be the winner. The Imperial Guard deployed mostly in a line across the center of the table, as seen in the images below of their initial deployment.
The Story
A lost company of Imperial Guardsmen, along with an armored company supporting them, managed to hide in an underground bunker from the Tyranids and survive the scouring of the continent. They've waited a while now, with no contact with the outside world. Running low on food, and facing the danger of increasing seismic activity, their captain decides to send out a reconnaissance party to determine the situation on the surface.
The guardsmen emerge from cave openings and spread out, but find no trace of life left on the dangerous, rocky surface. They soon encounter a few Tyranid bio-pool openings sticking out of the rock, letting them know that the Tyranids have not yet left. Just then, previously hibernating Tyranid organisms emerge out of crevasses in the rock and surround the recon party. Now they are in a fight for their lives to escape, retrieve any stranded men or equipment, and if possible destroy the birthing pool openings that had detected their presense.
Tyranid Turn 1
Emerging from crags and crevasses in the rocky terrain, the Tyranids seemed to come out of nowhere to nearly surround the guardsmen. The Tyranids had limited armor penetrating ability to deal with the impressive array of three Leman Russ's, two Hellhounds, and three Sentinels. On the other hand, there weren't all that many guardsmen to kill.
Two large units of Hormagaunts moved in a pincer attack simultaneously from the North and South, but found mostly armored defenders they would be unable to harm. The Flying Hive Tyrant, backed up by a unit of Termangants, boldly swooped down onto the edge of the cliff to the North, threatening the entire center of the Imperial Guard line. A unit of three Zoanthropes just managed to get within range to destroy one of the Leman Russ tanks with their potent Warp Lances.
On the East side of the battlefield, units of Tyranid Warriors moved on from the South and East, with those on the East side taking cover behind a rock formation. A unit of Gargoyles swooped down from the North, following by a Hive Tyrant with three Tyrant Guard (not pictured) just behind them. All fired at nearby Guardsmen, but with little effect. A unit of Genestealers also attacked from the East, running at full speed to assault the nearby Leman Russ battle tank. Piling on the tank, they managed to rip it apart with their vicious Rending Claws.
Imperial Guard Turn 1
The surrounded Guardsmen impressively held their nerve, and responded immediately to the sudden attack. The one remaining Leman Russ in the center fired at the Hormagaunts to the North, and blew most of them apart with a single shot of its mighty cannon. At the same time, the Hellhound to the West burned many of the Southern group of Hormagaunts. Most of the rest of the forces on that side of the battlefield directed their fire at the imposing form of the Winged Hive Tyrant, as officers pointed to the monster frantically shouting "bring it down!". Their men obliged, and the Tyrant succumbed to the huge weight of fire, its shredded carcass tumbling down the cliff face.
On the Eastern side of the battlefield, the other Hellhound fired on a unit of Tyranid Warriors, killing one and severely wounding another. The StormTroopers backed away from the other Tyranid Warriors and formed a disciplined firing line. Unfortunately, their fire did very little, except for a Meltagun shot that exploded one of the alien creatures outright. The Guardsmen in the crater fired on the nearby Genestealers, killing several with their flamer. The remaining men fired on the Gargoyles, killing about half of them. With their impressive firepower, the Imperial Guard had quickly taken out much of the bulk of the Tyranid force, greatly reducing their numerical advantage.
Tyranid Turn 2
The Hormagaunts in the South were far outside Synapse range, and were unsure how to proceed. They moved towards the nearby Hellhound and then, upon discovering it was inedible, simply milled around a bit. The Hormagaunts to the North, however, urged on by the nearby Zoanthropes, sprinted forward a full speed to charge the nearest unit of Guardsmen, easily slaughtering them all in a frenzy. The Zoanthropes themselves moved forward to unleash their Warp Lances on the unit of Sentinels, destroying one, but losing one of their own to psychic overload. The Termagants on the cliff lined up at the edge and fired down on their enemy, but only managed to kill a few Guardsmen.
To the East, the remaining Hive Tyrant moved along the cliff edge, while the Gargoyles assaulted two squads of Guardsmen. The surviving Genestealers assaulted a special weapon squad, and the Tyranid Warriors to the East managed to scramble over the rocks fast enough to pounce on the Storm Troopers. The Tyranid Warriors in the South advanced towards the East and fired on the Storm Troopers, but their fire was ineffective.
When the dust had settled, the Gargoyles were all dead, having been easily beaten by the combined force of two units, though the Guardsmen took some casualties in the process. The Genestealers, conversely, easily wiped out their enemy and consolidated away from the command unit in the nearby crater, not wanting to experience another burst from their flamer. The Tyranid Warriors killed all but two of the Storm Troopers, but the remaining two bravely held their ground.
Imperial Guard Turn 2
On the Western side of the battlefield, the Hellhound roasted most of the remaining Hormagaunts on the Southern flank, and the few survivers fled the field. The other Hellhound fired at the Termagants on the cliff face, as did some of the Guardsmen. The combined fire killed more than half of them, but the nearby Zoanthropes forced them to hold their ground. The Leman Russ tank fired everything at the Hive Tyrant, killing one of his Tyrant Guard and wounding another. The unit of Guardsmen with special weapons near the center of the battle attempted to cross some jagged crystaline terrain, but the dangerously shifting ground caused two of them to be killed in the process. The command squad in the crater to the East scrambled out and fired on the Genestealers, killing another four, while the unit behind them moved up to capture the objective behind the tank hull.
The brave command squad assaulted the remaining Genestealers, but only managed to kill one of them while dying to a man. It was a desperate and glorious charge that would be long remembered by those who witnessed it. Meanwhile, the Tyranid Warriors easily finished off the last two Storm Troopers, who paid for their courage with their lives.
Tyranid Turn 3
The two Zoanthropes again advanced and fired their Warp Lances at the Sentinels, destroying another of them. In the process, a Zoanthrope was again wounded by the powerful psychic feedback. The Termagants moved to the East a little to get some shots at the Guardsmen below them, managing to kill a few. The four remaining Hormagaunts enthusiastically assaulted the remnants of two separate squads of Guardsmen. Both squads, at the limit of their endurance, broke and fled for the cave openings, though there were two few Hormagants left to pursue them.
The Hive Tyrant advanced and fired at the Eastern most unit of guardsment, killing two of them. The remaining Tyranid Warriors all grouped together to fire at the weak rear army of the nearby Hellhound, which had done so much damage. Even with so many shots, they failed to do any harm to the vehicle.
Imperial Guard Turn 3
The Imperial Guard command squad, sensing time was running short, quickly moved to retrieve some important equipment before the inevitable withdrawal back underground. To cover the escape, the Leman Russ opened fire on the nearby Tyranid Warriors, killing another two.
At this point, we had to end the game as the store would be closing soon. The Guard controlled two objectives, and the Tyranids none.
The Result
Though most of the Guardsmen had been killed or wounded, the Tyranids were having difficulty dealing with the remaining Imperial Guard tanks. The powerful weapons of the vehicles were causing fearsome casualties, and the Hive Tyrant withdrew the rest of the Tyranids to avoid their destruction. They would return when they had time to gather the proper forces to combat enemy armor. The Guardsmen were then able to retrieve their wounded men and lost equipment and return to the safety of their underground bunker without it being discovered.







No comments:
Post a Comment