So rather than try to decide on weapon options that I'd use forevermore, I decided to try to magnetize my Tyranid Warrior arms. This way, I could easily switch out which weapons they used from game to game, and have more options available to me to try out. I mention all this because it pertains to the subject of this post, which is tips on how you can magnetize your own Tyranid Warriors. Through the process, I learned some helpful (and sometimes harsh) lessons on the subject, and being the helpful kind of guy that I am, I thought I'd share them with you.
First, you'll need some tools and supplies. Here's what I used:
- Manual drill with small bits - I used 1/16" and 1/8" drill bits, but it depends on the size magnets you use. Do not use a power drill for this, it is way too easy to mess up. A manual drill, or even just spinning the drill bit with your fingers, will give you much finer control. It will result in sore fingers, but it's worth it.
- A set of metal files.
- Super glue
- Some unassembled Tyranid Warriors
- Magnets - I used two different sizes, 1/8" long by 1/8" diameter cylinders, and 1/16" long by 1/16" diameter cylinders.
I will henceforth refer to the two sizes of magnets as the big magnets and the small magnets, respectively (even though they are both pretty small). The reason I used two different sizes was that the larger ones are stronger, and fit really well in the arm sockets of the body and in the Rending Claw arms, but are just barely too big to fit into the other arms. I used the small magnets in the shoulder joints of the arms, since they are lighter, and the large ones wouldn't without some greenstuff to cover them up. If you don't mind doing some greenstuff work, the magnets might hold better if you use the big magnets for everything, and just cover the big magnet sticking out of the arms with some greenstuff that you form to look like a shoulder.
The big magnets I ordered from amazon.com. They come in a package of 100. If you only want to use them in the body and the Rending Claw arms, you'll only need six of these for each Tyranid Warrior. If you use them for everything, the number you need will depend on how many options you want available, but at most you should need 14 for each Warrior.
Magcraft does make other sizes of magnets, but unfortunately amazon.com doesn't have anything smaller than those. The small magnets I used for this project were ones I already had, which I had left over from some previous magnetizing project. If you're following along at home and need to get some small magnets, you could check out the K & J Magnetics website. They sell all different sizes of magnets in various amounts, so you should be able to find anything you need there. The small magnets I used were the same size as these.
Now that you've got all that, you're ready to get started
Tip #1: Do not assemble the Tyranid Warrior bodies until after you've attached the magnets. This is one of those tips I learned the hard way. Unfortunately, I had already glued together my Tyranid Warrior bodies before I got the idea to magnetize all the arm options. This made things much more difficult than they needed to be. I believe it would be much easier to glue the magnets in the body before gluing the two body halves together. Thankfully, while doing this the hard way, I did manage to come up with some ways to make things a little easier. So even if your Tyranid Warrior bodies are already glued together you can still manage this without too much trouble. If you haven't already, then don't and it'll be a little easier.
The first thing to do is make the holes to hold the big magnets in the body. If you haven't already glued the body together, you can probably start to hollow out the arm socket areas with a hobby knife, then use a round file to finish it off to just the right size to hold the 1/8" diameter cylindrical magnets. If you have already glued the bodies together, you could drill out the arm sockets with a 1/8" drill bit, but this might leave too big of a hole with too much of a gap around the big magnets. I drilled a smaller hole, and then used files to widen it out until it was the right size. This takes much longer, obviously.
If the bodies are glued together, you want the hole to be a little bigger than the magnets so there is some slack. That way, when you put the magnets in to make sure they fit, they won't get stuck. You don't want that to happen. If you haven't glued them, it doesn't matter so much. Lucky you. I had some problems when I tried to glue the magnets in place where they wouldn't go in far enough, so I had to push them out with a file from the other side, widen the opening, and try again. Or worse, I would push too hard and it would go in too far and be loose in the body cavity. Or even worse, I'd push one in too far after already gluing the magnet in the opposite side, so there was no way to push it back out. Or after gluing in one side, when trying to glue the other side the pull from the first side pulled the magnet out of place before the glue set. On the last one I did, I made a wondrous discovery:
Tip #2: Three of the big magnets attached end to end are exactly the right width to fit in body between the upper arm sockets. Try it, it really works. Once you've got your hole drilled or filed big enough, take three of the magnets attached end to end, and slide it through the upper arm sockets and center it in the body. You might have to run the file through the whole body a few times to get the right and left socket holes lined up so that it is a straight shot through the body. Once you've got that done, the magnets should come flush to right about where the deepest part of the plastic in the arm socket used to be. That's exactly what you want.
The same can't be said for the lower arm sockets, unfortunately. Three of the big magnets end to end is way too long, and two is just a bit too short. Especially since you'll want the lower socket magnets to stick out just a bit more than the upper ones, since it will make attaching the two-handed gun arms easier. I had a few extra really thin disk magnets I stuck between two of the big cylinders, and that made it the right length. You could try out other things, like just gluing a thin piece of plastic or sheet styrene or anything the right thickness between two of the cylinders. Just make sure they are oriented the right way.
Tip #3: Always check the orientation of your magnets before you glue them. At this point, you have to make sure that the side and right side have opposite polarity. If you use the row of three cylinders together, that takes care of itself. But you also make sure that the bottom set of magnets is oriented the same way as the top set. So you want both left arm sockets to have the same polarity as each other, and both right sockets to have the same as each other (and opposite from the left).
So after you glue in that row of three big magnets in the upper arm cavity, you should magnetize your first set of arms, say a set of Scything Talons. If you have a bad memory and are worried about gluing them in the wrong way, here's a simple method of getting it right. Stick one of the little magnets onto the big magnet in one of the arm sockets, say the left. With a permanent marker, mark the side that is facing out. When you glue the magnet into the left arm, make sure the mark is on the inside, and not showing. Then do the same with the right side and right arm.
To make the hole for the little magnets, I just used a 1/16" drill bit with my manual drill. You'll have to hold the arm up to the socket and sort of eyeball where you want to drill the hole in the arm and at what angle. The two magnets will end up with their flat ends touching each other, so keep that in mind and try to drill at the correct angle that will result in the arm in the position you want it. A little variety is fine, of course, but if your drilling angle is really off, it's going to look strange. So don't vary it too wildly.
This next thing is important, so I'll put it in bold:
Tip #4: Make sure to leave a little slack in all the holes you are making for the magnets. This is particularly crucial here. If you slide the magnet in to see if the hole is deep enough yet and the fit is too tight, you'll never get it back out, and if the hole wasn't deep enough it'll be sticking out. You don't want this. So make sure you twirl the drill bit around while you drill to make the hole just a little bigger. Go slowly, and check often (but carefully) to see if the hole is deep enough yet. You want the magnet to come just flush with the plastic. If you make it a little too deep, you can file down the plastic a little bit BEFORE you glue the magnet in, but don't do too much of that.
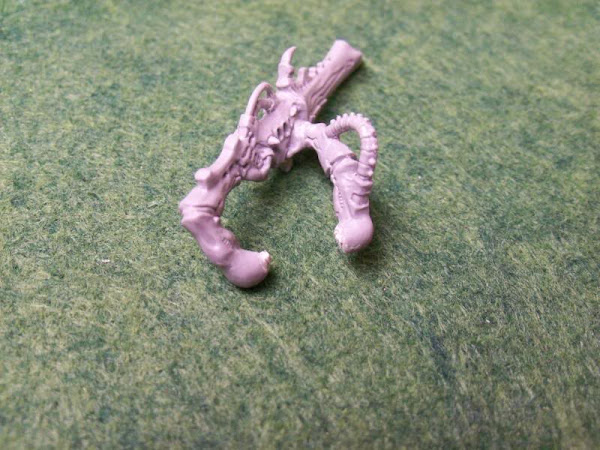
Once the hole is the right size and depth, put the tiniest amount of super glue in the hole and push the magnet in, with the marked side not showing. Let that dry, then do the arm for the other side. Once you've got a set of arms, you can easily test to make sure the big magnets for the lower arm sockets in the body are oriented the right way before gluing them in. Slide them into position and see if the arms attach on the correct side. Here you can see the body with the magnets glued in place.

With the body magnets in place, it's easy enough to do all the other single-arm weapon options (Spinefists and Rending Claws) the same way as the Scything Talons. The shoulders are the rending claw arms are big enough to use the big magnets in them instead of the small ones, but just barely. I'd advise doing it to give a stronger hold, just be careful to drill out the hole right in the center so you leave some arm around it.
I made additional use of the Rending Claw arms. I had some of the very old plastic Tyranid Warriors that have Boneswords. They don't fit at all with the current Tyranid style of miniatures, but I figured I could use their Boneswords. So I cut the hands holding the Boneswords from the arms, and cut off the hands from the Rending Claw arms. I then used the small magnets inside the arm and in the Rending Claw and Bonesword hands to allow switching between the two. Another reason for me using the bigger magnets in the Rending Claw shoulders was to support this extra weight, which it does well.
The two-arm weapon options are a little trickier. I didn't try to magnetize any of the heavy weapon arms, the Barbed Strangler or Venom Cannon. They might be too heavy for it to work. But it is possible to magnetize the Deathspitter and Devourer arms. You might be able to do it easier by magnetizing the join between the two arms holding the gun, but again this might make it too heavy. What I did was get some blu-tac to temporarily hold the two together and put the arms in position to judge the angle and location I needed to drill the magnet holes. I then drilled the holes, but not quite as deep as the others, so the magnet sticks out a bit from the shoulder.
You'll recall earlier I said that you want the bottom set of magnets in the body to stick out a little more than the upper ones, and this is why. I wanted the two-handed weapon options to be the lower set of arms. You won't be able to switch them between lower and upper arms because the width of the body is different at the top than at the bottom. Anyway, after drilling the holes but before gluing them, slide them in and try to fit the arms together so that the two arms join where they're supposed to with the magnets sticking to the body. You might have to mess around with different hole angles until you get this right. When it looks right, leave the magnets stuck to the ones in the body, put a tiny bit of super glue in the shoulder holes, and put them back in the position you had them. Hold them in place until the glue dries. Then place a little bit of super glue or plastic cement on the place where the arms are supposed to join. Put them back in position again and hold them until it dries.
Now hopefully, if you've done this right (and are lucky), it should be possible to slide the set of arms off the body by moving them straight forward from the body, one shoulder socket at a time. You might have to try to bend the arms just a little. If you'll notice, there are ridges going all down the Tyranid Warrior body, and you should be able to slide the shoulders between two ridges to remove the weapon. Once the model is painted you'll have to be pretty careful doing this to avoid chipping or rubbing the paint off.
Here you can see some pictures of the arms with magnets installed.


That's about it, really. Now go do all of that many, many more times. Then you're done! Afterward you'll be able to field your Tyranid Warriors with whatever weapon options you happen to feel like using on any given day. I'm sure you'll enjoy the overwhelming sense of freedom this gives you at having such endless possibilities opened up to your merest whim.
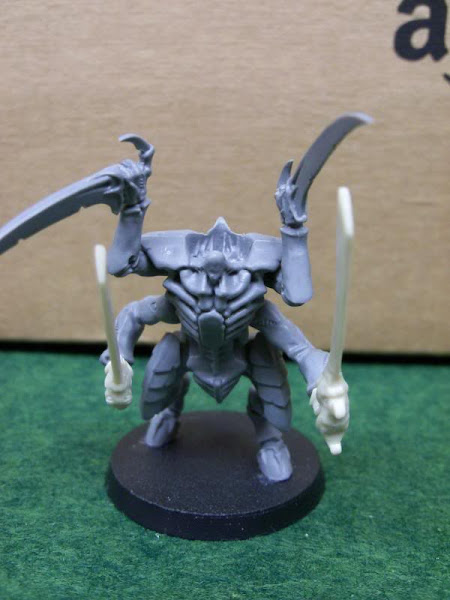
Here are pictures of several of the magnetized options being attached to the body.


Thats uncanny... I was just looking on the web for these magnets - not for attaching Tyranid arms but securing tank turrets. Excellent article.
ReplyDeleteBigLee put me on to this article (his Blog) and I agree - very well written and of use to me.
ReplyDeleteTony
http://dampfpanzerwagon.blogspot.com/
Thank you! I'm glad you found it helpful.
ReplyDelete