After defeating a magically empowered Ogroid Thaumaturge, Byron Manfred and his wight king companion charge headlong into a pulsing portal of flame that appears before them. The champions hasten towards what they can only hope will be their final confrontation with the Gaunt Summoner who rules the Silver Tower.
Showing posts with label fantasy. Show all posts
Showing posts with label fantasy. Show all posts
Monday, December 21, 2020


Monday, December 14, 2020
Warhammer Quest Silver Tower - Final Trial Part 2
The champions find themselves within a chamber dotted with amethyst crystals. Streams of howling ghosts pour from the cyrstals, distracting the champions with their maddening lamentations. Before the warriors stands the Gaunt Summoner, lord of the Silver Tower, who after several previous confrontations is now beginning to look somewhat pained and fatigued. Surrounding the daemon are more of his kairic acolytes, and the adventurers steel themselves to continue the grueling gauntlet prepared for them by the master of the Silver Tower.
Wednesday, November 11, 2020
Warhammer Quest Silver Tower - Final Trial Part 1
Byron Manfred opens his eyes to see the wight king standing guard over him. The necromancer can remember feeling the wight king's massive axe cutting into him, though his wounds have now disappeared, undone over time by the mysterious magic of the Silver Tower. Byron also vaguely remembers the now absent bestial fury that had overcome him, and obviously the wight king as well, which made them fight each other for possession of the fragment of Ghur. Suddenly Byron realizes that between them, they now possess all eight fragments of the Gaunt Summoner's amulet!
As the final syllables were uttered, the light flared bright, and from it stepped the Gaunt Summoner. No
illusion was this, no simulacra or trick. The Summoner had himself been summoned, and he stood before the
champions in all his infernal might. Yet the creature was not angry. Instead a shark-like grin split his hideous
features, and a malevolent chuckle shook his narrow shoulders. Very good, spoke the Summoner, very good. The
champions had brought him forth to battle. But were they ready? And if they were, which one of them would
claim his boon? Vital questions, sneered the Gaunt Summoner, but ones that would only see an answer if the
champions could keep up! With this, the daemon swept his staff in a great arc and with it tore reality aside like a
curtain. A glowing rent was left behind, and through this the Gaunt Summoner leapt. The champions exchanged
swift and telling looks, then plunged into the rift in pursuit of their tormentor.
Monday, October 5, 2020
Warhammer Quest Silver Tower - Trial of Ghur Part 2
Continued from Part 1
In our last episode, Byron Manfred, his wight king companion, and a darkoath chieftain hunted some of the strange beasts of the silver tower, following the currents of the winds of Ghur. After being consumed by a massive wolf made of pure amber, they found themselves facing another of the Gaunt Summoner's trials. After being surrounded by enemies in a passageway, the darkoath chieftain was taken out of action. Byron and the wight king fought on and, after a long struggle, defeated all of the adversaries facing them. After taking a short respite to recover the grievously wounded darkoath chieftain, the adventurers now prepare to continue their trial.
Monday, August 3, 2020
Warhammer Quest Silver Tower - Trial of Ghur Part 1
Byron and the wight king have just one more fragment to acquire in order to complete the gaunt summoner's amulet and reveal its true name. The wight king holds four of the fragments, while Byron has only three, making it vitally important that he be the one to lay his hands on the final fragment. They know the last fragment is the one associated with the wind of Ghur, and so they follow the trail of any dangerous beasts they encounter as they explore the constantly shifting silver tower, hoping this will lead to an area steeped in the magic of Ghur.
They soon encounter a barbarian fighting his way through the various wandering beasts of the tower. The fierce looking warrior calls himself a darkoath chieftain, though he looks like a savage marauder of the northern wastes. The chieftain appears to only desire to hunt down the strongest adversaries he can find in the tower to prove his worth to his nefarious gods. Thinking that he will not only be helpful in a fight but also likely to lead them to areas of the tower strong with the magic of beasts, Byron arranges to explore with the darkoath chieftain to help each other find strong enemies to vanquish.
After following the darkoath chieftain's lead for a while, the champions find themselves in a vast and echoing gallery from whose vaulted ceiling hangs the dusty skeletons of mythical beasts. Beneath those skeletal curios stands a vast statue, a monstrous
wolf graven from a single immense block of purest amber. The champions gasp in horror as that
lupine behemoth stirs, its eyes opening to spill wintry light throughout the chamber. Blades are drawn and
incantations readied, yet it is all for naught.
With a single great drawing-in of breath the giant wolf sucks the
champions from their feet and into its yawning jaws. Through a terrible void they tumble, surrounded by the
howls and roars of bestial things, before at last plunging down upon a hard stone floor. As the champions rise
shakily to their feet, there can be no doubt in their minds that another trial has begun.
Monday, May 25, 2020
Warhammer Quest Silver Tower - Trial of Aqshy
Byron and his wight king companion wander a long time in search of their next trial. Byron knows the final two amulets they must acquire will contain the powers of the winds of Aqshy and Ghur, so they search for areas of the tower that seem to be influenced by the winds of fire or beasts. Byron therefore takes it as a good sign when they happen upon a strange dwarf who refers to himself as a fyreslayer doomseeker. The orange-haired fyreslayer is searching for something he calls ur-gold. Byron convinces the doomseeker that they should join together to help each other search the tower, offering to let the fyreslayer keep any ur-gold they manage to find.
Eventually the champions come to a place where there is only one way forward: an ominous tunnel set low in a solid wall of brass. With little choice they fall to their hands and knees, crawling one after another into that steaming darkness. The further they crawl, the greater the temperature becomes, yet at the champions’ heels the tunnel rumbles shut like the closing gullet of some terrible beast. For long moments they crawl on with ever greater haste, sweat running freely down their scalded faces at the touch of hot brass. Just as they feel they can crawl no further, the champions scramble from the hideous tunnel and into the sweltering space beyond, a small chamber with a single door. Grimacing with pain, Byron comes to the realization that they have passed through a particularly unpleasant portal, and into the beginning of their next deadly trial.
Monday, April 6, 2020
Warhammer Quest Silver Tower - Trial of Shyish
Byron tumbles through the abyss until at last the darkness consumes him. He slowly regains consciousness in a dark and foreboding hallway. As his faculties return to him, Byron discovers a gargantuan knight in strange looking armor standing over him. The strangely-attired knight makes no attempt to harm the necromancer, and Byron is surprised to discover that he still possesses his two fragments of the gaunt summoner's amulet. Suddenly he remembers that his former companion would now have three of the fragments himself. Or would he? Would he have all of the rest of them by now? Byron had no way of knowing how much time had passed, or what might have become of the wight king he had previous allied himself with.
The knight helps Byron to his feet, describing himself as a "knight questor". The huge knight, who appears to be a devotee of Morr, explains that he is on a quest to slay the lord of the silver tower. Now that Byron is on his own and in need of a new ally who can provide some physical protection, he offers to aid the knight. So the two agree to cooperate in the quest for the gaunt summoner. They begin exploring the area of the silver tower they have found themselves in, which is a dark and macabre dungeon decorated with countless omens of death.
To Byron's surprise, his wight king companion finds him in the twisting passageways of the tower after searching tirelessly since their separation. Byron wonders if perhaps the wight king is more loyal to him than he realized, or if maybe it just didn't want to lose the fragment pieces Byron was carrying when they were separated. The three of them continue to quest together, though only Byron and the wight king know they need to collect more amulet fragments before they will be able to confront the gaunt summoner, and they do not intend to share that information with their new ally.
Eventually the champions come before a macabre gate of vast size and ominous aspect. It resembles a scrimshawed cage, wrought from the bones of countless birds. Within its arched confines dark shadows flutter and trill, the shades of a million feathered things flitting back and forth. Seeing no other path to take, the champions swing those bone gates open and advance cautiously into the enormous cage. As the last of their number passes within, the gates slam shut with a terrible crash, and the avian shades descend in a screeching storm. The Byron and the knight cry out as they feel beaks and claws tear at their flesh, their eyes, and their minds, while the wight king it largely unaffected. Then, as suddenly as the storm descended, it is gone, leaving the champions somewhere else altogether.
The knight helps Byron to his feet, describing himself as a "knight questor". The huge knight, who appears to be a devotee of Morr, explains that he is on a quest to slay the lord of the silver tower. Now that Byron is on his own and in need of a new ally who can provide some physical protection, he offers to aid the knight. So the two agree to cooperate in the quest for the gaunt summoner. They begin exploring the area of the silver tower they have found themselves in, which is a dark and macabre dungeon decorated with countless omens of death.
To Byron's surprise, his wight king companion finds him in the twisting passageways of the tower after searching tirelessly since their separation. Byron wonders if perhaps the wight king is more loyal to him than he realized, or if maybe it just didn't want to lose the fragment pieces Byron was carrying when they were separated. The three of them continue to quest together, though only Byron and the wight king know they need to collect more amulet fragments before they will be able to confront the gaunt summoner, and they do not intend to share that information with their new ally.
Eventually the champions come before a macabre gate of vast size and ominous aspect. It resembles a scrimshawed cage, wrought from the bones of countless birds. Within its arched confines dark shadows flutter and trill, the shades of a million feathered things flitting back and forth. Seeing no other path to take, the champions swing those bone gates open and advance cautiously into the enormous cage. As the last of their number passes within, the gates slam shut with a terrible crash, and the avian shades descend in a screeching storm. The Byron and the knight cry out as they feel beaks and claws tear at their flesh, their eyes, and their minds, while the wight king it largely unaffected. Then, as suddenly as the storm descended, it is gone, leaving the champions somewhere else altogether.
Monday, January 20, 2020
Warhammer Quest Silver Tower - Trial of Azyr
Byron Manfred and his wight king companion each carry two pieces of the Gaunt Summoner's shattered amulet. Together, they are half-way toward completing their quest and learning the Gaunt Summoner's true name, thereby gaining power over him. As they traverse the silver tower, searching for their next trial, they find themselves in a part of the tower where the air seems a little clearer, and the light a little brighter. Strangely, as they traverse this part of the tower, their surroundings only seem to become more sublime and heavenly with each passing day.
Here they meet a towering human who appears to be a priest of Sigmar, though clearly not a native of Sigmar's lands. The priest has a loyal but very strange looking animal companion with him. Byron keeps his questions to himself, but is immediately suspicious that this strange follower of Sigmar is willing to even converse with a necromancer. However, Byron reasons, the silver tower has undoubtedly made for some extraordinary alliances in the past, and perhaps this warpriest was willing to accept such company in order to search for a way out. And, after all, Byron has no way of knowing how long he has been imprisoned in this accursed tower, or what might have transpired outside of it in his absence.
They agree to explore together for a time for mutual protection. They soon discover shifting corridors which seem bereft of monsters. Cresting a flight of obsidian steps studded with star-like diamonds, the champions find themselves before a yawning portal of heavenly light. Golden statues of strangely armored knights flank the portal, and around their feet lay the blackened corpses of acolytes and beastmen by the score. The warpriest expresses his hope that this portal will lead him to the realm of heavens, which causes Byron to fear the priest might be delusional. Byron knows that whatever lay beyond the portal is surely of the Gaunt Summoner's devising, yet they all sense that their destinies lie ahead. They step through the portal and find themselves in a small chamber with a single exit.
Here they meet a towering human who appears to be a priest of Sigmar, though clearly not a native of Sigmar's lands. The priest has a loyal but very strange looking animal companion with him. Byron keeps his questions to himself, but is immediately suspicious that this strange follower of Sigmar is willing to even converse with a necromancer. However, Byron reasons, the silver tower has undoubtedly made for some extraordinary alliances in the past, and perhaps this warpriest was willing to accept such company in order to search for a way out. And, after all, Byron has no way of knowing how long he has been imprisoned in this accursed tower, or what might have transpired outside of it in his absence.
They agree to explore together for a time for mutual protection. They soon discover shifting corridors which seem bereft of monsters. Cresting a flight of obsidian steps studded with star-like diamonds, the champions find themselves before a yawning portal of heavenly light. Golden statues of strangely armored knights flank the portal, and around their feet lay the blackened corpses of acolytes and beastmen by the score. The warpriest expresses his hope that this portal will lead him to the realm of heavens, which causes Byron to fear the priest might be delusional. Byron knows that whatever lay beyond the portal is surely of the Gaunt Summoner's devising, yet they all sense that their destinies lie ahead. They step through the portal and find themselves in a small chamber with a single exit.
Monday, October 12, 2015
Frostgrave first game battle report
I recently played a game of Frostgrave at my local gaming store. I don't own and haven't read the rules, so I was mostly relying on explanations from the people who had played before, along with looking things up in a copy of the book when needed. The game is simple enough to play with minimal explanation, though I'm sure we must have gotten some things wrong along the way, which may or may not have impacted my impression of the game. See below for a battle report and my thoughts on Frostgrave based on my introductory game.
Monday, January 24, 2011
Grismeire Valley Campaign Turn 3 – High Elves 1st Army Attacking Vampire Counts 3rd Army
The commander of the High Elf Expeditionary Force himself, Prince Finduleas Tethelion of Caledor with his loyal Star Dragon, took his personal entourage to attack the Vampire Counts army defending the bridge southeast of Soude. The Vampire Counts force, led by Count Tepes, would have to hold the bridge at all costs against this determined attack being personally led by the Elven leader. Count Tepes’s only goal would be to fend off the attack by maintaining control of more of the territory on his side of the bridge than the enemy, so that they would be forced to retreat back across the river. The Elves would have to destroy the undead army to gain a foothold on the far side of the bridge. Being one of the few nearby bridges that would allow access to the Vampire Counts base camp, it was an extremely important objective for both sides.
Count Tepes set up his forces in a tight group in a swampy area on the far side of the bridge near some old ruins. He hoped the swampy terrain would bog down the elves so he could counter-attack and finish them off. Lord Tepes was with his Wight King battle standard bearer in a unit of Grave Guard, prepared to reinforce the line wherever the strongest enemy attack came. From their left to right were a unit of skeleton spearmen, a unit of Grave Guard with great weapons led by a vampire, another unit of skeleton spearmen, and a large unit of ghouls led by a vampire.

The Elves deployed in a long battle line, with Prince Tethelion on his imposing Star Dragon to their far left. Fearing being surrounded by the undead, he went with a strange tactic of using many very small units spread out on a very large front. He brought to battle three units of 15 spearmen each, and four units each of 5 swordmasters. He would try to use these many small units to surround the enemy. He also had a hard-hitting unit of seven dragon princes.

At the start of the battle, Prince Tethelion moved his entire army straight forward, though they were diverted somewhat by the swampy pools. His two mages, wishing to avoid any actual fighting, left their units and waded into one of the pools to hide themselves. Count Tepes formed his units into a semi-circle to avoid being flanked by the many units trying to surround him. His own unit of Grave Guard he positioned on his left flank to take the charge of the dragon princes.


Prince Tethelion then took to the air and landed on the far right flank of the undead army to breathe fire on the unit of ghouls, which had little effect. The dragon princes saw the mighty Count Tepes at the head of his Grave Guard and decided they didn't want to fight him. The rest of the Elven army formed up into a thin, but continuous battle line that arced around the Vampire Counts force.
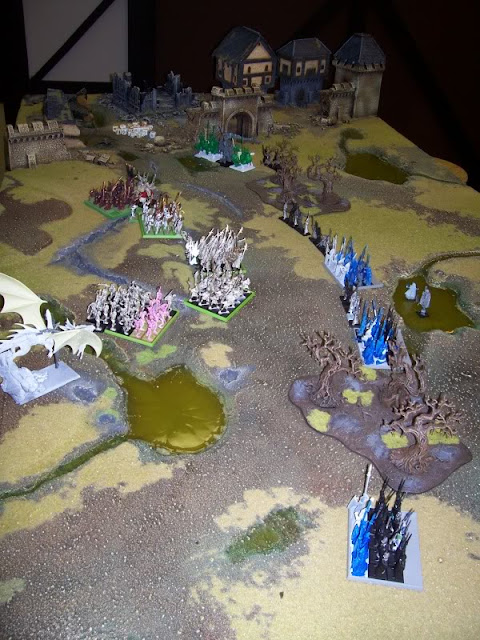

Most of his units were not close enough to charge the enemy, but Count Tepes could feel the noose tightening around his compacted army and had to do something. He had the two units at the center of his line, the Grave Guard with great weapons and a unit of skeleton spearmen, charge the enemy units they could reach. They each would face a unit of High Elf spearmen. It was a huge risk breaking up his battle line like that and leaving a huge hole in it's center, but he couldn't wait around to be surrounded by the enemy. The unit of ghouls on his far right flank turned to face Prince Tethelion so that he wouldn't be able to charge their flank.

Several of the skeleton spearmen were cut down by the swift elves before they could even attack. Still, seeing the large mass of skeletons bearing down on them caused the cowardly elves to instantly flee as soon as they made contact. The skeletons pursued, but the terrified elves ran so fast there was no chance of catching them. The Grave Guard did even better. They took no casualties while causing the frightened elves to flee and cutting them all down as they fled. One of the Elf mages lost his nerve seeing two units break and run, and he fled as well.

The mage and the Elf spearman unit both rallied immediately once they were out of danger. The two manges continued to be ineffective, however. They spent most of the battle trying to drain magic to prevent the vampires from being able to revive their fallen soldiers, but the vampires usually got the better of them and dispelled their efforts. The vampires in turn did manage to summon some ghouls and rejuvenate some losses, but not much else.
With their line broken, the Elves tried to rearrange themselves better, with one unit of swordmasters turning to face the pursuing unit of skeleton spearmen. The unit of High Elf spearmen on their far left continued to move around the enemy's right flank. Prince Tethelion went off on his own, swooping down behind Count Tepes's unit of grave guard and breathing fire on them.


Count Tepes and his bodyguard were no surrounded by the most powerful high elf units, the dragon princes on one side and Prince Tethelion on his mighty dragon on another. But unlike the overly-cautious elves, perhaps due to their general being off on his own, the Vampire Counts army would not sit idle. One of the other vampires led her skeleton spearmen in a charge against the swordmasters to her front. The other skeleton spearmen, hopelessly out of position and far from any of their vampire leaders, had no choice but to continue advancing and charge the High Elf spearmen again. The Grave Guard with Great Weapons turned around, now in an advantageous position in the enemy's rear. The ghouls again turned to face Prince Tethelion, this time in preparation of having to charge in to help rescue their general. Count Tepes and his Grave Guard could do nothing but steady themselves for the onslaught to come.
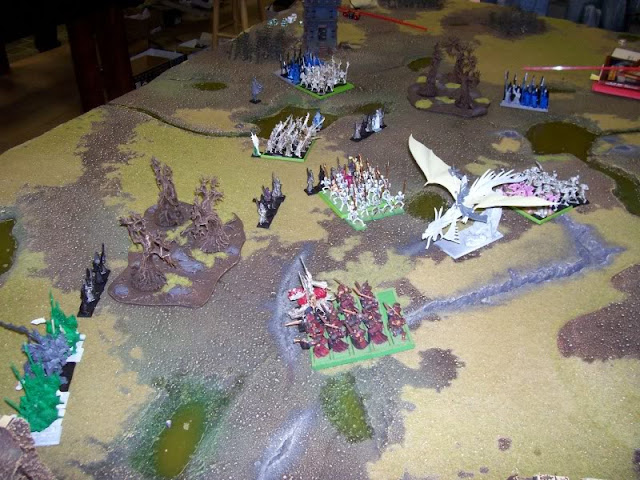
With the help of the vampiress leading them, the skeleton spearmen in the middle defeated the swordmasters, who fled right into the deadly great weapons of the Grave Guard behind them. The nearby unit of swordmasters panicked and ran at the sight of their comrades being slaughtered. The other unit of skeleton spearmen again didn't manage to kill a single Elf in their charge, and being defeated and so far from any of the vampires that controled them, they started to fall apart.

The broken swordmasters fled a little farther, fumbling through some underbrush. The High Elf spearmen in the back killed several more skeleton spearmen. The rest of the High Elf army just repositioned itself and watched in anticipation as the their lord on his star dragon and a unit of 7 dragon princes charged Count Tepes and his bodyguard at the same time. Prince Tethelion and his dragon focused all of their attacks on the vampire general, Count Tepes. It was, however, a far from impressive showing by Prince Tethelion, who cause no wounds. The dragon's attacks were fierce, but the magical army Count Tepes wore stopped some of them. The dragon did manage to cause some grievous wounds but Count Tepes quickly regenerated from them due to the powerful magic of the Drakenhof Banner carried by his loyal Wight King army standard bearer. With all of their fury, they only managed to cause Count Tepes a single wound. Unfortunately, while he was distracted attempting to ward off their blows, the dragon princes, clearly with no sense of honor, attacked him from the side. One of their lances pierced through his side into his heart, ending the fight for count Tepes. Meanwhile, the dragon prince champion was cut down in a challege by the army standard bearer. The High Elves had caused few wounds, and had lost the combat by a slim margin, but having just slain the enemy general their spirits were high and they didn't even consider fleeing.


Despite the loss of their general, the undead army held together remarkably well in his absence of the rest of the battle, a testament to the discipline and undying will of their master. The unit of ghouls led by a vampire wasn't yet close enough to charge in to aid the Wight King against the Elven Prince and dragon princes, so they advanced. The vampire did what he could to help by using his necromantic magic to revive some of the fallen grave guard. The other unit of grave guard turned to face the disordered swordmasters, and the unit of skeleton spearmen in the middle turned to face yet another unit of swordmasters.

The unit of skeleton spearmen fighting the High Elf spearmen finally succumbed to the weakening of the magic holding them together and was finished off. In the main combat, the dragon killed a few grave guard, and the grave guard in turn killed a couple more of the dragon princes. To the High Elves, it seemed hopeless as they continued to cut down the enemy and they would just rise back up to fight again. It was too much for the dragon princes, who broke and ran, leaving their general on his down. The Grave Guard unit turned to face the prince.
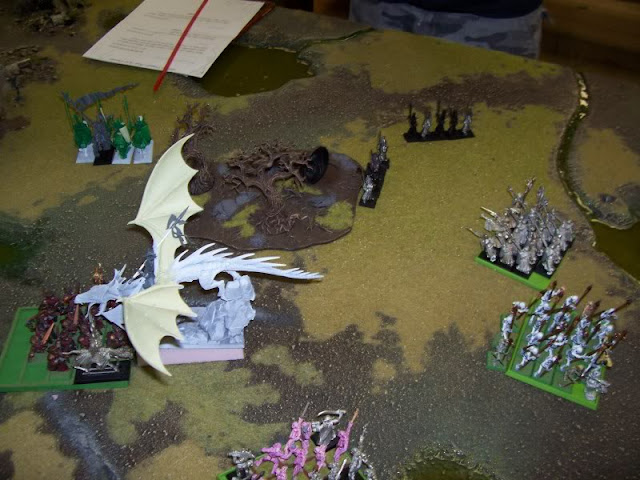
The broken unit of High Elf swordmasters finally rallies and moved into position next to the few remaining allies nearby. The dragon princes rallied and turned to watch the their Prince do battle with the Grave Guard. The other unit of swordmasters turned to face the skeleton spearmen threatening them. The High Elf army seemed unsure of what to do. In the combat, the Grave Guard champion issued a challenge to the Prince. Stepping in front of the rest of the unit, the champion was prepared to be cut down to protect the others. Incredibly, there was no need. The Prince and Star Dragon combined were unable to cut down the champion, as the powerful magic of their Drakenhof Banner regenerated the little damage they caused. The champion was, however, unable to harm the prince as he was difficult to reach way up there on his dragon. However, by doing no wounds and being very outnumber and surrounded, the Prince lost the combat by a huge margin. (He lost by 6, so needed to pass a leadership test on 4 or less). He stood resolute, however, refusing to retreat, refusing to accept that he could ever be defeated.

Feeling certain that Prince Tethelion would eventually lose his nerve and flee, the ghouls and skeleton spearmen positioned themselves behind to intercept the fleeing general. The other unit of Grave Guard would have charged a unit of swordmasters, but with their general dead the magic holding them together finally started to fade, and several of them crumbled to the ground. The few left were too important to risk in combat, so they held.

In the combat, this was the undead's last chance to cause Prince Tethelion to flee before the dragon princes could charge back into combat and the opportunity would likely be lost for good. The Prince and his dragon did better this time, cutting down the champion. But by now, surrounded and outnumbered and not seeming to be making any progress, Tethelion lost hope. He fled in dismay, and his dragon landed on the unit of ghouls, the confusion causing it to go into a hysterical panic and fly away, leaving the battle for good.

The Elves tried one last counter-attack to defeat the enemy. The three remaining units of swordmasters all thought about charging the enemy, two against the Grave Guard with great weapons, and one against the unit of skeleton spearmen. All three units units, however, were overcome with fear and couldn't bring themselves to do it. The Dragon Princes didn't even consider a charge, and just stood where they were, watching incredulously as their general flew away on his dragon with no particular destination.
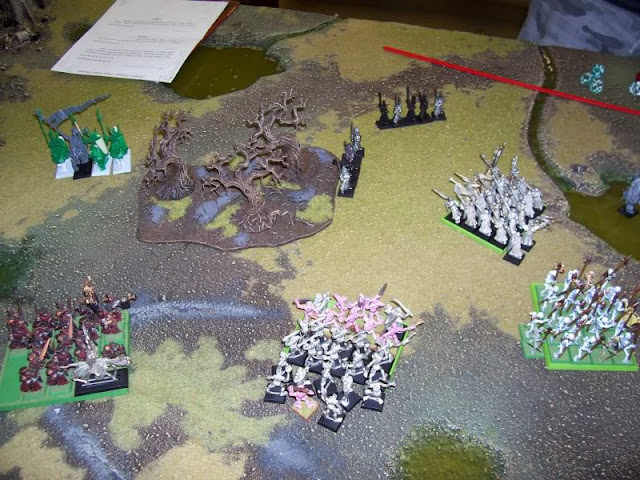
At the end, the only area of the battlefield that was held uncontested was the quarter held by the Wight King and Grave Guard, but it was enough. The Vampire Counts army was in control of the battlefield, and the Elves were completely leaderless. The Elves were forced to flee back across the Grismeire river in a panic, hoping to find wherever their general had fled to. It was a solid victory for the army of Count Tepes. It might take some time, but the regenerating magic of the Drakenhof Banner would return him to fighting strength eventually.
Count Tepes set up his forces in a tight group in a swampy area on the far side of the bridge near some old ruins. He hoped the swampy terrain would bog down the elves so he could counter-attack and finish them off. Lord Tepes was with his Wight King battle standard bearer in a unit of Grave Guard, prepared to reinforce the line wherever the strongest enemy attack came. From their left to right were a unit of skeleton spearmen, a unit of Grave Guard with great weapons led by a vampire, another unit of skeleton spearmen, and a large unit of ghouls led by a vampire.

The Elves deployed in a long battle line, with Prince Tethelion on his imposing Star Dragon to their far left. Fearing being surrounded by the undead, he went with a strange tactic of using many very small units spread out on a very large front. He brought to battle three units of 15 spearmen each, and four units each of 5 swordmasters. He would try to use these many small units to surround the enemy. He also had a hard-hitting unit of seven dragon princes.

At the start of the battle, Prince Tethelion moved his entire army straight forward, though they were diverted somewhat by the swampy pools. His two mages, wishing to avoid any actual fighting, left their units and waded into one of the pools to hide themselves. Count Tepes formed his units into a semi-circle to avoid being flanked by the many units trying to surround him. His own unit of Grave Guard he positioned on his left flank to take the charge of the dragon princes.


Prince Tethelion then took to the air and landed on the far right flank of the undead army to breathe fire on the unit of ghouls, which had little effect. The dragon princes saw the mighty Count Tepes at the head of his Grave Guard and decided they didn't want to fight him. The rest of the Elven army formed up into a thin, but continuous battle line that arced around the Vampire Counts force.


Most of his units were not close enough to charge the enemy, but Count Tepes could feel the noose tightening around his compacted army and had to do something. He had the two units at the center of his line, the Grave Guard with great weapons and a unit of skeleton spearmen, charge the enemy units they could reach. They each would face a unit of High Elf spearmen. It was a huge risk breaking up his battle line like that and leaving a huge hole in it's center, but he couldn't wait around to be surrounded by the enemy. The unit of ghouls on his far right flank turned to face Prince Tethelion so that he wouldn't be able to charge their flank.

Several of the skeleton spearmen were cut down by the swift elves before they could even attack. Still, seeing the large mass of skeletons bearing down on them caused the cowardly elves to instantly flee as soon as they made contact. The skeletons pursued, but the terrified elves ran so fast there was no chance of catching them. The Grave Guard did even better. They took no casualties while causing the frightened elves to flee and cutting them all down as they fled. One of the Elf mages lost his nerve seeing two units break and run, and he fled as well.

The mage and the Elf spearman unit both rallied immediately once they were out of danger. The two manges continued to be ineffective, however. They spent most of the battle trying to drain magic to prevent the vampires from being able to revive their fallen soldiers, but the vampires usually got the better of them and dispelled their efforts. The vampires in turn did manage to summon some ghouls and rejuvenate some losses, but not much else.
With their line broken, the Elves tried to rearrange themselves better, with one unit of swordmasters turning to face the pursuing unit of skeleton spearmen. The unit of High Elf spearmen on their far left continued to move around the enemy's right flank. Prince Tethelion went off on his own, swooping down behind Count Tepes's unit of grave guard and breathing fire on them.


Count Tepes and his bodyguard were no surrounded by the most powerful high elf units, the dragon princes on one side and Prince Tethelion on his mighty dragon on another. But unlike the overly-cautious elves, perhaps due to their general being off on his own, the Vampire Counts army would not sit idle. One of the other vampires led her skeleton spearmen in a charge against the swordmasters to her front. The other skeleton spearmen, hopelessly out of position and far from any of their vampire leaders, had no choice but to continue advancing and charge the High Elf spearmen again. The Grave Guard with Great Weapons turned around, now in an advantageous position in the enemy's rear. The ghouls again turned to face Prince Tethelion, this time in preparation of having to charge in to help rescue their general. Count Tepes and his Grave Guard could do nothing but steady themselves for the onslaught to come.

With the help of the vampiress leading them, the skeleton spearmen in the middle defeated the swordmasters, who fled right into the deadly great weapons of the Grave Guard behind them. The nearby unit of swordmasters panicked and ran at the sight of their comrades being slaughtered. The other unit of skeleton spearmen again didn't manage to kill a single Elf in their charge, and being defeated and so far from any of the vampires that controled them, they started to fall apart.

The broken swordmasters fled a little farther, fumbling through some underbrush. The High Elf spearmen in the back killed several more skeleton spearmen. The rest of the High Elf army just repositioned itself and watched in anticipation as the their lord on his star dragon and a unit of 7 dragon princes charged Count Tepes and his bodyguard at the same time. Prince Tethelion and his dragon focused all of their attacks on the vampire general, Count Tepes. It was, however, a far from impressive showing by Prince Tethelion, who cause no wounds. The dragon's attacks were fierce, but the magical army Count Tepes wore stopped some of them. The dragon did manage to cause some grievous wounds but Count Tepes quickly regenerated from them due to the powerful magic of the Drakenhof Banner carried by his loyal Wight King army standard bearer. With all of their fury, they only managed to cause Count Tepes a single wound. Unfortunately, while he was distracted attempting to ward off their blows, the dragon princes, clearly with no sense of honor, attacked him from the side. One of their lances pierced through his side into his heart, ending the fight for count Tepes. Meanwhile, the dragon prince champion was cut down in a challege by the army standard bearer. The High Elves had caused few wounds, and had lost the combat by a slim margin, but having just slain the enemy general their spirits were high and they didn't even consider fleeing.


Despite the loss of their general, the undead army held together remarkably well in his absence of the rest of the battle, a testament to the discipline and undying will of their master. The unit of ghouls led by a vampire wasn't yet close enough to charge in to aid the Wight King against the Elven Prince and dragon princes, so they advanced. The vampire did what he could to help by using his necromantic magic to revive some of the fallen grave guard. The other unit of grave guard turned to face the disordered swordmasters, and the unit of skeleton spearmen in the middle turned to face yet another unit of swordmasters.

The unit of skeleton spearmen fighting the High Elf spearmen finally succumbed to the weakening of the magic holding them together and was finished off. In the main combat, the dragon killed a few grave guard, and the grave guard in turn killed a couple more of the dragon princes. To the High Elves, it seemed hopeless as they continued to cut down the enemy and they would just rise back up to fight again. It was too much for the dragon princes, who broke and ran, leaving their general on his down. The Grave Guard unit turned to face the prince.

The broken unit of High Elf swordmasters finally rallies and moved into position next to the few remaining allies nearby. The dragon princes rallied and turned to watch the their Prince do battle with the Grave Guard. The other unit of swordmasters turned to face the skeleton spearmen threatening them. The High Elf army seemed unsure of what to do. In the combat, the Grave Guard champion issued a challenge to the Prince. Stepping in front of the rest of the unit, the champion was prepared to be cut down to protect the others. Incredibly, there was no need. The Prince and Star Dragon combined were unable to cut down the champion, as the powerful magic of their Drakenhof Banner regenerated the little damage they caused. The champion was, however, unable to harm the prince as he was difficult to reach way up there on his dragon. However, by doing no wounds and being very outnumber and surrounded, the Prince lost the combat by a huge margin. (He lost by 6, so needed to pass a leadership test on 4 or less). He stood resolute, however, refusing to retreat, refusing to accept that he could ever be defeated.

Feeling certain that Prince Tethelion would eventually lose his nerve and flee, the ghouls and skeleton spearmen positioned themselves behind to intercept the fleeing general. The other unit of Grave Guard would have charged a unit of swordmasters, but with their general dead the magic holding them together finally started to fade, and several of them crumbled to the ground. The few left were too important to risk in combat, so they held.

In the combat, this was the undead's last chance to cause Prince Tethelion to flee before the dragon princes could charge back into combat and the opportunity would likely be lost for good. The Prince and his dragon did better this time, cutting down the champion. But by now, surrounded and outnumbered and not seeming to be making any progress, Tethelion lost hope. He fled in dismay, and his dragon landed on the unit of ghouls, the confusion causing it to go into a hysterical panic and fly away, leaving the battle for good.

The Elves tried one last counter-attack to defeat the enemy. The three remaining units of swordmasters all thought about charging the enemy, two against the Grave Guard with great weapons, and one against the unit of skeleton spearmen. All three units units, however, were overcome with fear and couldn't bring themselves to do it. The Dragon Princes didn't even consider a charge, and just stood where they were, watching incredulously as their general flew away on his dragon with no particular destination.

At the end, the only area of the battlefield that was held uncontested was the quarter held by the Wight King and Grave Guard, but it was enough. The Vampire Counts army was in control of the battlefield, and the Elves were completely leaderless. The Elves were forced to flee back across the Grismeire river in a panic, hoping to find wherever their general had fled to. It was a solid victory for the army of Count Tepes. It might take some time, but the regenerating magic of the Drakenhof Banner would return him to fighting strength eventually.
Monday, December 6, 2010
Warhammer Fantasy movement trays
I'm trying out a new idea for Warhammer Fantasy movement trays. The existing solutions haven't really worked well. For one thing, when playing on tables with a lot of hills, having to prop up a large movement tray on a hill is difficult, looks silly, and may result in many of the models falling over. In fact with some of the more unbalanced models, just pushing the tray around can result in many of them tipping over. In a big unit, this can cause quite a mess and it can take longer to reposition all the models that it is worth.
The other problem is that movement trays have to be made in specific sizes, so I'd need a lot of them in 15, 20, 25, and 30 model sizes at least, for 20mm and 25mm square models. That's a lot of different options I'd need to make. Not to mention that once a unit starts taking casualties, there's a big empty space at the back of the movement tray that doesn't look good and is a pain when you have to put another unit in that vacated space.
The solution I'm going to try out is to use magnetic sheet and steel bases to make magnetic movement trays. I will cut out magnetic sheet in rectangles, some big enough to fit one rank of five models, some big enough to fit two ranks of five models. I'll then glue thin steel bases to the bottom of the Warhammer bases and attach the models magnetically to the sheet. With plastic models that have the completely empty base bottoms, I'll probably be able to find washers that fit in there. But with the slotta-bases, these thin steel squares work perfectly. I got the steel bases here. The 3/4" x 3/4" bases fit a 20mm Warhammer base perfectly.
With the different sizes of sheet, I'll be able to combine them to make different sized units. So a unit of 25 models will only require moving around three of the magnetic rectangles. The magnetism will also hold the models down, effectively keeping them from tipping when I move the unit or when they need to be positioned on a hill. If I need to reform the unit, the most common widths of 5 or 10 wide will be simple, and I can always make a handful of 2 and 3 model length rectangles of magnetic sheet for adding more files.
Below is a picture of a few Empire Greatswords with the thin steel bases glued to the bottom of their bases. The next picture shows the Greatswords with the two sizes of magnetic sheet I've cut out, one for holding a single rank of five models, the other for two ranks of five models.


Here I've attached the models to the magnetic sheet. The cling on quite nicely. If I wanted to use a unit of 15 Greatswords in the game, I can do it like this, without needing a special sized movement tray that holds 15 models or having extra movement tray hanging off the back of the unit. And when moving them, I only have to push around these two sheets of models. Looking from above, you can barely see the magnetic sheet at the bottom of the base. But I will be painting the magnetic sheet green so that it looks better once a few models have been taken off, exposing the sheet that was beneath them.


As you can see, any sort of incline or other unusual terrain will be no problem for these guys.

I have yet to try this out in a game, but I think it will work pretty well. I'll give an update after I've tried it out. I've you've tried out any interesting ideas for how to move your Warhammer units around the table, I'd be interested in hearing about them.
The other problem is that movement trays have to be made in specific sizes, so I'd need a lot of them in 15, 20, 25, and 30 model sizes at least, for 20mm and 25mm square models. That's a lot of different options I'd need to make. Not to mention that once a unit starts taking casualties, there's a big empty space at the back of the movement tray that doesn't look good and is a pain when you have to put another unit in that vacated space.
The solution I'm going to try out is to use magnetic sheet and steel bases to make magnetic movement trays. I will cut out magnetic sheet in rectangles, some big enough to fit one rank of five models, some big enough to fit two ranks of five models. I'll then glue thin steel bases to the bottom of the Warhammer bases and attach the models magnetically to the sheet. With plastic models that have the completely empty base bottoms, I'll probably be able to find washers that fit in there. But with the slotta-bases, these thin steel squares work perfectly. I got the steel bases here. The 3/4" x 3/4" bases fit a 20mm Warhammer base perfectly.
With the different sizes of sheet, I'll be able to combine them to make different sized units. So a unit of 25 models will only require moving around three of the magnetic rectangles. The magnetism will also hold the models down, effectively keeping them from tipping when I move the unit or when they need to be positioned on a hill. If I need to reform the unit, the most common widths of 5 or 10 wide will be simple, and I can always make a handful of 2 and 3 model length rectangles of magnetic sheet for adding more files.
Below is a picture of a few Empire Greatswords with the thin steel bases glued to the bottom of their bases. The next picture shows the Greatswords with the two sizes of magnetic sheet I've cut out, one for holding a single rank of five models, the other for two ranks of five models.


Here I've attached the models to the magnetic sheet. The cling on quite nicely. If I wanted to use a unit of 15 Greatswords in the game, I can do it like this, without needing a special sized movement tray that holds 15 models or having extra movement tray hanging off the back of the unit. And when moving them, I only have to push around these two sheets of models. Looking from above, you can barely see the magnetic sheet at the bottom of the base. But I will be painting the magnetic sheet green so that it looks better once a few models have been taken off, exposing the sheet that was beneath them.


As you can see, any sort of incline or other unusual terrain will be no problem for these guys.

I have yet to try this out in a game, but I think it will work pretty well. I'll give an update after I've tried it out. I've you've tried out any interesting ideas for how to move your Warhammer units around the table, I'd be interested in hearing about them.
Monday, November 1, 2010
Warhammer Battle for the Cave Multiplayer Battle Report
This was the second in a series of two linked multi-player Warhammer Fantasy games. You can read the results of the first battle in my Warhammer Clash of Scouts Multiplayer Battle Report post. I've also posted the scenario rules for this second game, which was the Battle for the Cave Multiplayer Warhammer Scenario which I created based on a multi-player scenario in the Warhammer Fantasy rulebook.
While the remnants of the Dwarf scout force screened the cave, the Dwarf General decided to send part of his army on a forced march through the night in order to get his artillery deployed as quickly as possible. The Elves, not wanting to be surrounded again, sent half of their army on a flanking maneuver to get around the rear of the advancing Dwarf forces. Perhaps uncharacteristically, the Chaos general decided to play it safe and keep his army together, marching at a moderate pace.
Turn 1
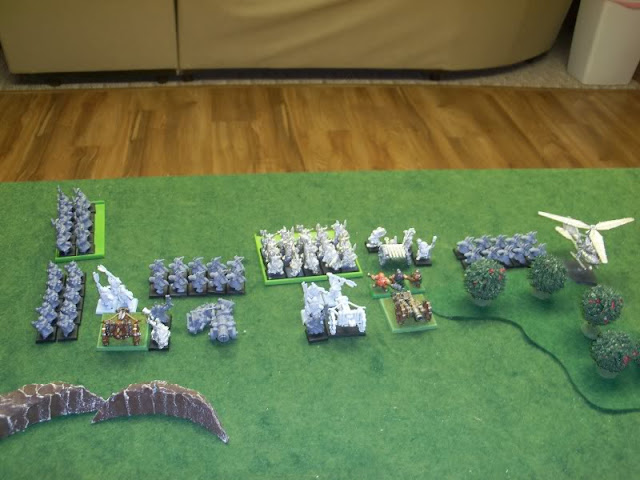
The Dwarf artillery arrived just before dawn and deployed with a field of fire facing the cave opening to deter any of their enemies from approaching it. The remaining scout forces deployed facing the cave but kept their distance. The Dwarfs had a clever plan up their sleeves for capturing the treasure...

Turn 2
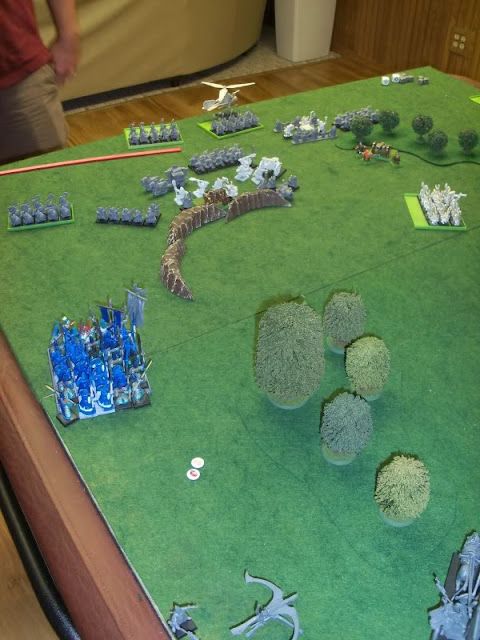
More Dwarfs began to turn up, informing their comrades of the High Elves behind them chasing the rear of the Dwarf army. The Dwarfs spread out their forces covering a lot of area with their many small units, not knowing which direction an attack might come from. The first Elves to show up, however, were to the right of the Dwarf army, and consisted of a large unit of spearmen, a bolt thrower, a lion chariot, and a mighty Mage Lord. Unfortunately, the great wisdom the Mage Lord had acquired over centuries of study did not prevent him from making a foolish mistake and exposing himself to the Dwarf artillery battery. He was quickly and unceremoniously blown to pieces by the Dwarfs, who quickly took advantage of the opportune target.


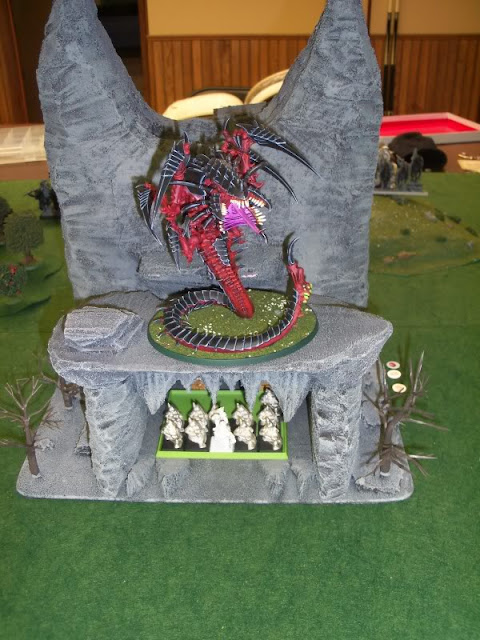
At the same time, the entire Chaos Warrior army arrived on the opposite side of the battlefield from the Dwarfs, facing the back of the cave. They would have a long march ahead of them in order to reach the cave, but their general thought it best to have the large cave between them and the Dwarf artillery. Meanwhile, the clever Dwarf plan was unfolding, as a unit of Miners who had been sent to tunnel into the cave arrived safely at their destination. Having reach the cave containing the treasure horde, they quickly discovered that, of course, it was guarded by a dragon! Though surprised by the unexpected encounter with the ferocious cave dragon, the Miners fought back with courage and ferocity. Four of their number fell, but they severely wounded the strange-looking dragon, and none thought of fleeing.

Turn 3
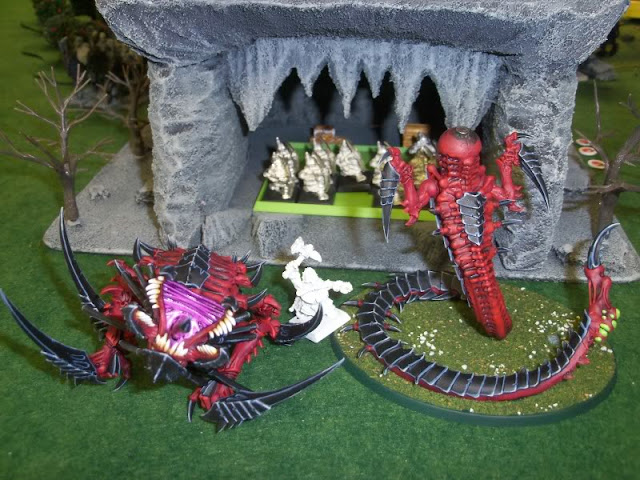
The entire Warriors of Chaos army advanced in haste, but its right flank was held up by a unit of knights slowing down to traverse the nearby wood. Some of the High Elf flankers sprung their trap, as a unit of Swordmaster and large unit of Spearmen appeared in the Dwarf rear. A few Dwarfs were prepared for the envelopment and got off a few crossbow shots, but it had little effect. The Dwarfs now had three large, imposing, and powerful units of High Elves in their flank and rear. In the cave, the dragon became overwhelmed by the sudden and brutal attack of the Dwarf Miners. It was unable to defend itself from their renewed attack, and the Dwarf Hero leading the miners finished off the monster, smashing it right in half with his hammer. With the treasure's guardian defeated, the Miners consolidated their position in the cave, ready to defend it to the last.


Turn 4
In the Dwarf rear, more units were turning up every minute. A large unit of Dwarfs joined the battle, but so did a Dragon mage, and another High Elf mage on foot. A brave unit of Dwarfs with great weapons, though in a a hopeless situation, decided to go out gloriously and charged High Elf Spearmen, only to be flanked by the Swordmasters. They could only hope that their sacrifice would provide some time for the rest of their army to reorganize. The other unit of High Elf spearmen charged a small unit of Dwarfs with crossbows, the only thing between the High Elves and the Dwarf artillery battery. Meanwhile, the Warriors of Chaos continued their advance, the right flank again slowed by the woods and units getting in each others way.
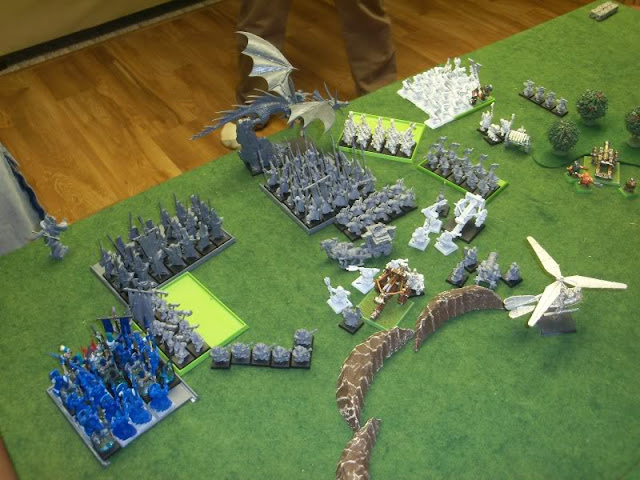

As a small consolation, the Dwarf artillery battery just barely managed to kill the Dragon mage and his dragon. However, the Dwarfs with great weapons were wiped out, and the Dwarf crossbow unit lost three of their number and fled. As a result, the crew of a nearby Bolt Thrower panicked and fled. The High Elf Spearmen followed through into the heart of the Dwarf artillery battery, charging the Bolt Thrower directed by the Dwarf Master Engineer and army general.


Turn 5
Both the High Elves and Dwarfs found it difficult to maneuver in the hectic scrum that had developed in the midst of the Dwarf battle line. However, the High Elves with their large, powerful units easily bested the mostly small units and war machine crews of the Dwarfs. The Dwarfs still had one large unit and a couple war machines left, but most of the rest of their force was scattering. What little hope remained was no doubt dashed as yet another large unit of High Elves with spears showed up, moving in to finish off the scattering remnants of the Dwarf army rather than trying to reach the cave, which the Dwarf Miners still held. Meanwhile, the Warriors of Chaos continued their long, slow advance towards the cave, so far taking little part in the battle.


Turn 6
The stalwart Dwarfs rallied most of their units, but they were small and spread out, and the Dwarfs struggled to form a coherent defense with the large Elf units in their midst. The Swordmaster drove off a unit of Dwarfs with Greatweapons. The Dwarfs still had one large unit and some artillery in reserve near a wood, and another strong at the base of a nearby hill keeping an eye on the cave entrace. At this point, the Chaos Warriors joined the battle, charging into a combat between High Elf spearmen and Dwarfs with crossbows, killing many on both sides in the three-way combat. The Dwarfs fled, but the High Elves held their ground. A lone, apparently suicidal Marauder Horseman charged another unit of High Elf spearmen and was rewarded with the swift death he was clearly seeking.


Turn 7
As the battle was nearing its end, the bulk of the Chaos Warrior army finall reached the cave, moving around it on either side. There wasn't much time left, as the Miners had secured most of the treasure by this point, but a unit of Chaos Knights positioned itself for a charge into the cave. The Dwarf unit at the base of the hill was prepared to charge the Knights to prevent them from assaulting the cave, but a spectacular shot from the far-off Hellcannon annihilated the entire unit. The stunned hero who barely survived the blast vengefully fired his pistol at the nearest enemy, the Chaos Knights. His shot took down one of the knights, but with the Knights now free to assault the cave, that shot could make the difference between victory and defeat. Elsewhere, the other unit of Chaos Knights defeated and drove off the High Elf spearmen, and reformed facing the cave opening, giving the Chaos army another unit that could assault the Dwarf-held cave.


Turn 8
The last remaining large unit of Dwarfs was destroyed by the High Elf spearmen and Swordmasters, leaving their army mostly destroyed. The Dwarf gyrocopter bravely sacrificed itself to buy more time to secure the treasure by charging one of the Chaos Knight units, and helpfully a unit of High Elf spearmen also charged them. That left the Chaos army the one unit of four Chaos Knights to assault the Dwarf Miners holding the cave. This was the only chance left to snatch victory from the Dwarfs. They charged in, killing most of the Miners, through the remaining Miners and the hero killed two of the Knights. Despite the heavy losses, the Dwarfs were determined to hold the cave.

Final Battle
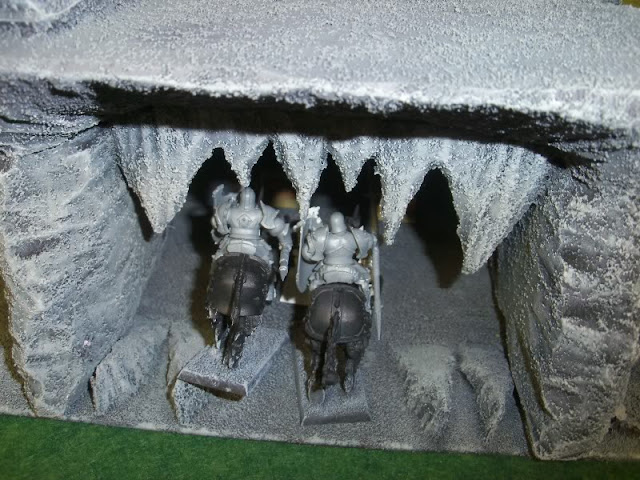
The grinding battle at the mouth of the cave continued. The remaining Miners were cut down, leaving only the lone Dwarf hero to defend the treasure. It came down to a single combat between the Dwarf hero and the one remaining Chaos Knight. The Knight fought ferociously, badly wounding the Dwarf. Fighting through the pain, and no doubt motivated by visions of all the treasure he was fighting for, the Dwarf Hero struck a mighty blow that sent the Chaos Knight tumbling to the rocky cave floor, where the Dwarf finished him off.


In the cave, only the Dwarf hero remained able to fight, but the time they spent in the cave was enough to secure most of the treasure horde. Many Dwarfs had been sent through the tunnel the Miner's had dug to transport away the treasure that the Miner's had secured. The Dwarf hero, along with the surviving wounded Miners, went back through their tunnel along with the Dwarfs who had been sent to carry away the treasure, leaving the largely intact High Elf and Chaos armies to fight each other over the remaining scraps. The Dwarf army was mostly shattered, many Dwarf lives and war machines alike had been lost, but the legendary treasure horde was theirs.
While the remnants of the Dwarf scout force screened the cave, the Dwarf General decided to send part of his army on a forced march through the night in order to get his artillery deployed as quickly as possible. The Elves, not wanting to be surrounded again, sent half of their army on a flanking maneuver to get around the rear of the advancing Dwarf forces. Perhaps uncharacteristically, the Chaos general decided to play it safe and keep his army together, marching at a moderate pace.
Turn 1
The Dwarf artillery arrived just before dawn and deployed with a field of fire facing the cave opening to deter any of their enemies from approaching it. The remaining scout forces deployed facing the cave but kept their distance. The Dwarfs had a clever plan up their sleeves for capturing the treasure...


Turn 2
More Dwarfs began to turn up, informing their comrades of the High Elves behind them chasing the rear of the Dwarf army. The Dwarfs spread out their forces covering a lot of area with their many small units, not knowing which direction an attack might come from. The first Elves to show up, however, were to the right of the Dwarf army, and consisted of a large unit of spearmen, a bolt thrower, a lion chariot, and a mighty Mage Lord. Unfortunately, the great wisdom the Mage Lord had acquired over centuries of study did not prevent him from making a foolish mistake and exposing himself to the Dwarf artillery battery. He was quickly and unceremoniously blown to pieces by the Dwarfs, who quickly took advantage of the opportune target.


At the same time, the entire Chaos Warrior army arrived on the opposite side of the battlefield from the Dwarfs, facing the back of the cave. They would have a long march ahead of them in order to reach the cave, but their general thought it best to have the large cave between them and the Dwarf artillery. Meanwhile, the clever Dwarf plan was unfolding, as a unit of Miners who had been sent to tunnel into the cave arrived safely at their destination. Having reach the cave containing the treasure horde, they quickly discovered that, of course, it was guarded by a dragon! Though surprised by the unexpected encounter with the ferocious cave dragon, the Miners fought back with courage and ferocity. Four of their number fell, but they severely wounded the strange-looking dragon, and none thought of fleeing.


Turn 3
The entire Warriors of Chaos army advanced in haste, but its right flank was held up by a unit of knights slowing down to traverse the nearby wood. Some of the High Elf flankers sprung their trap, as a unit of Swordmaster and large unit of Spearmen appeared in the Dwarf rear. A few Dwarfs were prepared for the envelopment and got off a few crossbow shots, but it had little effect. The Dwarfs now had three large, imposing, and powerful units of High Elves in their flank and rear. In the cave, the dragon became overwhelmed by the sudden and brutal attack of the Dwarf Miners. It was unable to defend itself from their renewed attack, and the Dwarf Hero leading the miners finished off the monster, smashing it right in half with his hammer. With the treasure's guardian defeated, the Miners consolidated their position in the cave, ready to defend it to the last.


Turn 4
In the Dwarf rear, more units were turning up every minute. A large unit of Dwarfs joined the battle, but so did a Dragon mage, and another High Elf mage on foot. A brave unit of Dwarfs with great weapons, though in a a hopeless situation, decided to go out gloriously and charged High Elf Spearmen, only to be flanked by the Swordmasters. They could only hope that their sacrifice would provide some time for the rest of their army to reorganize. The other unit of High Elf spearmen charged a small unit of Dwarfs with crossbows, the only thing between the High Elves and the Dwarf artillery battery. Meanwhile, the Warriors of Chaos continued their advance, the right flank again slowed by the woods and units getting in each others way.


As a small consolation, the Dwarf artillery battery just barely managed to kill the Dragon mage and his dragon. However, the Dwarfs with great weapons were wiped out, and the Dwarf crossbow unit lost three of their number and fled. As a result, the crew of a nearby Bolt Thrower panicked and fled. The High Elf Spearmen followed through into the heart of the Dwarf artillery battery, charging the Bolt Thrower directed by the Dwarf Master Engineer and army general.


Turn 5
Both the High Elves and Dwarfs found it difficult to maneuver in the hectic scrum that had developed in the midst of the Dwarf battle line. However, the High Elves with their large, powerful units easily bested the mostly small units and war machine crews of the Dwarfs. The Dwarfs still had one large unit and a couple war machines left, but most of the rest of their force was scattering. What little hope remained was no doubt dashed as yet another large unit of High Elves with spears showed up, moving in to finish off the scattering remnants of the Dwarf army rather than trying to reach the cave, which the Dwarf Miners still held. Meanwhile, the Warriors of Chaos continued their long, slow advance towards the cave, so far taking little part in the battle.


Turn 6
The stalwart Dwarfs rallied most of their units, but they were small and spread out, and the Dwarfs struggled to form a coherent defense with the large Elf units in their midst. The Swordmaster drove off a unit of Dwarfs with Greatweapons. The Dwarfs still had one large unit and some artillery in reserve near a wood, and another strong at the base of a nearby hill keeping an eye on the cave entrace. At this point, the Chaos Warriors joined the battle, charging into a combat between High Elf spearmen and Dwarfs with crossbows, killing many on both sides in the three-way combat. The Dwarfs fled, but the High Elves held their ground. A lone, apparently suicidal Marauder Horseman charged another unit of High Elf spearmen and was rewarded with the swift death he was clearly seeking.


Turn 7
As the battle was nearing its end, the bulk of the Chaos Warrior army finall reached the cave, moving around it on either side. There wasn't much time left, as the Miners had secured most of the treasure by this point, but a unit of Chaos Knights positioned itself for a charge into the cave. The Dwarf unit at the base of the hill was prepared to charge the Knights to prevent them from assaulting the cave, but a spectacular shot from the far-off Hellcannon annihilated the entire unit. The stunned hero who barely survived the blast vengefully fired his pistol at the nearest enemy, the Chaos Knights. His shot took down one of the knights, but with the Knights now free to assault the cave, that shot could make the difference between victory and defeat. Elsewhere, the other unit of Chaos Knights defeated and drove off the High Elf spearmen, and reformed facing the cave opening, giving the Chaos army another unit that could assault the Dwarf-held cave.


Turn 8
The last remaining large unit of Dwarfs was destroyed by the High Elf spearmen and Swordmasters, leaving their army mostly destroyed. The Dwarf gyrocopter bravely sacrificed itself to buy more time to secure the treasure by charging one of the Chaos Knight units, and helpfully a unit of High Elf spearmen also charged them. That left the Chaos army the one unit of four Chaos Knights to assault the Dwarf Miners holding the cave. This was the only chance left to snatch victory from the Dwarfs. They charged in, killing most of the Miners, through the remaining Miners and the hero killed two of the Knights. Despite the heavy losses, the Dwarfs were determined to hold the cave.


Final Battle
The grinding battle at the mouth of the cave continued. The remaining Miners were cut down, leaving only the lone Dwarf hero to defend the treasure. It came down to a single combat between the Dwarf hero and the one remaining Chaos Knight. The Knight fought ferociously, badly wounding the Dwarf. Fighting through the pain, and no doubt motivated by visions of all the treasure he was fighting for, the Dwarf Hero struck a mighty blow that sent the Chaos Knight tumbling to the rocky cave floor, where the Dwarf finished him off.


In the cave, only the Dwarf hero remained able to fight, but the time they spent in the cave was enough to secure most of the treasure horde. Many Dwarfs had been sent through the tunnel the Miner's had dug to transport away the treasure that the Miner's had secured. The Dwarf hero, along with the surviving wounded Miners, went back through their tunnel along with the Dwarfs who had been sent to carry away the treasure, leaving the largely intact High Elf and Chaos armies to fight each other over the remaining scraps. The Dwarf army was mostly shattered, many Dwarf lives and war machines alike had been lost, but the legendary treasure horde was theirs.
Subscribe to:
Posts (Atom)