Monday, February 16, 2009

Attraignnor IV Campaign: Turn 7

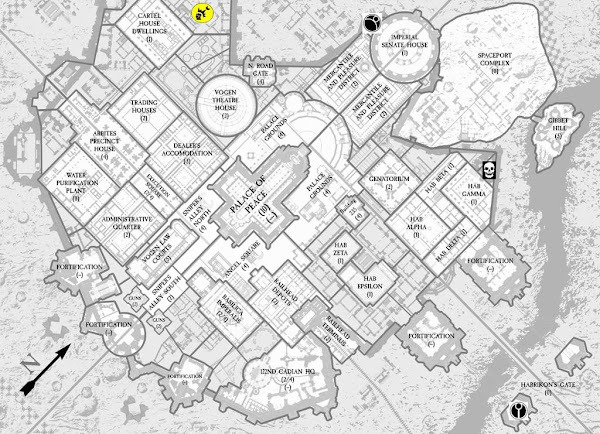
Warhammer 40k campaign map
As dawn's first rays splashed across the enormous gates of the Imperial Palace, a solitary figure crested the hills of rubble fronting the palace's once glorious walls. Like an angel with wings of fire the figure descended from the dawn, his arms open wide in welcome and forgiveness to the palace defense cannons now trained upon him. Behind the majestic figure came a tide of sycophants and an army of golden angels. The light caressed their armor and sounds of celebration floated across the ceramite walls. The remaining populace of the Imperial palace were bombarded by a noise unknown to them for years.. Joy. Prophets ran to the gates crying that their savior had come at last, and almost as one, the once imperial citizens flooded the streets. The palace gates were opened, and the mighty angel stepped forward. His very glance threw those upon which it landed onto their knees, and these poor wretches knew their time of suffering was at an end. Captain Octavio Ferranus looked upon the lost children at his feet and bade them rise. His warriors quickly relieved the tired guardsmen at the walls, and the populace rejoiced as vast stores of supplies were brought forth through the gates. Ferranus ordered the sick and wounded to be mended by his finest apothecaries. He ordered the hungry to be fed. His procession trundled forth, bringing peace to these shattered people. Gangs were disbanded and their members assimilated into the ranks of the Church of 36 Secrets. Ferranus' procession slowly became a full fledged parade, and the streets were filled with music and dance. At the steps of what once was the Governor's Manor, a massive throne of Ultramarian White Marble was brought forth, and the populace bade Ferranus to sit, and he acquiesced. And upon sitting, the people asked for his guidance and leadership. And to the last they swore their fealty, and on that day Cardinal Degrassio of the Church of 36 Secrets crowned the Lord Captain Octavio Ferranus, ruler of all Attraignnor IV, and the people rejoiced.

Meanwhile, the Tau continued their attack on Angel Square, despite their previous setback. Commander M'yen was too badly wounded to continue leading his men, so another commander, Shas'el J'karra Mont'au Mesme Tsua'm, led the wave of reinforcements. The results were disastrous for the Tau. Some in stealth suits managed to sneak behind enemy lines and ambush a unit of Chaos Marines. But the Tau were stunned by the ferocity of their enemy when the marines recklessly charged through some rubble to leap on the stealth team before they could escape. The ensuing melee resulted in the stealth team being massacred.

Some Kroot also managed to sneak forward into a vital building in Angel square ahead of the main attack. But Lord Agramon of the Chaos Marines had stayed behind in Angel Square to continue the fight against the Tau, while other chaos marine forces continued on into the Basilica Imperialis. Lord Agramon discovered the Kroot hiding in the building, charged forward ahead of his men, and annihilated the enemy. He then flew across to another building and ripped apart a Tau Tank that had moved up to fire on his men. The flaming wreck of the tank crashed to the ground in the already damaged building. But just then, the Commander Mesme ambushed Lord Agramon, flying up over the side of the building to open fire on the chaos lord. The hail of fire tore into Lord Agramon, wounding him badly. He fell to the ground into the wreckage of the Tau tank, and was buried in rubble from the collapsing building.

Aside from the Tau commander avenging his wounded comrade against the chaos lord, the rest of the battle went badly for the attackers. The Chaos defenders caused severe casualties among the Tau while suffering few of their own, and the Tau were forced to retreat.

At the same time, another Tau force attacked the Eastern side of the Palace grounds where other Chaos Marines were posted to defend the chaos staging area. The Chaos forces here were under the command of Warlord Captain Thamuz, a strategic strategist and valued advisor to Lord Agramon. Here, several squads of Kroot were able to sneak deep behind enemy lines and occupy the wooded areas on the palace grounds. Once the Kroot were in position, another Tau force attacked head on.

The defending Chaos marines organized a defensive line to hold off the attack, and then suddenly realized they had been completely surrounded by the enemy as they were fired on from all sides. The Tau broadsides devastated the chaos tanks. A large unit of defending marines and the lieutenant leading the army were pinned down in a forest by punishing enemy fire for the duration of the fight.

But the chaos forces fought back. Some of the Kroot in the rear of their lines were eliminated by a chaos marine unit, but at great cost. The only two unwounded members of the unit then tried to take down one of the enemy hover-tanks. But despite many, many attempts, they were completely unable to damage the flying beast. A mobile unit of thousand sons in a rhino moved up an annihilated a stealth team, before re-embarking and moving farther back to get in position to fire on some of the infiltrating Kroot.

The Tau attack suffered a severe setback when their commander was accidentally killed while attempting to surprise the defenders and land in the midst of the battle. The marines counter-attacked, a handful of Khorne Berzerkers managing to chase down one of the elusive broadsides. But the broadside held off the ferocious attack and even managed to kill one of the crazed marines in close combat. Some reinforcements arrived in the form of a unit of Terminators teleporting in to destroy a couple units of Tau infantry. They then charged another broadside, which managed to kill one of the terminators before being ripped apart.

The battle was hard fought on both sides, but attrition got to the Tau forces first and they fell back to fight another day.
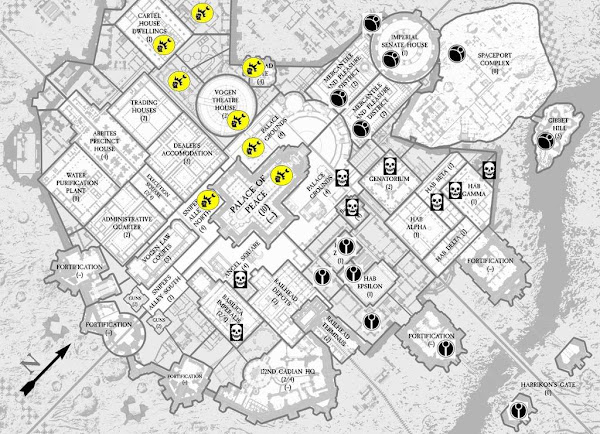
Warhammer 40k campaign map
Victory Points
Chaos: 46.5
Tau: 14

Friday, February 13, 2009

Brigadier General George Armstrong Custer

To lead the brigade of Michigan cavalry I intend to eventually have, I of course would need to paint up Brigadier General George Armstrong Custer. The figures I used are 10mm GHQ command miniatures from the Federal Commanders #1 pack. The figure I used for Custer is actually meant to be Ambrose Burnside. I just filed down the hat much lower, and filed down Burnside's sideburns a bit, and it looks close enough.

As I understand it, Custer liked to design his own uniforms. There is a color drawing in the book The Gettysburg Companion by Mark Adkin that shows the uniform that Custer was apparently wearing at the Battle of Gettysburg. This consisted of a black jacket with grey trim, a blue collar with a silver star on it, a red handkerchief around the neck, and dark green pants. I thought it look interesting, and would give the model some personality and make it stand out from other mounted officers. I'm hoping that I can do something with all of the brigade command stands to make them look a little different from the others, so they are easy to identify even without looking at the labels on the bottoms of the bases. So when I painted Custer, the uniform he was wearing at Gettysburg was what I was trying to replicate.

Wednesday, February 11, 2009

1st Michigan Cavalry Dismounted

I recently finished painting up a unit of dismounted Union American Civil War cavalry to represent the 1st Michigan. You can see the mounted version of the unit here. The figures are 10mm GHQ Federal Dismounted Cavalry. The miniatures are very nice, perfectly proportioned, and well detailed like all of the 10mm GHQ miniatures I have. But their carbine barrels are so thin that they get bent at the slightest touch. So it seems like it is just a matter of time before many of the barrels break off from being bent back into position over and over.

Monday, February 9, 2009

Attraignnor IV Campaign: Turn 6

Warhammer 40k campaign map
With the fall of the Imperial Fists librarian to Tzeentch, as with the corruption of all the Imperial Fists on Attraignnor IV, the Dark Gods began whispering to their followers, calling them towards the doomed planet. Most who answered the call were small warbands and would quickly fall under the sway of the charismatic Captain Ferranus. The palace grounds were given to the great Tzeentchian Daemon Lords Cyclonius Du Mer of the Alpha Legion, and the Dreadnought Ancient, Master Zalel of Caliban, to defend.

The Tau launched a sneak attack deep into the daemons' lines, squads of Kroot and stealth teams nearly getting completely past the alpha legion's patrols in the area. The alarm was quickly raised by Veteran Sgt. Drazziel, a hardened veteran of Caliban, who was able to sound the alarm before coming under fire by the alien army. Because of Sgt Drazziel's quick action, Squad Satchiel of the Ravenwing was able to hold the eastern flank. The Alpha legion patrol unit Argos and the detachment of Silver Skull Havocs pressed the advantage on the western flank whilst under heavy fire. Patrol unit Octavio fared much worse. Their Rhino was tore to pieces even as they learned of the alien presence and as the vile Tau commander and bodyguard of dreaded Crisis Battlesuits fell from the sky, it looked as if the center would fall.

His squad destroyed, Veteran Sgt. Drazziel raced to the breaking center, cutting through the aliens heretical machinery, as the chime upon his back began to sing. The sing became a droning wail just as the mighty warrior came in sight of the alien commander, and eight enormous bodies suddenly appeared behind him. He dove to the floor, firing at the aliens just as a storm of bolter fire roared past into the alien leader's bodyguard. Alpha Legion Terminator Squad Drachus had arrived.

On the eastern flank, the Ravenwing had single handedly run through a hoard of Kroot and rushed the Broadside Battlesuits deep behind Tau lines, but at a heavy cost. Sgt. Satchiel was finally knocked from his steed by the energy pulse of a shield drone. The brave Ravenwing Sgt had held long enough, however, and his last sights before losing consciousness were of his Master, Ancient Zalel, soaring in from the south and the esteemed Cyclonius Du Mer hurtling down from the heavens.

The Tau commander, seeing his forces overrun made ready his retreat, but not before the fallen Squad Octavio's Sgt. Romethius unleashed his final trick, surrendering his very soul to the Keeper of Secrets, N'Kari, who quickly pursued the alien leader.

At the last moment, Ancient Zalel initiated the final facet of his plans. With the Terminators to the west, and Zalel himself to the east, it was easy for him to implant the idea that the north was the only road open into the Kroot shaper's brain. He watched in fiendish delight as the mighty Cyclonius was overrun by a massive wave of aliens and banished to the warp. His hold on the forces of the palace grounds was cemented.

Meanwhile, having linked up at the Palace Grounds with the forces of renegade Space Marine Captain Octavio Ferranus, formerly of the Imperial Fists, the forces of the Crusaders renegade Space Marine chapter began spreading out to capture important areas of the city. A large force of them moved south into Angel Square, led personally by the warp-infused monstrosity, Lord Agramon.

The Tau in the East had also moved into Angel Square, led by the young and inexperienced Commander M'yen. Forward elements of the Crusaders advanced force encountered a contingent of the Tau right around the massive building that served as a base for the majestic angel statue. At first the Tau brought a lot of firepower to bear on the small force of renegade marines that were the first to arrive. But due to their ability to coordinate supplies, resources, and tactical information with their allies led by Captain Ferranus, Lord Agramon managed to stage a perfectly timed counter-attack.

Lord Agramon himself arrived with substantial reinforcements at the critical moment to swing the balance of the fighting around the statue building. Having never faced forces of chaos before, Commander M'yen was caught unprepared for the shocking ferocity of the sudden attack.

The timing of the counter-attack was almost disrupted by some overzealous followers of Khorne, who in their eagerness to get to combat drove their rhino full speed and arrived at the building ahead of the other counter-attacking units. But even this turned out to benefit the renegade marines. As the rhino flew forward recklessly and wildly towards the center of the Tau advance, it drew fire from every Tau in the vicinity. Firing the smoke grenades and driving forward insanely into the hail of fire, the rhino managed to take an unbelievable amount of punishment before finally being destroyed by a Tau seeker missile.

But the Rhino had managed to draw fire from the bulk of the Tau army, allowing the beleaguered chaos marines huddling in the ruined buildings a chance to regroup without being fired on. Also, though the Khorne marines were flung from the smoking wreckage of the rhino right into the middle of the Tau advance, they were quickly rescued. A squad of terminators waiting in orbit above managed to lock onto the signal from the squad and teleport right into the midst of the Tau, where they could do the most damage. At the exact same time, Lord Agramon arrived with the rest of the reinforcements in the same area.

The Tau were overwhelmed with the shock of the massive firepower coming from all the reinforcements as well as from the other squads that had managed to move into better firing positions with the break in incoming fire. Most of the center of their battle line broke and ran, and the battle was lost. The Tau commander, with the little forces he had remaining, tried to hold his ground and fight back against the sudden chaos surge, but Lord Agramon personally put an end to that, badly damaging the Tau commander's battlesuit and leaving him badly injured. The Tau commander did manage to escape in a transport vehicle, but the renegade Marines were left solidly in control of Angel Square.
Warhammer 40k campaign map
Victory Points
Chaos: 32.5
Tau: 14

Friday, February 6, 2009

Pendraken 10mm WW1 miniatures

I recently bought some 10mm World War 1 miniatures from Pendraken Miniatures in the UK. Since the Pendraken Miniatures website is disappointingly lacking in pictures and information about their miniatures, I thought I would post a description of the contents of the packs, some pictures of the miniatures, and my review of them. Hopefully this will be helpful for anyone considering purchasing some, or trying to decide on a scale or manufacturer to buy some Great War miniatures from. I bought several different packs each of Western Front British and Western Front German miniatures.

The packs of infantry typically have three poses total, one officer pose and two different poses of infantryman. The numbers of each appear to be very inconsistent. I've had packs with anywhere from 2-7 of the officer pose, with the rest split between the other two poses, not necessarily evenly. So this could be a real problem for anyone that wants a particular ratio of officers and men, or wants to split the two infantryman poses evenly for some reason. You won't be able to count on a certain number of officers, so you may end up with extras or have to buy more packs. Even the total number of figures in a pack isn't consistent, but they all had at least 30 figures.

Fist up, here's a picture of a couple of the infantry figures in front of a ruler to give an idea of their overall size. Click on any of the pictures for a larger view.

Size Size

British
BP1 - Infantry in Cap
BP1 BP1

BP2 - Infantry in Helmet
BP2 BP2

BP3 - LMG in Helmet (10 figures, all the same pose)
BP3 BP3

BP15 - Highlanders
BP15 BP15

BP22 - High command (4 figures, 2 of each pose)
BP22 BP22


German
GP1 - Infantry in Picklehaube
GP1 GP1

GP2 - Infantry in Helmet
GP2 GP2

GP6 - German Stormtroopers (4 poses, including officer)
GP6 GP6 GP6 GP6

GP11 - HMG 08 in helmet (3 teams of two figures)
Size GP11 GP11

GP19 - High command (3 figures of two different poses, and one trench periscope?)
GP19 GP19 GP19 GP19

My overall impression of these 10mm Pendraken WW1 miniatures is favorable. They are fairly detailed and the details are crisp. They are mostly well cast, though a few had excessive amounts of flash on them. The figures look a bit stocky and not perfectly proportioned, but that is true of most 10mm miniatures. On the other hand, they are extremely sturdy miniatures, even the bayonets and rifle barrels. My other experience with 10mm miniatures is GHQs excellent 10mm American Civil War miniatures. They are amazingly well proportioned, but many of them are also extremely fragile, and I end up with many bent rifle barrels. That won't be a problem with these Pendraken miniatures. So aside from the oddly inconsistent figure numbers in the packs, which might be an issue for some people who want to be able to count on having certain ratios of officers to men, I would definitely recommend these. Of course, I haven't painted any of them yet, and that's when I'll really find out how good they are by how easy it is to paint the details.

The figures can be ordered straight from the Pendraken website. They don't have an online shopping cart, which is kind of annoying. So you have to e-mail them your order and the total and your payment information. I'd advise splitting up your credit card number into multiple e-mails if you go that route, just to be safe. But the service I got was good, the delivery was fast, and even with the expensive shipping from the UK to the US (which was about 20% of my order total), with the exchange rate it ended up not being all that expensive to order from them. It was cheaper to order straight from them than from anywhere else I was able to find online.

Wednesday, February 4, 2009

10mm Scale Split Rail Fences

I discovered recently while playing my first historical wargame (a game of Field of Battle set in the American Civil War using 10mm miniatures) that I have very little terrain that works for 10mm scale miniatures. So I need to start working on some 10mm scale terrain to use in my historical gaming. It seems like fences, corn and wheat fields, hills, woods, and orchards are some of the most common terrain features to have been found on American Civil War battlefields. So those are the things I will start with.

First up, I decided to make some split rail fences. I figured they would be fairly easy and inexpensive to make. I bought a box of flat toothpicks and cut some of them in half. Then I stacked the small pieces up like a split rail fence, gluing down the pieces a row or two at a time onto a large popsicle stick. Once it all dried, I painted the fence brown and painted and flocked the popsicle stick. That's all it took, and I have a quick and cheap split rail fence. Here are some pictures of the results.

Monday, February 2, 2009

Attraignnor IV Campaign: Turns 1-5

Below is the campaign map with the initial positions of the armies marked. Click on it for a larger view.
Warhammer 40k campaign map
And here is a summary of the first five turns of movement, with the maps below. So far, it looks like one leg of the Tau army staged an attack on the main gates of Attraignnor IV's capitol city, only to arrive and find the gates destroyed and unguarded, as the city was already in the middle of a civil war. They crossed the bridge into the city, capturing the fortified defenses just inside the walls, and advanced through some civilian areas.

The other leg of the Tau force inserted into a small forgotten corner in the northwest of the city. They quickly secured the Imperial Senate House, but it has long since been abandoned and is no longer any sort of seat of power for the Attraignnor IV government. They continued on to capture the massive Spaceport Complex in order to aid in landing further Tau reinforcements, and set up a very strong defensive position on Gibbet Hill, overlooking the river and a great deal of the city.

Meanwhile, a renegade space marine chapter from off-world descended on the city, dropping off troops in the residential areas in the northeast of the city and making their way to the southwest. Former Imperial Fist Captain Ferranus and his forces broke through into the capitol city from the Western suburbs. They had been contacted by the off-world marines, who do not reveal the name of their chapter but are secretly known as the Crusaders. Both groups of renegades made their way towards the large expanses of the palace grounds, where they met up to organize and coordinate their attacks.

With the two chaos forces now linked up at the palace grounds, the Tau army in the North of the city, though well-entrenched, is completely cut off from the Tau army to the East.

The Tau in the north, realizing they are cut off by the large chaos force assembled on the palace grounds, have decided to consolidate their position. Meanwhile, the combined chaos forces are spreading out to capture key strategic targets within the city.
Warhammer 40k campaign map
Victory Points
Chaos: 3
Tau: 2
Warhammer 40k campaign map
Victory Points
Chaos: 4.5
Tau: 2.5
Warhammer 40k campaign map
Victory Points
Chaos: 10.5
Tau: 8.5
Warhammer 40k campaign map
Victory Points
Chaos: 16.5
Tau: 11.5
Warhammer 40k campaign map
Victory Points
Chaos: 24.5
Tau: 14