I recently played another game of Warhammer 40,000 up at the Battle Bunker in Downers Grove, Illinois. We agreed to 1500 points of my Tyranids against my opponent's Orks. The Battle Missions book had just been released, so I picked up a copy when I arrived at the store. It contains 30 new missions that don't require any special table setup or force organization chart or army selection, so we decided we would play one of those.
Each army had three missions in the book that are particularly suited to their style of warfare. If you wish to play one of these (as opposed to randomly playing any of the 30 missions in the book), you roll off with your opponent. The winner will play one of the three missions specific to their army. That player rolls a D3 to determine which of the 3 missions to play. You could accomplish the same thing by one player rolling a single D3 for which of the three missions, with an odd number meaning choose from one army's missions, and even meaning the other. Then again, if you didn't like a lot of die rolling, you wouldn't be playing this game anyway.
As I said, the missions don't require specific army setup or table setup, so you can make armies and set up the table ahead of time and still play any of them. They mostly just involve changes to how the armies are deployed, where the objectives are placed, and the victory conditions. Each one usually also has one or two special rules that apply. So they're pretty simple to get playing really quickly compared with, for example, Planetstrike games.
We rolled to see which Ork or Tyranid mission we'd be playing, and got the first Ork mission. It is called Blitzkrieg, and is meant to represent a swiftly advancing column of Orks suddenly coming upon an enemy and immediately attacking them without warning. Deployment zones were opposite table quarters, with three objectives: one in the center of the board, and one each in the centers of the two non-deployment zone table quarters. Victory went to the army that held the most objectives at the end.
The catch was that only Fast Attack units could deploy at the start of the game. Everything else had to be kept in reserve. My opponent didn't have any Fast Attack units in his army. I had one unit of 16 Gargoyles, but no Synapse creatures that could deploy. I could have chosen to keep them in reserve, but decided to deploy the Gargoyles in the hopes that they could pass their Synapse test and be able to get into a good position before the enemy could show up.
A special rule for the mission allowed any fast vehicles to start making reserve rolls on turn 1. Unfortunately, my opponent didn't take any fast vehicles, either. So everything about the mission that seemed like it was meant to benefit an Ork army didn't help him at all. I, of course, didn't have any fast vehicles either. For this mission, the Orks would have the first turn on a roll of 2+, which my opponent made. So he would go first, but since he didn't have anything on the table, his first turn was pretty short. It was just that kind of day for the hapless Orks.
The Story
The Tyranid invasion of Planet No-Name, now designated Imperial World 18-D93, was progressing swiftly now. The small splinter fleet of Hive Fleet Behemoth had already accomplished their initial mission, fighting off an invading force of Orks to recover Tyranid genetic samples from an abandoned science facility. They then continued their assault on the planet, overwhelming local defense forces, and even fighting off small contingents of Ultramarines and Space Wolves who had been sent in to check their advance.
The Tyranid advance continued on many fronts. Meanwhile, in the rearward areas that had been cleared of any enemy resistance, Tyranid orgamisms set about devouring and breaking down all bio-matter to absorb into the Hive Fleet. Many birthing pools were created to mix the genetic material together and produce reinforcements for the Tyranid forces. With all enemies in these areas gone and all life having been stripped from them, the Hive Mind had no reason to consider these rearward areas vulnerable.
That changed when an Ork ship crash landed on Planet 18-D93 behind the Tyranid lines where the lightly defended birthing pools had been created. A small army of Orks poured out of the ship, immediately charging into battle with the nearest Tyranid organisms they could get to grips with. The Hive Mind had to quickly divert reinforcements to protect several of the orifices it had created to birth new Tyranid creatures onto the planet, thus protecting it's supply of fresh forces for the invasion effort.
Turn 1
The Ork army was not yet in sight off in the distance, but heading towards an area with three undefended birthing pools. The pools were buried in the ground with only their openings sticking out through the surface. With most of their vehicles having been destroyed in the crash, the foot-slogging Orks made slow progress. The first Tyranids to arrive were 16 Gargoyles dropped in from above. Being so far from the control of a Synapse Creature, the confused Gargoyles did nothing but mill about and slowly crawl towards a nearby rock formation, looking for shelter.


Ork Turn 2
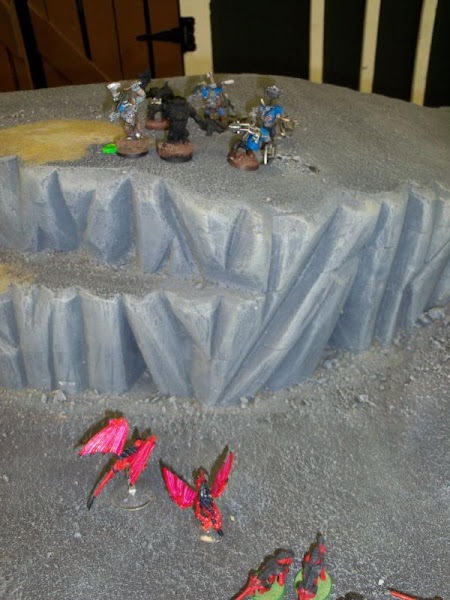
The Orks began to arrive in the area. The Warboss led a large squad of Boyz, advancing cautiously in the foreign terrain. A looted tank and Dreadnought located a ramp they used to descend from the cliff. A unit of Lootas took position on the high ground on the cliff overlooking the valley that contained the Tyranid birthing pools.


Tyranid Turn 2
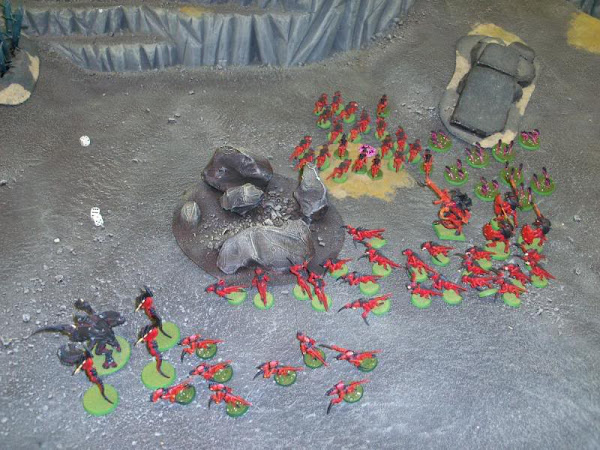
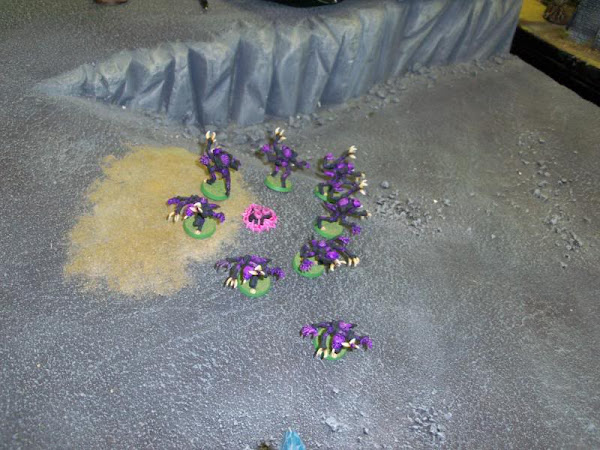
The aimless Gargoyles continued to mill about, slowly making their way towards the safety of the nearby rocks. At the same time, many more Tyranid reinforcements arrived to protect their precious stores of bio-material. A unit of Genestealers, who could operate independently of the Hive Mind, arrived on the right and cautiously made their way toward one of the birthing pools through open ground. Those Lootas on the cliff may have made them a bit reluctant. In the center, an old Hive Tyrant who had been around for the very beginning of the invasion of Planet 18-D93 arrived with his Tyrant Guard, along with a unit of Termagants to his left and some Rippers to his right.

Ork Turn 3
A few more of the Ork stragglers turned up with a unit of Nobz and a Painboy moving in behind the tank, and other unit of Nobz with a Painboy arriving behind the Lootas. The Warboss's unit, Looted tank, and Dreadnought all advanced towards the approaching Tyranids. The Lootas fired a furious volley at the Hive Tyrant, but failed to do any harm to the tough Tyrant Guard.


Tyranid Turn 3
The remaining Tyranid reinforcements all showed up, and now the numbers favored them heavily. The Ork army with their stragglers falling behind would pay for their disorganized attack. The Tyranid Gargoyles, finally under control of the Hive Mind thanks to the Hive Tyrant, moved towards the cliff face. The 21 Termagants moved up into the rock formation, to be replaced by 20 Hormagaunts, and another unit of 8 Hormagaunts with Adrenal Glands and Toxin Sacs. Some armor busting support also arrived, in the form of a Regenerating Carnifex with Crushing Claws, Bio-Plasma, along with three Zoanthropes. They advanced towards the Looted Tank and Dreadnought. The Genestealers continued the cautious approach toward the birthing pool on the right. The Rippers advanced towards the cliff, and the Hive Tyrant moved towards the attacking Orks. The Tyrant got just close enough to the Looted Tank for his Heavy Venom Cannon to have range. He fired at the vehicle and scored a direct hit, the impact stunning the crew.


Ork Turn 4
Still the straggling Ork reinforcements did not arrive. Undeterred, the Orks pressed on. The Warboss and his unit advanced towards the nearest birthing pool, and the Dreadnought moved behind a nearby wall hoping to avoid the attentions of the Carnifex and Zoanthropes. The Nobz on the Ork right moved up behind the Looted Tank, as the disoriented tank crew struggled to get the machine moving again. On the cliff, the other unit of Nobz moved towards the birthing pool to their left while the Lootas changed targets to fire at the much more vulnerable Genestealers, killing four of them with another massive volley.


Tyranid Turn 4
The Tyranid army boldly advanced. The Carnifex, Zoanthropes, and Hormagaunts moved to the left towards the approaching Orks. The Termagants moved to surround the birthing pool in the center, with the Rippers moving to support them in case of attack. The Hive Tyrant stayed in the center to keep control of the lesser creatures. He also fired another shot at the Looted Tank. As the Zoanthropes were not yet in range, it was up to the Hive Tyrant to prevent the tank from firing its powerful battle cannon, which would cause devastation amongst the massed Tyranids. The shot missed, but was close enough to catch the side of the vehicle in the blast. Luckily, shards from the blast tore into the gunners, delaying them from firing for a few more crucial moments. Elsewhere, the Genestealers, undaunted by their losses, continued toward the birthing pool on the Tyranid right.

At the base of the cliff, the Gargoyles were once again out of Synapse range. This time, the simple creatures were able to remember their mission, and heeded the faint echos of the Hive Mind's commands. They flew up to the top of the cliff, descending on the terrified Lootas who had previously lost sight of them. The Gargoyles surrounded the stunned Orks, fired their Fleshborers, then charged into combat, spitting their poisonous venom. The panicked Orks stood no chance and were easily massacred.


Ork Turn 5
Finally the remaining Ork reinforcements arrived! The slow moving heavy artillery battery showed up with it's escort of Ork Boyz led by a Weirdboy. Their late arrival had already cost the Orks much. Then, immediately upon seeing the battle unfolding before him, the Weirdboy shouted "Ere we GO!", intending to teleport himself and his Boyz right into the fight. Unfortunately, in his enthusiasm to get to grips with the enemy, he teleported way too far. His entire unit disappeared into the warp, and there was no telling if or where they re-emerged. The rest of the Orks paid little notice to the new arrivals. The Tank crew, frustrated at not having taken much part in the battle and happy to be able to move their vehicle again, slammed down on the giant red button in their excitement, thrusting the tank straight forward into a ruined wall, and getting right in the way of their advancing Dreadnought. No damage was done to the wall or the tank, except for a little inconvenience to the Dreadnought and Nobz who moved around the out-of-control vehicle. The Warboss and his Boyz continued to advance towards the nearest birthing pool and finally reached it, though they had become very spread out in the process.


On the top of the cliff, the Painboy and his Nobz were unimpressed by the sudden attack of the Gargoyles which had wiped out the Lootas. The Nobz charged in, tearing apart all but two of the Gargoyles who then fled back down the cliff face toward the Hive Tyrant.

Tyranid Turn 5
The Tyranids continued their advance. On the left, the Carnifex and two units of Hormagaunts moved towards the nearby birthing pool and the Warboss's Boyz. Letting out a piercing scream, the Carnifex attempted to spit a ball of coruscating bio-plasma at the Boyz, but only succeeded in spitting up on himself and two nearby Hormagaunts. One of the Hormagaunts melted into a puddle of slime, but the other was miraculously unharmed, as was the Carnifex who is no doubt used to dribbling bio-plasma on himself. In the center, the Termagants, Rippers, Hive Tyrant and remaining two Gargoyles consolidated their defensive positions around the center birthing pool. The Hive Tyrant fired a shot at the exposed Ork Dreadnought, but missed completely. The Genestealers created a defensive cordon around the birthing pool on the Tyranid right.


The Zoanthropes were finally close enough to the enemy to demonstrate their capabilities. Their searing Warp Lance psychic blasts easily destroyed the Looted Tank. Nearby, the enraged (an a little embarrassed) Carnifex charged into the unit of Boyz near the birthing pool, accompanied by the Hormagaunts with Toxin Sacs and Adrenal Glands. Six of the Hormagaunts reached the enemy, and incredibly cut down six of the Orks, though the return attacks from the remaining Orks easily finished off all of the fragile creatures. Then the ponderous Carnifex swung his mighty Crushing Claws, obliterating another seven of the Orks crowding around him. The enraged Warboss was unfortunately too far away to add his weight to the fight. Having lost so many Boyz, with a still unharmed Canifex rampaging amongst them, the Boyz ran for it and scattered completely as the pursuing Carnifex ran them down.


At the end of turn 5, the roll was made for random game length to see if there would be another turn. There was, but we both decided to call an end to the game here. The Orks had no more Troops choices with which to capture an objective, and appeared to have no hope of contesting the two objectives solidly held by the Tyranids, even if the game lasted another few turns. So the Orks retreated, and the Tyranids had successfully fought off the surprise attack on the birthing pools behind their lines. However, the did have to divert forces from the front to do so. Would this leave them open to a counter-attack from Imperial forces? And what became of the teleporting Weirdboy? Would he return with an even bigger army to resume the attack? Would the retreating Warboss rally his Orks back into a significant fighting force? All this remains to be seen, as the future of Planet 18-D93 hangs in the balance.
Good battle report. Sounds like fun was had by all.
ReplyDeleteThanks for sharing your experience about the battle report for new Warhammer 40K.I will buy the battle mission book to try the new missions that includes in the recently release copy.
ReplyDelete