The Story
There are no official scenario rules, so I went for a pretty straightforward and typical gaming scenario. Basically, both sides are trying to either rescue or capture a wounded downed pilot. The pilot's aircraft has crashed in the wilderness, and both sides are trying to get to him and carry him off first.
The Forces
One side represented a Concord Combined Command force, the other a group of Freeborn mercenaries. I used some figures from my Warhammer 40,000 Renegade Imperial Guard army. The C3 force contained four units of five C3 Rever soldiers with plasma carbines and HyperLight armor. The Freeborn force had four units of eight Freeborn Revers with plug carbines and basic armor. I used the basic Rever statline for all of them, with the exception of one officer on each side, and two NCOs on the Concord side. These had one higher Courage and Initiative than a normal soldier (so Courage: 8 and Initiative: 6). I allowed any friendly units within 6" of an Officer to use their Courage for any Courage tests, and Initiative for reaction tests. Units with an NCO in them could use the Courage and Initiative of the NCO.
The Setup
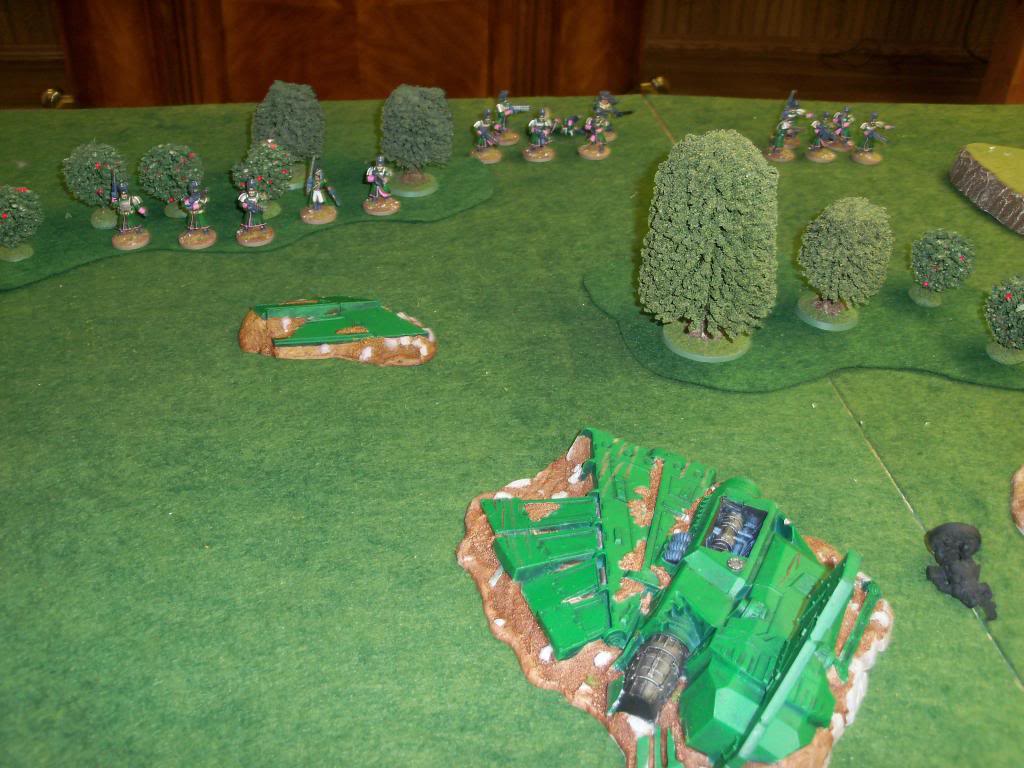
The terrain consisted of just some hills, some woods, and the wreckage of the crashed aircraft. The wounded pilot was placed in the exact center of the table. A model had to end a move in base contact with the pilot to capture him. After that, the unit holding him would move at half pace, and the pilot model would be kept in base contact with the model carrying him. If this model fell casualty, the pilot would need to be picked up again by having a model end a move in base contact with him. Whatever side was able to move off their own table edge with the wounded pilot would be the winner. Models were deployed up to 6" onto the table. The initial deployments can be seen below, with the Freeborn on the left and the Concord on the right.


The Game
The Freeborn unit on the far left took an Engage action to move up onto the hill and take some long range shots at the Concord unit across from them, which contained the Concord officer. The Concord soldiers didn't bother to react, since at such a long range, they could count on the Hyperlight armor to protect them even if a few lucky shots hit them. But the Freeborn unit was amazingly lucky and took down one of the C3 soldiers, drawing first blood.

The unit on the Concord far right followed their Sergeant into firing positions in the woods in front of them. This gave them a good field of fire to cover where the wounded pilot was.
The Freeborn officer led his squad straight up the middle of the battlefield toward the wounded pilot. The Concord squad that has just moved into the woods was quick enough to get some reaction fire at them, thanks to the quick reaction of their sergeant to the movement. However, at such long range, the fire was ineffective.

On the Concord left, the squad with the other sergeant moved up onto the hill to give themselves a good view of where the wounded pilot was.

The Freeborn officer continued his dash toward the downed pilot, taking fire two directions as the C3 squads on both flanks of the Concord line opened fire on them. The long range, combined with the movement of the targets and the obscuring wreckage, made for difficult shots, and none found their mark. The Freeborn unit ignored the minor threat and made it to the wounded pilot, one of them picking him up.

Seeing their chance to rescue their downed pilot slipping away, the Concord squad on the left of the C3 force threw themselves forward to engage the Freeborn Officer's unit in a fierce firefight, causing a casualty in each unit.

The nearest Freeborn unit moved up to give some relief to their leader, and took some long range shots at the Concord soldier, but they were protected by their Hyperlight armor.

The unit in the woods on the right of the Concord force also moved up out of the trees to fire on the Freeborn unit holding the pilot, dropping two of the mercenaries. The one carrying the pilot, however, remained unharmed.

Seeing the enemy quickly closing in on him, the Freeborn officer began pulling his squad back, taking constant fire from the two nearby Concord units as they withdrew. Another two of the Freeborn fell as casualties, but again the one carrying the pilot remained unscathed.

Desperate to stall the Freeborn escaping with the downed pilot, a Concord unit again moved up and engaged them in a vicious firefight. Finally the Freeborn carrying the pilot was shot down, along with another of his squad. In return, the Concord unit lost their sergeant. The battle was taking its toll on both units, and the both had the combat status degraded.

The action was heating up now. The Freeborn unit on the hill on their left ran up to pick up the dropped pilot. Running out of alternatives, the Concord unit on their right moved up to engage them in a firefight, losing one of their own but taking down two of the Freeborn.

The Freeborn unit that now carried the pilot began to withdraw. The Concord unit should have fired on them as they fell back, but they hesitated, beginning to reconsider the importance of their objective. (They failed their Reaction test, so were unable to take opportunity shots and had the Combat Status lowered).

Overcoming their moment of doubt and hesitation, the Concord squad moved up to engage the enemy, taking down another of the Freeborn mercenaries, but not the one carrying the pilot.

Seeing his men dropping fast, the Freeborn officer took the remaining two men of his squad and joined with the squad carrying the pilot, which bolstered the resolve of his men.

Still desperate to slow the enemy down and recapture the wounded pilot, the Concord squad again surged forward and engaged the Freeborn in a close range firefight. The exchange of fire cost the sergeant his life. Another Freeborn also fell casualty, but the one carrying the pilot remained safe. However, the mounting casualties were getting to them, and their effectiveness began to erode.

Hoping to free their friends from the Concord pursuit, the nearby Freeborn unit moved up to engage the C3 soldiers in a firefight, causing another casualty on each side.

Not pictured, the C3 Officer led his unit forward as fast as possible, hoping to get in range of the enemy in time to stall them. The combined and depleted Freeborn unit with the pilot again withdrew toward the safety of their line.

The Concord Officer's unit continued to move up and engaged the fleeing Freeborn unit as it continued it's withdrawal. Unfortunately, their fire at that range was mostly ineffective. They took down another Freeborn mercenary, but were unable to hit the one carrying the pilot or slow down the enemy's escape. The Freeborn Officer's unit managed to leave the battlefield with their prize, the captured Concord pilot.


Observations
1. Having NCOs in a couple of units with Courage 8 may have been too much. Even 7 as a basic courage seemed to result in me passing most of the Courage tests, so I was rarely seeing drops in Combat Status. Then again, that was probably just due to me having rolled particularly well on my Courage checks.
2. Positioning your models is extremely important, since (as I interpret it), you can't draw line of sight over bases of friendly models even in your own unit. Frequently when returning fire or in a firefight, I had shots blocked by my own men. I think this is helpful as a deterrent for making very large units, since that will result in more shots being blocked.
3. Reacting with Opportunity Fire was usually not a very attractive option, and ended up only being used in desperation. First, there's the possibility of failing the initiative test and doing nothing PLUS dropping in Combat Status. Then there's basically -2 to hit for opportunity fire compared with normal shooting. Maybe it would be more worth doing if regardless of passing or failing the Initiative test you got to have your opportunity fire either way, failing the test just means that you then drop in Combat Status. Maybe there could be an action that allows you to indicate you are covering an area of ground or another unit, which then give you an Initiative bonus when attempting to do reaction fire on them?
4. There doesn't seem to be much incentive to get within 12" of an enemy before firing. Not only does it make your shots less likely to hit (assuming, as I did, that both sides in the Firefight use the Firefight to hit modifiers), but it gives your enemy free shots back at you that they would have to pass an Initiative check to get otherwise. In this case, I ended up still doing it because I needed to stay close in hopes of grabbing the wounded pilot, but even then it doesn't seem worth doing.
5. Overall I like the action/reaction system. I had a unit on each side that never actually did anything, but I think if the game had gone on longer, or in a different kind of scenario, I would have gotten around to using them as other units got depleted. I didn't get much chance in this game to see the fluid combat status come into play much, since I was rolling really well on my Courage checks, so I can't really comment on that aspect of the game.
Krazus: verynice game Craig, and some very interesting conclusions.
ReplyDeleteThanks for sharing.