The Confederate Division under Major General James Longstreet has successfully held their position on the battlefield, while unfortunately the rest of the Confederate army has fallen back. The swift but somewhat disorganized Union pursuit of the fleeing Confederates has put Longstreet's division in danger of being cut off from the rest of the army. They currently find themselves surrounded by Union forces, and must attempt to break out and re-join their retreating army. The game was played using the Breakout Scenario I have previously posted on this blog.
The Forces
The forces were as described in the Breakout Scenario. They are roughly even, though the Confederate force has two fewer Elite Infantry units, but they do have two Artillery Batteries. The Confederates have the disadvantage of being surrounded, but they do get to choose which direction they will attempt to break out on, and whichever direction they go they will initially greatly outnumber their enemy, until the Union can catch up with the rest of their force.
Confederate
The Confederate force was led by Major General James Longstreet (Staff Rating: 8) and consisted of:
Texas Brigade - Brigadier General John Bell Hood
Staff Rating: 8, Decisiveness: Low, Independence: Low
| Unit | Type | Armament | HTH | Shooting | Morale | Stamina | Special |
|---|---|---|---|---|---|---|---|
| 1st Texas | Infantry | Rifled Musket | 6 | 3 | 4+ | 3 | |
| 4th Texas | Infantry | Rifled Musket | 6 | 3 | 4+ | 3 | |
| 5th Texas | Infantry | Rifled Musket | 6 | 3 | 4+ | 3 | |
| 18th Georgia | Infantry | Rifled Musket | 6 | 3 | 4+ | 3 | |
| 3rd Arkansas | Infantry | Rifled Musket | 6 | 3 | 4+ | 3 | |
| Artillery Battery | Artillery | Smoothbore Light | 1 | 3-2-1 | 4+ | 2 |
Stonewall Brigade - Brigadier General Thomas Jackson
Staff Rating: 9, Aggression: High
| Unit | Type | Armament | HTH | Shooting | Morale | Stamina | Special |
|---|---|---|---|---|---|---|---|
| 33rd Virginia | Infantry | Rifled Musket | 6 | 3 | 4+ | 3 | Brave, Steady |
| 2nd Virginia | Infantry | Rifled Musket | 6 | 3 | 4+ | 3 | Brave, Steady |
| 4th Virginia | Infantry | Rifled Musket | 6 | 3 | 4+ | 3 | Brave, Steady |
| Rockbridge Artillery | Artillery | Smoothbore Light | 1 | 3-2-1 | 4+ | 2 |
Forrest's Cavalry Brigade - Brigadier General Nathan Bedford Forrest
Staff Rating: 8
| Unit | Type | Armament | HTH | Shooting | Morale | Stamina | Special |
|---|---|---|---|---|---|---|---|
| 4th Tennessee | Cavalry Infantry | Pistol/Shotgun | 6 4 | 1 2 | 4+ 4+ | 3 3 | Skirmish, Marauders |
| 8th Tennessee | Cavalry Infantry | Pistol/Shotgun | 6 4 | 1 2 | 4+ 4+ | 3 3 | Skirmish, Marauders |
Union
The Union force was led by Major General Winfield Scott Hancock (Staff Rating: 8) and consisted of:
Irish Brigade - Brigadier General Thomas F. Meagher
Staff Rating: 8, Aggression: Low
| Unit | Type | Armament | HTH | Shooting | Morale | Stamina | Special |
|---|---|---|---|---|---|---|---|
| 69th New York | Infantry | Rifled Musket | 6 | 3 | 4+ | 3 | |
| 63rd New York | Infantry | Rifled Musket | 6 | 3 | 4+ | 3 | |
| 88th New York | Infantry | Rifled Musket | 6 | 3 | 4+ | 3 | |
| 116th Pennsylvania | Infantry | Rifled Musket | 6 | 3 | 4+ | 3 | |
| 28th Massachusetts | Infantry | Rifled Musket | 6 | 3 | 4+ | 3 |
Iron Brigade - Brigadier General Solomon Meredith
Staff Rating: 8, Independence: Low
| Unit | Type | Armament | HTH | Shooting | Morale | Stamina | Special |
|---|---|---|---|---|---|---|---|
| 2nd Wisconsin | Infantry | Rifled Musket | 6 | 3 | 4+ | 3 | Brave, Steady |
| 6th Wisconsin | Infantry | Rifled Musket | 6 | 3 | 4+ | 3 | Brave, Steady |
| 7th Wisconsin | Infantry | Rifled Musket | 6 | 3 | 4+ | 3 | Brave, Steady |
| 19th Indiana | Infantry | Rifled Musket | 6 | 3 | 4+ | 3 | Brave, Steady |
| 24th Michigan | Infantry | Rifled Musket | 6 | 3 | 4+ | 3 | Brave, Steady |
Michigan Cavalry Brigade - Brigadier General George Armstrong Custer
Staff Rating: 8
| Unit | Type | Armament | HTH | Shooting | Morale | Stamina | Special |
|---|---|---|---|---|---|---|---|
| 1st Michigan | Cavalry Infantry | Breech-Loading Carbine | 5 4 | 1 2 | 4+ 4+ | 3 3 | Skirmish |
| 5th Michigan | Cavalry Infantry | Breech-Loading Carbine | 5 4 | 1 2 | 4+ 4+ | 3 3 | Skirmish |
The Setup
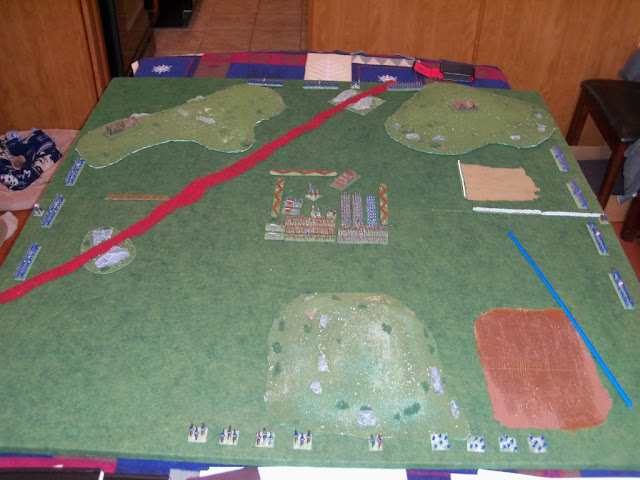
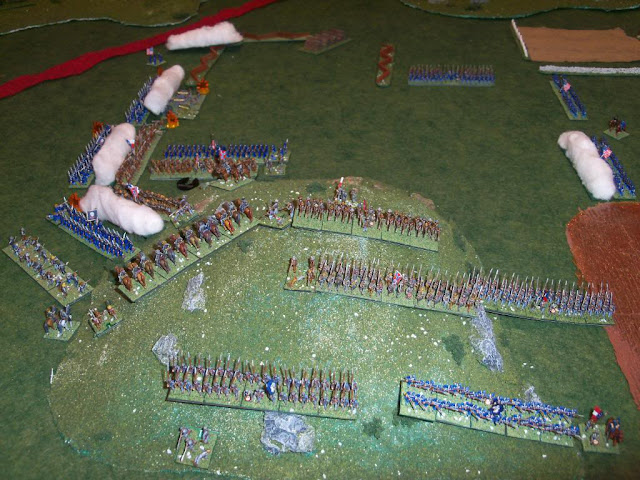
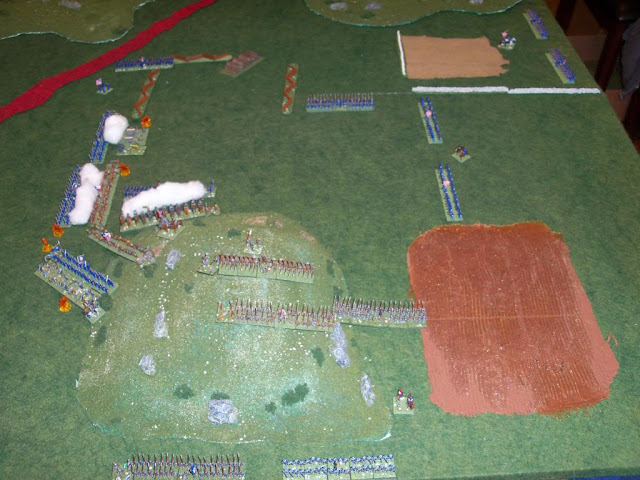
The red felt line in the picture below represents a road. We decided that the rocky pieces jutting from the hills would count as obstacles, costing 6cm of movement, and would obscure targets on the other side of them. The Union army deployed first. At the bottom of the picture is the Michigan Cavalry, in skirmish formation. To the right, 4 regiments of the Irish Brigade led by Brigadier Meagher. To the top, the last Irish Brigade regiment and two Iron Brigade regiments (what was initially the reserve in the prior battle), commanded by Major General Hancock. To the left, the other three Iron Brigade regiments led by Brigadier Meredith. The Confederates choose to go toward the bottom edge, which I will consider to be South for the purposes of the battle report. The surrounded Confederate force is deployed in the center of the battlefield, with the Texas Brigade in line facing South, and the Stonewall Brigade behind them in march column. Both Artillery Batteries faced West, toward the bulk of the Iron Brigade. The Confederate Cavalry reinforcements would arrive from the South.
Turn 1
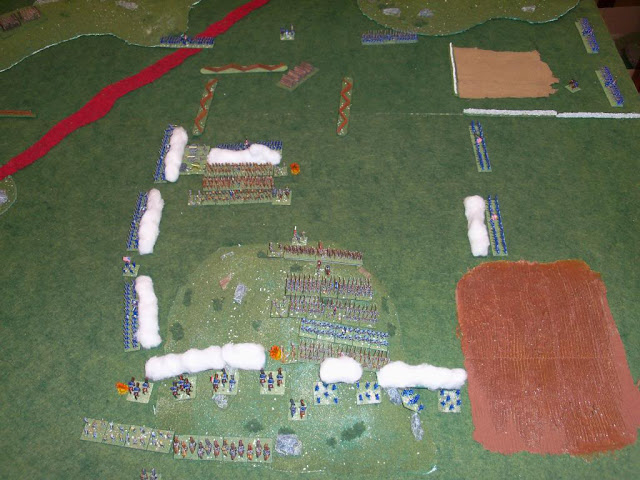
Finding themselves surrounded, the Confederates decided to attempt to breakout to the South, towards the Union Cavalry screen. Unfortunately, the had some trouble getting organized and determining who should move first. Jackson's Stonewall brigade was ready to move, but held up by the Texans in front of them. Two of the Texas brigade regiments finally got moving, making it to the base of the hill.
The Union Cavalry in the South moved near the top of the hill and dismounted, ready to do whatever they could to stall the escaping Rebels. To the West and North, the Iron Brigade regiments were ordered forward and were able to take some long range shots at the Confederate Artillery, which was largely unaffected by the fire. To the East, the overcautious Brigadier Meagher did not advance the Irish Brigade regiments under his command.
Turn 2
The group of two Texas Brigade regiments continued their advance, reaching the top of the hill to encounter the skirmishing Union Cavalry. They took some shots, but the spread out cavalrymen shrugged it off. The three Stonewall Brigade regiments moved up in march column behind the two Texas Brigade regiments, while the three remaining regiments of the Texas Brigade advanced slowly under the command of Longstreet, who attempted to to analyze the situation and not act too rashly. The two Confederate artillery batteries unleashed a brutal cannonade on the closest Iron Brigade regiment.
Brigadier Meagher was again cautious, perhaps thinking it best to let the Confederates escape and avoid further casualties to his own men. He did move the two southernmost Irish Brigade regiments forward, and they got close enough to take some ineffective shots. The Union Cavalry used their breech-loading carbines to good effect, causing some disorder in the leading Texas Brigade regiment. Brigadier Meredith swung two of his Iron Brigade regiments to the south in an attempt to get ahead of the escaping Confederates. In the north, General Hancock sent another Iron Brigade regiment to charge the Rockbridge Artillery, though they got held up on the snake rail fence and were unable to finish off the artillery quickly.
Turn 3
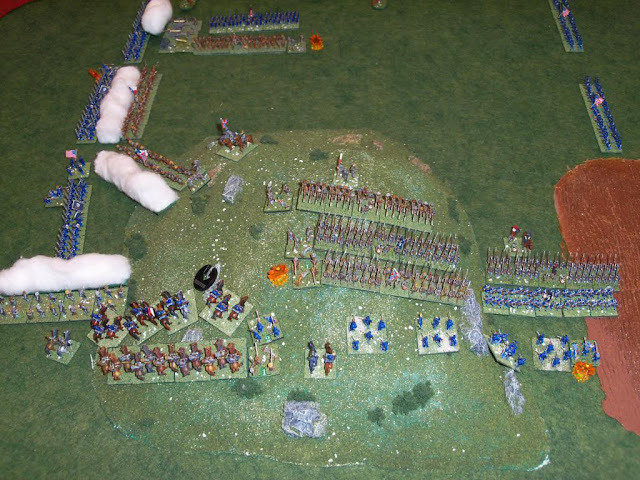
The Confederate Cavalry under Nathan Bedford Forrest showed up right on schedule, riding right up behind the dismounted Union cavalry and peppering them with pistol and shotgun shots. Meanwhile, the Stonewall Brigade formed into line, and followed the non-disordered Texas Brigade regiment up the hill in a column of regiments. The thin blue line of dismounted Union cavalry on the hill looked to be hopelessly overpowered by the enemy, but they held their ground. The remaining three regiments of the Texas brigade stayed where they were, as Longstreet pondered how best to utilize them. To the north, the Iron Brigade regiment easily captured the Rockbrigde Artillery battery.
Again, the Irish Brigade regiments under Brigadier Meagher stayed put as the battle moved away from them. To the far north, Hancock held two regiments reserve. He did order one of the Iron Brigade regiments under his command forward, to engage the rear-most regiment of the Texas Brigade at close range. Brigadier Meredith brought his three Iron Brigade regiments up to form and "L" with the line dismounted Michigan Cavalry, and volley fire erupted all along the curved Union line.
Turn 4
Major General Longstreet now knew what he needed to do with the three Texas Brigade regiments under his command. One was still disordered from the Union volley from behind them, but the other two regiments were moved up to engage the immediate threat, which was the Iron Brigade regiments to the west. Longstreet knew if he could hold them off a little longer, most of his Division could escape, since there so far had been little threat from the Irish Brigade to the east. Forrest sent one of his Cavalry Regiments to harry the flank of the southern most Iron Brigade regiment. He send his other regiment of Tennessee cavalry charging into the dismounted skirmishing Union infantry, which quickly routed from the furious attack. The rest of the Confederate infantry on the hill spread out into two columns, so that the other unit of Union Cavalry was taking fire from two full Confederate infantry regiments, but the proud Wolverines still held their ground. To the north, the remaining Confederate artillery battery, which had endured a great deal of close range fire and amazingly survived, now got a measure of revenge as it blasted the regiment before it with grapeshot.
Meredith wheeled his southern most regiment to the left, trying to close the door on the Texas Brigade regiments that had fallen behind. Behind the artillery battery, an Iron Brigade regiment charged the rear of the straggling Texas Brigade regiment, which simply fled towards the south. To the east and north, the Federal infantry remained still, though Brigadier Meagher did ride forward a little to get a better view of how things were progressing. The remaining Union Cavalry did their best to delay and disorder the advancing Confederates with their accurate shooting, while the Union Infantry continued their volleys, causing a great deal of disorder in the Rebel ranks. Amazingly, yet another round of close range volley fire failed to finish off the determined Confederate artillery battery.
Turn 5
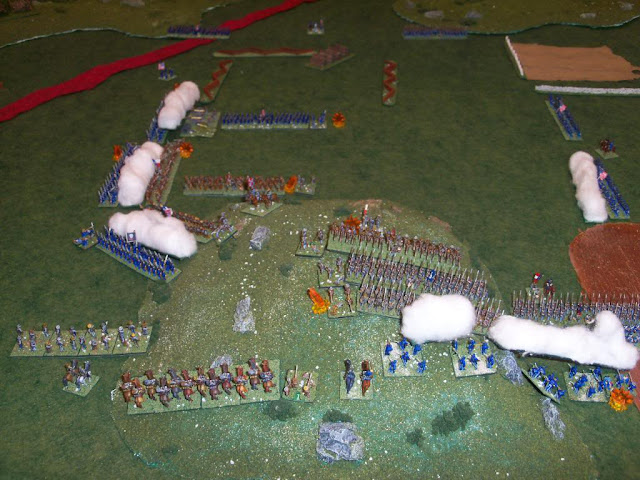
Stonewall Jackson personally led the charge of the 33rd Virginia into the skirmishing Union Cavalry on the hill. Though Custer did his best to inspire his Wolverines, the outcome was never in doubt, and they were routed off the battlefield, leaving the southern escape route completely open. The Confederate cavalry under Forrest got behind and to the side of the southern most Wisconsin regiment of the Iron Brigade, which took close range fire from three sides. True to their name, they managed to hold their ground under the withering fire. The remaining Rebel artillery battery poured another brutal round of grapeshot into their foes.
Hancock sent one of the Union reserve regiments to the south, but it appeared to be too late to make a difference, as they had a long way to go. The Iron Brigade regiment behind the Rebel artillery once again charged into the rear of the Confederates before them, this time breaking them, and capturing any who didn't scatter. The rest of the Union division did all it could, which was to continue their volleys against the enemies to their front. Yet again, the Confederate artillery miraculously survived another round of fire.
Turn 6
The two foremost regiments of the Stonewall brigade were able to escape the battlefield. The remaining Virginia regiment and the two Texas Brigade regiments on the hill needed to pause a bit to rest and reorganize, though their goal was in sight. Elsewhere, Forrest's Tennessee Cavalry were doing their job well. One regiment charged into the rear of the southern most Iron Brigade regiment to tie them up, and the other moved up to get between another of the Iron Brigade regiments and the escaping Confederates.
By this point, the Iron Brigade's strength had been spent, and their engaged regiments began to fall back. Firing as they withdrew, they finally routed the implacable Confederate artillery battery. Unfortunately, the beleaguered southern most Iron Brigade regiment was routed by the rampaging Tennessee cavalry. To the east, the completely fresh Irish Brigade was beginning to get involved. Hancock went over to see just exactly what was taking them so long, and Meagher finally got them moving. The regiment that Hancock sent from his reserve covered a great deal of ground, and was able to take some shots into the rear of a Texas Brigade regiment, causing them to flee in disorder.
Turn 7
With the path now wide open, two more of the Confederate infantry regiments made their escape. Only one regiment of Rebel infantry still remained far from safety, and it desperately poured fire into the withdrawing Wisconsin infantry to their front, but they stubbornly refused to break.
The fresh regiment of Iron Brigade infantry that had been kept in reserve now moved up, firing on the straggling unit from the Texas brigade and causing them to fall back. In the east, the Irish brigade finally got into the fight in earnest, their combined fire causing dreadful casualties and disordering another Rebel regiment.
Conclusion
Another regiment of Texas infantry was able to escape the battlefield in the south, leaving only two remaining. At this point, we ended the game. The Confederates had already escaped with 5 infantry regiments, which is more than half of the 8 they started with, giving them the victory. The expert use of the Confederate cavalry to delay and distract the Iron Brigade, combined with the lack of motivation on the part of the Irish Brigade, gave the Confederates the victory.





What size are your bases?
ReplyDeleteInfantry bases are 3/4", or roughly 20mm, square. Cavalry bases are 1", or about 25mm. Artillery are 3/4" by 1 1/2".
ReplyDeleteThanks!
DeleteBrilliant report once again, a great scenario and one I must try out.
ReplyDelete