Wednesday, March 11, 2009

The Battle for Mork's Throne - Part 1

I got to do some gaming on February 21st. We played 2 linked games, my Chaos Space Marines against my friend's Orks. First was a game of Battlefleet Gothic, with the Orks attacking to try and break through a Chaos Space Marine blockade. The second, a game of Warhammer 40,000. If the Orks won the Battlefleet Gothic game, they would get the benefit of two preliminary bombardments against the Chaos Space Marines in the Warhammer 40,000 game. If the Chaos Marines won the Battlefleet Gothic game, in the second game at least half of the Ork army (in terms of points) would have to come on in reserve, due to their fleet arriving piecemeal. We came up with a basic story for the linked games.

Renegade Space Marines of the Crusaders chapter are on an unimportant world in the Sagittarius Arm to perform an arcane ritual. As their fleet patrols the outer reaches of the system, and small Ork fleet appears out of nowhere. It is a splinter force of a large Ork Krusade to reclaim important and powerful cultural artifacts of the Ork race. Finding a fleet of ships defending the system and guarding one planet in particular, the Orks assume there must be something important there, and they attack in an attempt to break through the Chaos blockade.

In the pictures below, I used blue lines to represent the movement of ships, and the red lines to show firing. The red felt areas are gas/dust clouds. The white pieces of paper are asteroid fields. Here is the layout.
Mork's Throne 1-1 Mork's Throne 1-2

The Ork fleet contained (from left to right in the first picture): A squadron with 2 Onslaughts and 2 Savages, a Kill Kroozer, a squadron of 2 Ravagers, and two squadrons each of two Brute Ram Ships. The Chaos fleet contained: A squadron of 3 Idolators, a Carnage class cruiser, a squadron of 5 Infidels, a Devastation class cruiser with a Warmaster, and two squadrons each of 4 Iconoclasts. The Chaos defenders had to be set up first, with each ship or squadron forced to be in a random third of the table. The Orks then deployed together to attack the Chaos line where it was weakest.

The Orks had the first turn and advanced at full speed. The Ravagers fired off some torpedoes to disrupt the middle group of ships as they tried to turn around.
Mork's Throne 1-3

On the Chaos turn, the squadron of Idolators moved out from behind the asteroid field and turnd to face the approaching Ork fleet. The rest of the Chaos fleet frantically tried to turn their ships around to come to the aid of the Idolators.
Mork's Throne 1-4

The Orks continued their rapid advance. A squad of Brute Ram Ships fired on the squad of Infidels but only caused on hit on their shields. The Kill Kroozer fired on the Idolators, destroying one of them. The Ravager squadron managed to run out of torpedoes.
Mork's Throne 1-5 Mork's Throne 1-6

On the Chaos turn, the squadron of Infidels got around the asteroid field and fired on the Ork Kill Kroozer, causing minimal damage. Then they fired a brutal salvo of torpedoes that destroyed two Ork Savage Gunships. The remaining two Idolators flew into an asteroid field, preparing to spring a trap in the rear of the Ork fleet. The Carnage cruiser and Iconoclast squadrons continued to move at full speed toward the bulk of the Ork fleet. They fired on a squadron of Brute Ram Ships, destroying them easily.
Mork's Throne 1-8 Mork's Throne 1-7 Mork's Throne 1-9 Mork's Throne 1-10

The Ork fleet continued to advance at full speed. The Kill Kroozer and two Onslaught gunships opened fire on the chaos Infidel squadron. All but one were destroyed, despite them bracing for impact. Their bracing for impact was completely ineffective, perhaps due to extremely close range leaving little time to prepare for the attack.
Mork's Throne 1-11 Mork's Throne 1-12 Mork's Throne 1-13

Ready to spring their trap on the Ork fleet, the two Idolators proceeded to crash spectacularly in the asteroid field and destroy themselves. The Carnage cruser advanced behind the Ravager squadron and opened fire on them, destroying them both. The one remaining Infidel got behind the Ork Onslaughts, gunning to get revenge for its former comrades, but its fire was ineffective. The two squadrons of Iconoclasts continued advancing as well. One squadron opened fire on the remaining Brute Ram Ships, but did no damage.
Mork's Throne 1-14 Mork's Throne 1-15

The Orks again advanced at full speed in an attempt to punch through the blockade. The Kill Kroozer fired on a squadron of Iconoclasts, destroying one of them.
Mork's Throne 1-16

The two squadrons of Iconoclasts moved toward the Kill Kroozer and fired on it, causing some damage, but nothing major. The Devastation class cruiser continued moving toward the battle, while some bombers it had launched in the previous turn flew towards their intended target, the Kill Kroozer. The Carnage class cruiser and the one remaining Infidel escort got behind the Ork ships and fired on the two Onslaughts, destroying one of them.
Mork's Throne 1-17 Mork's Throne 1-18

The Ork ships again continued to advance at full speed. The Kill Kroozer locked on to the menacing group of Chaos bombers that was approaching it, and incredibly managed to shoot them down. The largest threat to the Kill Kroozer was now eliminated. In addition, the two Brute Ram Ships managed to make it off the table edge, and past the blockade.
Mork's Throne 1-19

On the final Chaos turn, the squadron of three Iconoclasts and the one remaining Infidel moved towards the final Onslaught gunship. They fired, and in a small measure of revenge for it's fallen squadron mates, the final remaining Infidel destroyed the Ork ship.
Mork's Throne 1-20

In the next turn, the Ork Kill Kroozer made it off the table and past the blockade. Both sides had suffered some serious losses, but with the Kill Kroozer making it past the blockade relatively intact, it was a clear victory for the Orks. They would be able to land and support of pretty significant force on the planet they had chosen to attack, and the renegade Space Marines on the planet's surface would have their work cut out for them.

Monday, March 9, 2009

Attraignnor IV Campaign: Turn 10

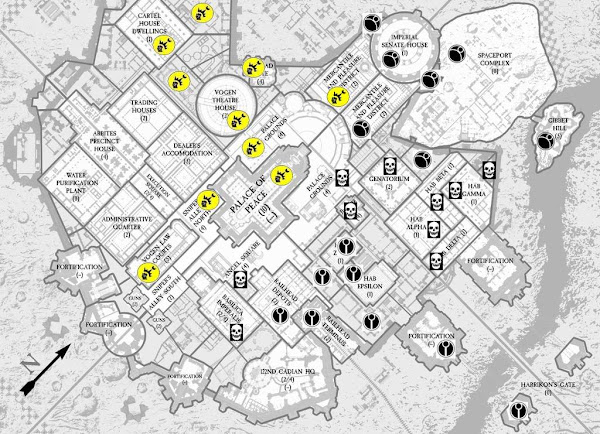
Captain Octavio Ferranus heard of the civilian uprising in the mercantile and pleasure district, and took advantage of it. He sent reinforcements into the area, already thrown into chaos by the revolt, and took control of it, causing celebration among the rebel citizens. Meanwhile, the off world Chaos Space Marine chapter made use of a civilian militia they recruited from the large hab blocks. They sent the hastily raised militia into the area around building 235, finally regaining complete control of the area.

Meanwhile the Tau, having suffered setback after setback, had decided that they city was lost to them. With the civilians now banding together to rise up on their own against the alien invaders, the Tau knew that they had no hope of victory. The Tau force in the north began to pull back to the spaceport complex in order to evacuate their troops from the planet and abandon it to chaos. The Tau in the East moved into the Railhead Terminus, brushing aside local resistance. They had convinced many citizens in the hab blocks they controlled to join the greater good of the Tau Empire. But now the Tau had given up fighting for the planet, and began the slow process of trying to evacuate, taking their human supporters with them. With control of the rail system, the Tau were planning to retreat from the city on rail cars, and then have ships land outside the city to evacuate them from the planet.

Victory Points
Chaos: 59.5
Tau: 17

Wednesday, March 4, 2009

Painting 10mm Great War British

In order to help keep me motivated to keep painting, I took a break recently from painting Civil War miniatures to work on something else for a while. That last thing I really need is another project, but I figured working on something different for a while would keep me painting and also make it a refreshing change when I go back to paint more Civil War stuff again.

In a previous post, I wrote a review of Warhammer Historical: The Great War, and I liked the rules. So I bought some 10mm Pendraken Great War miniatures, which I also discussed in a blog post here. I got just enough miniatures to make a few units to eventually try out the rules with. The first up to be painted were some late war British.

I am by no means an expert in the period. Like I said, I'm just painting these as a temporary change of pace from the American Civil War miniatures I've been working on. So the colors may not be perfect, but they seem to look okay to me. They were painted using Games Workshop/Citadel paint.

First I primed them white and painted the uniforms Snakebite Leather.
Great War BEF Great War BEF

I painted all the straps and pouches with Bleached Bone, flesh areas with Bronzed Flesh, boots with Shadow Grey, rifle with Bestial Brown, rifle barrel and bayonet with Mithril Silver. The base can be whatever color you want. I then put a wash of thinned down brown ink over the entire miniature (except for the bayonet, so that it stays shiny).
Great War BEF Great War BEF

The miniatures have something on them that I think is a covered canteen. I've seen it painted blue in other pictures of Great War miniatures, so I painted those blue. I then painted some roughly square shaped red unit markings on the shoulders.
Great War BEF Great War BEF

I then glued the miniatures to thin wooden 25mm circular bases from Litko Aerosystems, which I had spray painted brown. I put three of them to a base because in Warhammer Historical: The Great War, each 28mm miniature represents 3-4 men. I decided instead to use three 10mm miniatures to a base so that I'd be playing in 1:1 scale.
Great War BEF Great War BEF Great War BEF

I then based them with a combination of brown and light tan sand/fine ballast, medium grey ballast, and green flock. I was attempting to get the look of rocky dirt/mud, with just a little bit of grass showing.
Great War BEF Great War BEF Great War BEF

So there you have it. I think this method gave pretty good results, with relatively few steps. Let me know what you think.

Monday, March 2, 2009

Attraignnor IV Campaign: Turn 9

Warhammer 40k campaign map
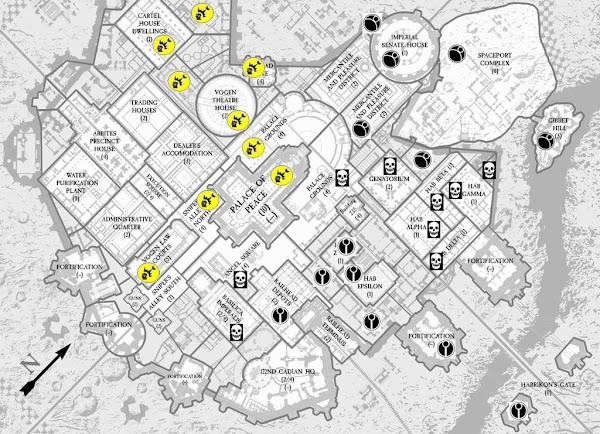
With the simultaneous pincer attack on the Chaos forces having been repulsed, the Tau army pulled back to consolidate their forces and reexamine their strategy in the war. The Tau in the East managed to gain control of the Railhead Depots, expanding their front in the face of the defensive line of the Chaos Marines. Meanwhile, the off-world Chaos Space Marine chapter pacified the final remaining hab block. They are now using their control of the densely populated residential areas to recruit citizens of Attraignnor IV into militia forces to help defend the Chaos held territories. This would help make up for their relative lack of numbers.

Word soon came to the populace of the western mercantile district. It was news of hope, of joy. Word soon passed to the impoverished and war beaten citizens of the Merc of the great and benevolent Lord Captain Octavio Ferranus, High King of all Attraignnor.

A once wealthy merchant by the name of Geraldius VanDyre, of House VanDyre, ran like never before attempting to escape the vile drones of their xenos oppressors. Weighed down by the heavy pack of food liberated from the stores these particular drones were guarding, Geraldius knew he wouldn't win this race. He dove around the corner into the next faceless ruin. Up and up, he decided. Halfway up the first flight, the stairs crumbled beneath him, and the youngest son of House VanDyre fell.

The floor beneath the stairs crumbled, as did the floor below that. VanDyre landed hard and had to bite through the flesh of his own hand to stop himself from crying out. Shrapnel had impaled his right leg and he was pretty sure a couple of ribs were broken, but he was alive, and he still had the precious food. Silent and crying, Geraldius lay still where he fell as tiny blinking lights buzzing above him gave away the drones searching the floor he just fell through.

He must have blacked out for a time, for he was awakened by the sun's rays somehow finding their way to his face. He couldn't stop the cry this time as he tried to move. He couldn't stand either. As he looked around for something to brace himself with, he spotted a strange reflection from the corner of his eye. He crawled over painfully and discovered a half buried and forgotten doorway

It was the entrance to a forgotten PDF armory. Racks of rifles lined the walls. Crates of ammunition were stacked in the corner. Explosives, fatigues, body armor, it all stood before him. His prayers had been answered.

It was a miracle, the people thought. This man, their leader, came back, beaten and bloody with not only food, but a miracle. Hidden in the bowels of a Mechanicus warehouse, protected by the Mechanicus guards and techpriests who hadn't sided with the vile aliens, the citizens at last found hope. Scouts and spies were designated. The weapons store was retrieved. A resistance was formed. VanDyre had a massive banner made in the image of Ferranus' own as rumor described it and it hung from the wall of the secret warehouse to bring hope to the lost souls living there.

Reports began coming in that the enemy were withdrawing a significant part of their force from the front, and sightings were reported of a be-robed Tau accompanied by a large cadre of warriors with bright red helms issuing orders to the xenos commanders. Geraldius VanDyke knew the time was now.

As the sun rose, the resistance launched their attack. Geraldius raised the banner high and gave the order to strike.

Unfortunately, the Tau were a skilled military force. The element of surprise was lost as the resistance army moved into position. Without a word of warning or recognition, an impromptu airstrike was called in to give the xenos warriors time to form up. Heavy firepower tore into the resistance lines before the citizens let off a single shot. But the mighty banner waved, and the resistance army held. Firepower far greater than the aliens expected roared from the ruins around them, and a team of battlesuits was tore apart by massive lascannon blasts that came out of nowhere. At almost the same time, the Tau discovered another trick the resistance handed them as one of their mighty Broadsides was obliterated by a hidden booby-trap.

The resistance was made up of untrained citizens, however, and most could not get the knack for the ranged weapons. Though the heavy fire kept the aliens in cover, it was mostly ineffective, and most citizens chose to rush into point blank assaults. The casualties to these men and women of Attraignor IV were horrendous as they attempted to cross the streets, but heroes are born in such times. Mika Grosnikt led his gang, the Warp Angels, into close quarters with a squad of xenos warriors. While Mechanicus Sgt. Sigma6 beat down the warriors, the Warp Angels broke through the line and made a break for the next building. As they jumped out of windows and tore through broken walls to reach the alien sniper team, Grosnikt realized the powerful power sword given to him by the techpriests was lost in the frenzied fighting. Though he was mostly ineffective fighting with only his shotgun, the Warp Angels did him proud, cutting down the xenos machines, and decapitating their controller. Movement in the next building revealed their next target, and Mika led them on to find themselves face to face with the red helmed bodyguards of the alien in robes. Though knowing they were outmatched, the Warp Angels screamed, fired, and charged.

By the end of the engagement, the resistance had taken fully half the sector, and Geraldius VanDyre knew that his people dealt a mighty blow to their alien oppressors. The Tau forces in the sector were knocked off balance, and the long range comms were back up. VanDyre was able to contact the palace and publicly swore fealty to the High King. He gave account of what the resistance accomplished and shared their intelligence. The High King was well pleased, and took special note of the be-robed Tau leader. Geraldius was gifted the rank of Merchant Warden, and his men were commended greatly. All that remained was for Ferranus to garrison the district.

After over ten years, respite was finally within the Merc citizens' reach.

The Tau forces retreating from the Palace grounds that regrouped in the mercantile district met up with their ethereal that came down to the planets surface to witness the destruction and the chaos that has been ensuing, to judge better whether or not this pacification has run its course and the planet was lost to chaos. During the meetings and deliberations the most confusing and unfortunate turn of events happened. The uprising and fanaticism of the ruined cites people and their turn against any hope they had left on their war torn planet. Militias of all kinds poured over the city and headed straight toward their encampment. A defense was set up and the people fell in the streets not stopping to think they just threw themselves at the Tau guns. Men, women and children old or brave enough to hold a weapon fought on pushing past the defenses.

Bold and upset the Tau ethereal stood his ground through multiple bombings and mortar fire just long enough to see the faces of what type of man they were there to save. With a final assault of a wild young bunch the decision was made. With a furrow of the brow and a hiss of disapproval, the ethereal retreated back to his lander and left.
Warhammer 40k campaign map
Victory Points
Chaos: 53.5
Tau: 14.5

Wednesday, February 25, 2009

Making Hills

Today I will be covering another attempt at making scenery appropriate for 10mm scale miniature games. This time it was my first attempt at creating my own hills. If you want to make some the same way, you'll need some cardboard, maybe some styrofoam, wax paper, glue, flock, and the key element: plaster cloth. I found this at Hobby Lobby. It comes in a roll of this loose cloth with plaster on it, and you just wet it and spread it out how you want, then it dries hard. Very convenient.

The first thing I did was to cut a base out of very thin card. Here is a picture of the base for my first hill.
Hill

Then in the middle of the base, I glued a large piece of styrofoam to form the bulk of the hill.
Hill

I found this to cause a bit too steep and uneven of an incline. For future hills, I built up the bulk using many layers of thick cardboard. Each layer was cut in a similar shape as the one before, but about a half inch to an inch smaller all around. This seemed to work better, but made the hills much less steep.

With the large piece of styrofoam in place, I built up the sides and top with newspaper and coardboard to make the hill more rounded.
Hill

For the hills after this, I taped or glued strips of wax paper to the stepped cardboard layers to round out the hill shapes. This gave a much more rounded hill. Don't try using newspaper like I did. After you put the wet plaster cloth on the hill, the paper gets wet and collapses. This resulted in a lumpy rather than smooth curvature to the hill.

So once that was done, I applied the plaster cloth. I used Woodland Scenics Plaster Cloth. You just cut it into strips, dip a strip into water, lay it on the hill, and smooth it out with your fingers. Keep doing this in strips until the hill is covered, then let it dry overnight. I'd usually put on a second layer the following day just to make the hill sturdier. Here are the results on the first hill.
Hill

Another thing to watch for is that while the plaster was drying, it tended to make the thin cardboard base I was using warp a little. So I made sure to put some heavy things all around the perimeter of the hill to hold the base down while it dried and keep it flat. If you can find something more sturdy or waterproof to use for the base that is thin and you can still cut it out in rounded shapes, that would probably work much better. I, however, do not know of anything that fits that description.

Once the plaster cloth was completely dry, I spray painted the entire hill green.
Hill

I then glued several rocks around the hill, using them to cover up or distract from places where the shape of the hill looked unnatural. You can see how I created the rocks here. Below are some pictures of the hill with rocks attached.
Hill Hill

The next step was flocking the hill. I used some watered down Elmers/PVA glue, which I brushed all over the hill before sprinkling Woodland Scenics Green Turf over it. This method did not work very well, and there were large bare patches all over that I had to re-flock, which was very difficult since applying more glue would wash away any flock that was already in that area. Because of this, I had to re-flock the hills several times to get decent coverage. Using some kind of spray glue might work better, but then there is no way to keep it from getting on the rocks. Perhaps flocking with spray glue before putting on the rocks would be best. If you must brush on Elmers glue, water it down as little as possible, just enough to make it brushable. The less watery it is, the better it will hold the flock.

Below are some pictures of the first attempt at flocking the hill. I also sprinkled some ballast on before flocking, (I used Woodland Scenics Medium Ballast) to make the hill look a little rocky.
Hill Hill

After a few touch-ups on the flock job, I added some dark green clump folliage all around the hill to look like bushes. Again, I used the Woodland Scenics Medium Green Clump Foliage. This is also another good way to cover up any odd looking spots on the hill, or places that didn't get flocked well. I covered up a lot of the bald areas with some clump foliage, which was much easier than trying to re-flock them.
Hill Hill

At this point, I sprayed some matte varnish over the entire hill to hopefully keep the flock, ballast, and clump foliage from coming off over time. And that's all there is to it: one custom made hill. Hopefully this has given you some ideas or inspiration, and you can learn from some of my mistakes. And if you make some of your own, definitely let me know what other things you learn and tips you have for others to benefit from.

Finally, here are some pictures of the other hills I created in a similar fashion, and a couple of rocky terrain pieces I also made.
Hill Hill Hill Hill Rocks Rocks

Monday, February 23, 2009

Attraignnor IV Campaign: Turn 8

Warhammer 40k campaign map
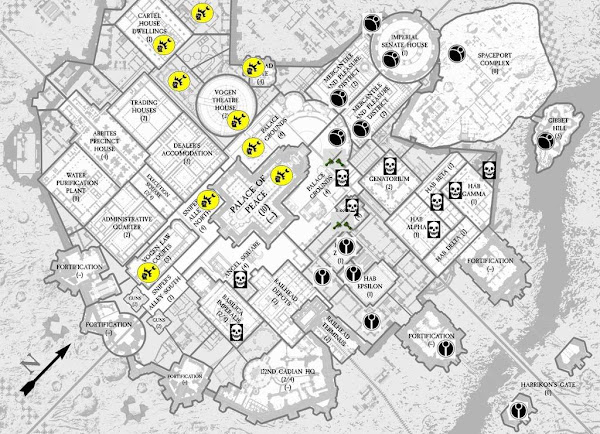
The forces of Captain Octavio Ferranus gained control of the Law Courts just south of the Palace. The off-world chaos space marine forces continued their push to capture hab blocks in the northeast corner of the city, solidifying their hold on Hab Alpha. Meanwhile, the Tau forces continued their attacks on the chaos positions.

The Tau in the north of the city continued their attack on the Palace Grounds from the Mercantile and Pleasure district. Both sides were cautious after the previous losses they had suffered fighting over the palace grounds. Warlord Captain Thamuz, leading the defense of the staging area on the palace grounds, had learned valuable lessons already. Now he was much more effective in dealing with the infiltrating Kroot squads, isolating and destroying them with minor losses.

The Tau broadsides were again effective in damaging and destroying the Chaos tanks, but Captain Thamuz had a plan for them as well. He called down reinforcements, in the form of a squad of Obliterators teleporting down from orbiting ships. They arrived on the battlefield right where they were needed, and were very effective in destroying the Tau broadsides. They even managed to destroy the battlesuit-wearing Tau commander.

As the Chaos forces closed in, the remaining Tau fire warriors made a courageous stand on a hill overlooking the battlefield. A couple of frantically charging chaos warriors managed to reach part way up the hill in their attempt to reach the fire warriors, but were blasted apart by the devastating onslaught of pulse rifle fire. Captain Thamuz pulled the rest of his forces back, allowing the last of the Tau to retreat from the battlefield. Being a cautious commander, Captain Thamuz did not wish to waste any of his men pointlessly capturing the hill when the battle was already won.

During their retreat, the remainder of the Tau force happened upon a scrambled Ork camp, the refuge of some Orks that has survived the invasion and awaited their chance to resume their attack. When the Tau encountered them, they were apparently getting motivated to start a waaagh march towards the areas in the skies that were most colored with the smoke of war. Hearing those giant explosions must have got them riled. But the Tau army already had reinforcements moving up from the Mercantile and Pleasure district to support the attack on the palace grounds.

With the meeting up and support of 2 whole squads of fire warriors, The Orks were mowed down. With the advantage of fighting on these grounds for what seems months, the Tau dug themselves in good picking key locations to whittle the Orks away. That was until a unit of Nobs nearing the Tau line called for a push and got the charge they needed to breech the Tau line. It was a massacre and the 2 new fire warrior teams were cut down. It was up to the last two fire warriors to hold their ground and keep the murderous unit of Nobs at bay while the rest of the Tau army adjusted and repositioned them self for the next wave of fire.

They did just that, not breaking and running they stood up to the nobs, repeatedly smashing their faces with their rifles, they were cut down but got the job done. As this was happening, the forest to the far was literally torn in half by a squad of ten massive Orks in Mega armor. The appearance was enough and after taking a test shot at them with the last surviving Broadside, the decision to avoid them at all costs was made. The Tau were able to position themselves in the right spots of the field to eventually defeat the Ork war party and send them scrambling with very few numbers left.

Elsewhere, the other wing of the Tau army, in the Eastern area of the city, used took advantage of the Tau’s legendary mobility to perform a surprise maneuver. They pulled back from their attack on Angel Square, and were almost immediately able to redeploy a large force for an attack on Building 235, where Chaos Marine forces had set up power generators to power their staging area on the palace grounds.

The rapid redeployment of the Tau forces caught the Chaos Marines off guard. They had only a small contingent of marines stationed around Building 235, since they did not have the numbers to fully defend all of the territory they had managed to capture in the city. The meager forces in the area would not be able to withstand a full scale attack from the Tau, and reinforcements were not able to arrive before the Tau sprung their attack.

Commander Mesme of the Tau managed to redeploy his forces masterfully, and in no time had all but surrounded the Chaos Marine defenders of the area around Building 235. Commander Mesme skillfully used the combined strengths of each of the variety of units he had at his disposal to annihilate a unit of Khorne Berzerkers, including markerlights, seeker missiles, sniper drone fire, and even an ambush by a unit of flying Vespid, culminating in a surprise assault to finish off the last berserker at point blank range.

Another unit of Chaos Marines was cut down by a massive horde of Kroot, and things were not looking well for the defenders. But reinforcements were on their way. Responding to a call for support from the beleaguered defenders, a squad of Raptors first swooped down to do some reconnaissance for the rest of the forthcoming reinforcements. Unfortunately, the landing in the building they were aiming for proved trickier than expected, and two were taken out of the fight immediately, badly injured while trying to amongst the jutting steel and shifting rubble of the building.

The rest of the squad then immediately came under a hail of fire, and took cover in the rubble around them. They would be little help to the rest of the reinforcements, and their mission to relay vital information about the situation on the battlefield could only be considered a complete failure.

So the terminator units aboard Lord Agramon’s flagship would be forced to teleport into the middle of a battle blind, with little information about the layout or situation. But their defense forces could not hold much longer and were completely boxed in and unable to inflict any casualties on the enemy Tau. It was a risk that Warlord Captain Adriel and his terminators would have to take.

Three squads of terminators teleported down to the battlefield, but only two arrived. The third had been teleported way off course in a crucial miscalculation. But such were the risks of trying to teleport into the middle of a battlefield without proper reconnaissance being done.

The two squads of Chaos Terminators, one led by Captain Adriel himself, appeared suddenly right in the midst of the Tau army, and wasted no time in causing havoc in the Tau line. A heavy flamer laid waste to two units of the vile xenos, while Lord Adriel personally slaughtered his way through several more units with his howling daemon weapon.

The Tau were clearly disrupted by the sudden onslaught in a battle that only moments before looked completely in their grasp. The remainder of the Tau force fled from the rampaging terminators, and scattered through the surrounding buildings. The reinforcements had been enough to turn the tide, but only just. The Tau were forced to fall back in order to regroup, but they had managed to kill or wound all of the Chaos Marines stationed in the area to defend building 235. The area around the building was no longer completely under their control, nor had the Tau managed to capture it outright. Captain Adriel and his terminators would return to the orbiting flagship, forced by other pressing matters to leave the area contested.

If the Tau had succeeded in their pincer attack on the Chaos Marine forces, they might have been able to punch through and connect both wings of their army. But the Chaos marine line managed to hold, and keep the Tau forces from joining together. The desperate Tau plan to turn the war around had been a complete failure.
Warhammer 40k campaign map
Victory Points
Chaos: 48.5
Tau: 14

Wednesday, February 18, 2009

Making and Painting Rocks

Recently I have been working a lot on creating some terrain appropriate for 10mm miniatures. One such project was creating hills of an appropriate size and properly sloped. I also wanted some rock formations jutting out of these hills. I'll cover the creation of the actual hills in a future post, but today I want to talk about creating and painting the rock formations.

First I went to Hobby Lobby to pick up some supplies. They had rubber molds of rock formations in several varieties. I got one that had many smaller rocks, since it was for terrain to be used with 10mm miniatures. I also bought a small carton of casting plaster. And that is pretty much all you need for making rocks.

For the plaster, you simply mix the powder with a certain amount of water until it has a uniform consistency, then pour it into the mold. They recommend you first use a spray bottle to spray the mold with water that has a little bit of soap in it. I don't know if that is to keep it from sticking to the mold, or keep bubbles from forming at the surface, or something else. But I did as instructed.

You can tap the mold a few times to get rid of any bubbles. Then just let it dry overnight. I found that one batch of plaster (3/8 cup of powder and 2 tbsp. of water) was about exactly right for filling the mold completely. Then again, I think I may have accidentally used too much water and mixed it a bit too thin, because the resulting rocks were very brittle and many crumbled and broke when I removed them from the mold. So be careful about using too much water.

Here is a picture of the first batch of rocks, and the mold I used to make them.
Rocks

Next came the painting. I had never painted rocks before, so I had no idea how to proceed. I started by using spraypaint to basecoat the rocks black. You definitely want to spray paint on a base coat because if you try to paint on the bare plaster, the water soaks up into it and it takes a lot of paint to cover anything.

If you want to replicate what I did, all of the paint colors I will mention here are GW/Citadel paints. If you use different paints, there is a really handy utility here for finding matching colors in different paint lines. How it works is you just pick the paint line that you want to match to, and the paint line you use. Then it gives you 0-3 matches for each color in the line you are trying to match, along with a number rating. The lower the number, the closer the match is. Try it out, it is very useful for finding a color you have that matches one that someone recommends in a painting tutorial.

After the black spraypaint basecoat, I gave all of the rocks a very heavy drybrush of Codex Grey. I followed this with a lighter drybrush of Fortress Grey. You can see the results of these two steps in the pictures below.
Rocks Rocks

At this point, I was thinking that the rocks looked decent, but too grey. Rocks you see in real life jutting out from hills often have some color to them, but I have no idea how to replicate this look with paint. I tried a few things, including applying ink washes in various colors, sometimes one after another. I was never happy with any of the results. The ink washes blended the colors together too much so that at a distance you couldn't really see as much of the detail anymore. I tried to correct for this by doing another drybrush after the inkings, but I still didn't like the colors it was producing.

I experimented with introducing color to a few of the rocks, as you can see below. Since I didn't like the results, the rest of the rocks I just gave one final drybrush with Ghostly Grey, but only along the ridges and places that jutted out. You can see the results of this last step below, as well as the rocks I experimented with inking in various colors.
Rocks

Also at this point, the rocks were still very brittle and kept crumbling on me while I was painting them. I didn't want them to crumble more after I was finished and ruin the paint job. So I brushed on a coat of watered down Elmers/PVA glue to make the rocks sturdier. It worked well and kept them from crumbling any further, but if you're going to do that I would recommend doing it before you paint the rocks. Some of the glue didn't dry completely clear, and it left some white pools and dulled-down areas on the rocks.

Overall, I liked how the grey rocks turned out, but I still really wanted some rocks with some color to them. So I made up another batch of rocks to try a different method. Again I spray painted them black and then did a heavy drybrush of Codex Grey, as can be seen in the picture below.
Rocks

This time my next step was another drybrush of the GW/Citadel foundation paint Khemri Brown. In the picture below, the results of this step are showin in the large rock to the right. The next step was a lighter drybrush with Bleached Bone. You can see the results of this in the rocks to the left.
Rocks

There are also two rocks in the picture, the smaller ones at the bottom to the right, that I tried some inking on. The one farthest to the right had yellow ink an then brown ink applied. The other one had some green ink applied, and then was drybrushed with Bleached Bone. It does give the rocks some interesting colors and looks good up close, but from a distance the details just don't stand out. So I decided to stick with the just drybrushing method.

So to sum up, for grey rocks subsequent drybrushes of Codex Grey, Fortress Grey, and Ghostly Grey. For rocks with a little more of a browning color, drybrushes of Codex Grey, Khemri Brown, and Bleached Bone work pretty well. All with black spraypainted basecoats.

I'm pretty happy with the results overall, for a first attempt. But if you have any advice or techniques for painting rock formations, I'd definitely be interested in hearing them.