
Monday, July 16, 2012
Painted Renegade Imperial Guard Conscripts


Thursday, May 31, 2012
Still More Painted Renegade Imperial Guard Conscripts
Thursday, May 10, 2012
GHQ Painted Confederate 33rd Virginia Infantry Regiment

Saturday, April 21, 2012
Pegasus Hobbies Pre-Painted River Set and Wooden Fences
A while ago I ordered a couple of the pre-painted terrain sets from Pegasus Hobbies. They are pretty inexpensive and save a lot of time in painting and preparation, so they definitely seem worth it. I got two sets of their river pieces, so that I could stretch across the table lengthwise if I wanted, and some of their wooden fences.
Here are some pictures of the terrain with some 28mm miniatures for size comparison. This is only showing one of the two river sets. Each set has two long straight pieces, two short straight pieces, and two 45 degree curves.


And here are some pictures with some of my 10mm Civil War miniatures. This makes the terrain pretty versatile, since I can use it as a stream in 28mm games and a river in 10mm games.


The paint job on these is probably just as good as I would have done painting them, if not better. And the time it saved make these definitely worth getting. If I had bought unpainted terrain, it would still be sitting on the shelf unpainted, but these are ready to use in a game right away. Pretty good deal if, like me, you have a big backlog of painting projects or just aren't that good at making or painting terrain.


And here are some pictures with some of my 10mm Civil War miniatures. This makes the terrain pretty versatile, since I can use it as a stream in 28mm games and a river in 10mm games.


The paint job on these is probably just as good as I would have done painting them, if not better. And the time it saved make these definitely worth getting. If I had bought unpainted terrain, it would still be sitting on the shelf unpainted, but these are ready to use in a game right away. Pretty good deal if, like me, you have a big backlog of painting projects or just aren't that good at making or painting terrain.
Tuesday, April 3, 2012
Pegasus Hobbies Gothic City Terrain
A while ago I got a couple of the Gothic City Terrain kits from Pegasus Hobbies to make some Warhammer 40,000 terrain with. I initially was planning on getting one each of the four different gothic city terrain kits they make to combine into one large building, since I don't like buildings on the table that would only be large enough to be an outhouse in 28mm scale. I actually only ended up getting two of the kits, the Gothic City Buildings Small Set #2 and the Gothic City Ruins. The kits are larger than you'd think, so the result from just those two kits ended up pretty large.
The buildings are decent for the price, though I do have a few warnings. First, it does take a lot of effort to assemble these kits, partly because of the tons of mold lines that need to be cleaned, especially in the windows, but also because some of the pieces just don't fit together quite right without some significant filing. It took a huge amount of filing to get flat surfaces where some of the pieces joined.
Second, the kits aren't nearly as modular as they seem to be. There really is one way they are intended to go together, especially with the ruined walls, and if you do it a different way you are going to have problems. For example, with the ruins, as with all the wall pieces, they look different on one side than the other. But they didn't design it so that you could easily choose which side you wanted to be inside and which be outside. With the other building set, you can assemble them with whatever side you want facing inside, but once you choose, you have to do it all that way. Since the pillars are attached to the wall sections, if one wall piece is set up one way, the next one has to be the same way, so you can't switch the inside and outside walls for different parts.
Anyway, I combined the two kits to get a decent sized piece representing just the front part of a ruined church building. I added in some of the pre-painted Pegasus Hobbies Gothic Rubble sets to have some rubble inside the ruins. Here are some pictures of the results, with a few of my converted Imperial Guard figures for scale.


I didn't glue all of the pieces together, which allows me to partially disassemble it. This was mostly to aid in storage, so it can be broken down to take up less space. But it will also allow me some variety in how I set up the building, or allow me to use just a ruined corner or other individual piece if I don't want something so big. Here you can see how it disassembles and an alternate setup.


And here are a couple shots of the whole thing packed together for storage, so the huge building takes up relatively little space in my closet.


Hopefully this has been helpful for those considering the Pegasus Hobbies Gothic City Terrain sets. If you have any of them, I'd love to see what other people have done with them. You can generally get a good deal and free shipping on these from Amazon:
Here is a link to some other Pegasus Hobbies Products
The buildings are decent for the price, though I do have a few warnings. First, it does take a lot of effort to assemble these kits, partly because of the tons of mold lines that need to be cleaned, especially in the windows, but also because some of the pieces just don't fit together quite right without some significant filing. It took a huge amount of filing to get flat surfaces where some of the pieces joined.
Second, the kits aren't nearly as modular as they seem to be. There really is one way they are intended to go together, especially with the ruined walls, and if you do it a different way you are going to have problems. For example, with the ruins, as with all the wall pieces, they look different on one side than the other. But they didn't design it so that you could easily choose which side you wanted to be inside and which be outside. With the other building set, you can assemble them with whatever side you want facing inside, but once you choose, you have to do it all that way. Since the pillars are attached to the wall sections, if one wall piece is set up one way, the next one has to be the same way, so you can't switch the inside and outside walls for different parts.
Anyway, I combined the two kits to get a decent sized piece representing just the front part of a ruined church building. I added in some of the pre-painted Pegasus Hobbies Gothic Rubble sets to have some rubble inside the ruins. Here are some pictures of the results, with a few of my converted Imperial Guard figures for scale.


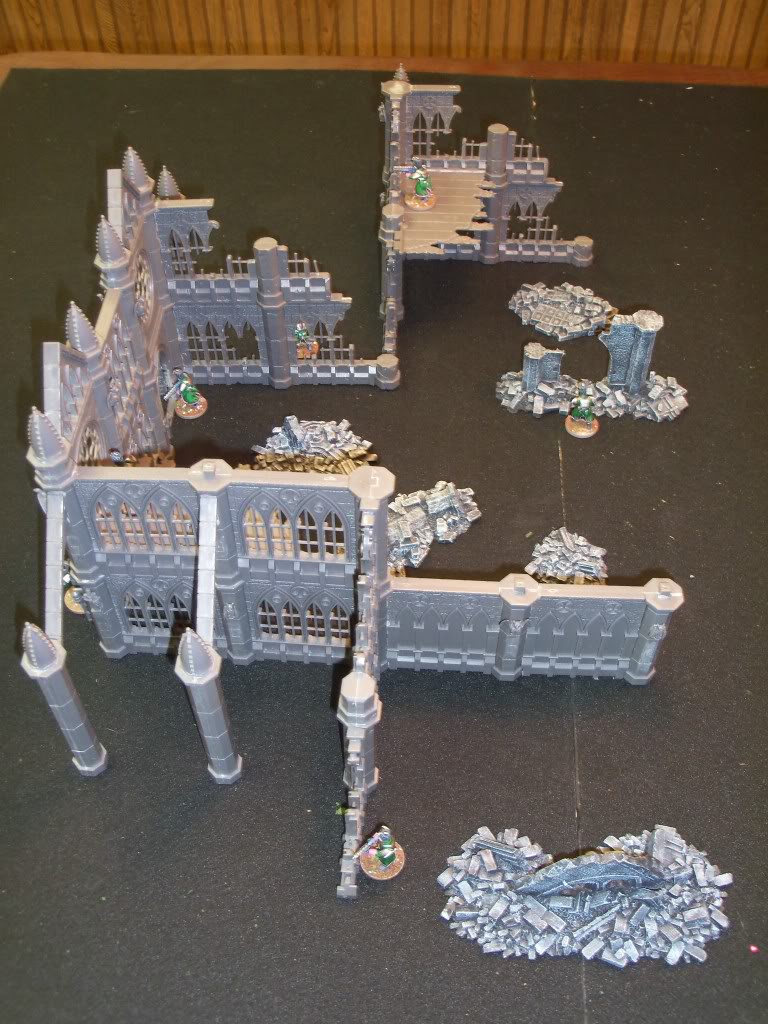


I didn't glue all of the pieces together, which allows me to partially disassemble it. This was mostly to aid in storage, so it can be broken down to take up less space. But it will also allow me some variety in how I set up the building, or allow me to use just a ruined corner or other individual piece if I don't want something so big. Here you can see how it disassembles and an alternate setup.


And here are a couple shots of the whole thing packed together for storage, so the huge building takes up relatively little space in my closet.


Hopefully this has been helpful for those considering the Pegasus Hobbies Gothic City Terrain sets. If you have any of them, I'd love to see what other people have done with them. You can generally get a good deal and free shipping on these from Amazon:
Here is a link to some other Pegasus Hobbies Products
Monday, October 24, 2011
More Painted Renegade Imperial Guard Conscripts
I don't have much to say about them. They were painted pretty much the same as the previous batch, except that I did a bit of highlighting on the sharp edges of the green coats before doing the Devlan Mud wash over the whole model. I think it does make them look a little better, but I'm not sure if it's worth the extra effort. Let me know what you think of these guys compared to the previous batch.
Tuesday, October 11, 2011
Warhammer Fantasy Temple of Skulls
I've painted up my Warhammer Fantasy Temple of Skulls terrain piece. I decided to buy this after seeing one in person. It is much larger than I expected, and should be a useful piece of terrain for Warhammer Fantasy or 40k.
After assembling it, I noticed that the plastic was extremely smooth. Especially on the big skull parts, which I imagined to be carved out of stone. I wanted a bit of a rough texture, so it would look more natural and more ruined. And it would also make it easier to paint just by dry brushing. To add some texture to it, I mixed some watered down glue and some sand and coated pretty much the entire thing with it. I then tried as best I could to remove it from the spikes sticking out of the columns.
In retrospect, this is probably too much texture. It might have worked better to apply some spray glue, and then sprinkle on a much finer grained sand until it had the coverage I wanted. That would have given enough texture to make it not look completely smooth, without being quite as rough as this, and without covering as much of the piece.
For painting, I started with a black primer. Then I just painted most of it a dark grey color, with a dark brown for the parts I wanted to be dirt. Then I drybrushed with a lighter grey, and a lighter dry brush with an even lighter gray. I put a wash over the dirt to try and give it more of a varied brown tone, but I'm not sure that accomplished much. I also touched up the skulls white, and painted some grey rocks amongst the big dirt areas. The spikes in the column were painted with Boltgun Metal drybrushed with Tin Bitz. I finished it up with some static grass in a few places. Overall, a pretty quick job.
Have a look at the pictures, and let me know what you think. I included some previously painted figures on it, to give a sense of scale, and to add a bit of drama to the scene.


After assembling it, I noticed that the plastic was extremely smooth. Especially on the big skull parts, which I imagined to be carved out of stone. I wanted a bit of a rough texture, so it would look more natural and more ruined. And it would also make it easier to paint just by dry brushing. To add some texture to it, I mixed some watered down glue and some sand and coated pretty much the entire thing with it. I then tried as best I could to remove it from the spikes sticking out of the columns.
In retrospect, this is probably too much texture. It might have worked better to apply some spray glue, and then sprinkle on a much finer grained sand until it had the coverage I wanted. That would have given enough texture to make it not look completely smooth, without being quite as rough as this, and without covering as much of the piece.
For painting, I started with a black primer. Then I just painted most of it a dark grey color, with a dark brown for the parts I wanted to be dirt. Then I drybrushed with a lighter grey, and a lighter dry brush with an even lighter gray. I put a wash over the dirt to try and give it more of a varied brown tone, but I'm not sure that accomplished much. I also touched up the skulls white, and painted some grey rocks amongst the big dirt areas. The spikes in the column were painted with Boltgun Metal drybrushed with Tin Bitz. I finished it up with some static grass in a few places. Overall, a pretty quick job.
Have a look at the pictures, and let me know what you think. I included some previously painted figures on it, to give a sense of scale, and to add a bit of drama to the scene.


Subscribe to:
Posts (Atom)