The morning sun was just clearing the mountains to the east, its rays bringing a comforting warmth to the mists lingering from the night’s chill. Birds chirped in the trees, and the usual scuttle of the forests creatures was just beginning for the day as if nothing was amiss. Within the tree-shrouded vales were arranged, row upon row, nearly countless tents of the finest materials and the most brilliant white. Amongst the tents tall and elegant figures moved with a grace and swiftness that clearly marked them as members of the elder race; the blue and white panoply of their heraldry clearly marking them as High Elves of Ulthuan. In the forest of Chalons, an army made their camp. In one particular vale there were three tents, somewhat larger than the rest. It is to one of these tents a rider races, his cloak and tunic tugged by the wind as his mount carried him nearly faster than the eye could register.
“My lord, a herald from Calandras’ expedition requests an audience.” Declared one of the guards outside the tent’s entrance as the sounds of horses’ hooves and the jangling of its harness broke the reverie of the tent’s occupant.
“Show him in, Ilthalas. Show him in.” replies the tent’s lone occupant. He is an elf, to be sure. His frame is slight, moreso than those of his countrymen, and he is tall though age seems to be stooping him ever so slightly. His fine robes bear many runes and mystic writing and he carries a tall white staff, clearly identifying him as a mage of the High Elves.
Into the tent steps a clearly excited elf wearing light armor of shining mithril. He is dressed for war but lightly so. Removing his tall helmet and tucking it into the crook of his arm, he drops to one knee and bows low to the elder mage.
“Lord Folariath, arch mage of The White Tower, my master Calandras sends his greetings and bids me deliver news of his campaign to the north.” The herald says, his excitement making the words come out rapid and breathlessly.
“At ease, my friend. Be at ease. You are excited and unless my eyes deceive me you do not appear as though the campaign has met some doom. Your tunic and armor show no more than the dust one would expect on a rider from the Grismerie River Valley. Tell me, what news do you have of Calandras’ little expedition?” Folariath said, his fatherly tone helping to soothe the nerves of the herald.
“My lord, as you know, Calandras led a force to the north where Prince Tethelion of Caledor has been engaged in a campaign with the Bretons to defeat the foul Vampire and Chaos Beast hordes invading from the mountains to the North. My lord, Calandras came upon a sizeable contingent of the Beasts undoubtedly marching to engage Prince Tethelion’s forces, and engaged the Beasts in battle just this past afternoon.”
“Truly? Our purpose in these lands is to discover the lost history of our people, not to wage war. I’ve no doubt that Prince Laethelas will not begrudge Calandras for engaging an enemy but as I’m sure you are aware, every single life lost on these shores is precious. Pray deliver the rest of your report, and it best be good.” Folariath said to the herald, a slight hint of anger evident in his voice and the crackling of energy in the cool morning air.
“My lord total losses for the battle were five Sea Guard of Lothern, one Chariot of Chrace, and thirteen of the Sword Masters that campaigned with us. I am also very sad to say that Gaelith, noble son of Galen and bearer of the army standard, was slain by the foul Beastlord that commanded the enemy hordes. The Beasts, however, were slaughtered almost to the last foul creature. Indeed my lord only four of the creatures were left breathing to flee the field. Calandras was able to massacre the enemy and liberate the small Breton village, though the Beasts had already defiled it extensively.”
“Hmmmm. The loss of thirteen Sword Masters is a strong blow, but if indeed the Beasts were so thoroughly routed perhaps it may have been worth their sacrifice. If I am to make a report to Prince Laethelas I will have what details you are privy to.”
“Yes, my lord. When we arrived upon the field of battle, the Beasts had already defiled the village and arrayed themselves for battle. Their lord and a large unit of Bestigors held the center along with two large units of Gors. To the left of their line was a chariot, some hounds, and some Ungor scouts whilst to the right of their line were some Razorgor beasts, and another chariot. Calandras and Feluvian, his apprentice, could detect the presence of two magic users amongst the Beasts though it was not immediately plain to us where they were. On the final approach of our line, ghastly Harpies attacked upon our flanks. Our own lines were held at the center by Gaelith and the Sword Masters, flanked by Calandras and Feluvian each leading a unit of Sea Guard. The Chariot held our wide right flank, whilst the two bolt throwers were held to the rear of our lines in a support role.” The herald, recounting the order of battle, seemed to calm himself as he settled into the doldrums of the battle’s beginning maneuvers.
“Our forces held the initiative and struck first. Feluvian cast a spell from the Lore of Life which caused all manner of flora and fauna to erupt from the ground below the Gor unit with their battle standard. The dwellers below that unit decimated the beasts, virtually wiping it out and consuming the foul standard as well. Alas, the winds of magic overwhelmed Feluvian’s untrained mind and he burnt out… unable to harness magic for the remainder of the battle. On our left, a bolt thrower fired a salvo at the harpies and killed all but two and forcing them to retreat a ways. On the right, the bolt thrower fired at the main body of the Beasts’ line, and the two units of Sea Guard supplemented this with their own volley of arrows. The white shafts found their marks and the two blocks of Gors were further whittled by the accurate fire.”
“The Beasts attempted to close with our line but it seemed as if the loss of their center unit was too much. Really, all they managed to do was set themselves up for our attacks. One of their foul magic users cast some spell on his own troops, but the winds of magic were still raging from Feluvian’s miscast and the beast mage exploded, decimating his own unit. On our right, the Chariot engaged and wiped out the pack of hounds. The second bolt thrower fired at the Harpies but did not do significant damage. The Sea Guard and Sword masters moved forward to bait the Beasts and were rewarded with the foolish creatures charging. The outcome was obvious. One unit was wiped out. The other was decimated and fled. The Sword Masters had attempted to charge the Bestigors but were likely befuddled by the magical fury and thus were in turn charged themselves. They quite quickly inflicted heavy casualties and caused the Beasts to flee. On our left, the Sea Guard found themselves engaged by the beast Chariot and one of the Razorgors. The combat continued to be won by the consummate skill of the Lothern regulars. On the right, the Lion Chariot engaged and broke another Razorgor, but was in turn charged by the second beast chariot and their scouts, the Ungors. At the rear, our bolt thrower crews valiantly held off the two flocks of harpies but were caught up in the excitement and attempted to give chase upon the fleeing creatures. In the center, the Beastlord upon his chariot and the second beast mage charged the Sword Masters with reckless abandon and inflicted several casualties. Up until this point, our losses had been minimal. The Beasts’ lord was a force to be reckoned with and began to sell his life dearly. Feluvian’s Sea Guard charged the Beastlord in the flank but due to some foul magic items, he was just too hard to wound and continued to slay the Sword Masters.”
“Calandras began to fear total loss of the Sword Masters and started to position himself for a charge into the fray whilst at the same time Feluvian had an epiphany and ceased focusing on the Beastlord, instead focusing on the creature’s chariot and the Razorgor pulling it. The combat quickly turned; the Beastlord was defeated and run down by the Sword Masters. On our right, the Chracian Chariot had been bogged down by the Beast Chariot and Ungors. They were able to defeat the chariot, but at great cost. The bolt thrower on our right was then able to kill the chariot and more Ungors. As the battle wound down, we had slain all but three Bestigors, one Ungor, and possibly a heavily wounded Razorgor.” The herald let out a long breath of relief, having recounted the battle. Now, however, he began to wonder how the powerful mage lord would take the news.
“I see. Well, it would appear that Calandras’ tactics were sound though it would also seem the Beasts’ lack of fury played an equal part in their defeat. Indeed, the loss of the Sword Masters comes as a strong blow but one must weigh the fact that Calandras may have broken the Beasts’ back in that region. Perhaps it is fortuitous, then, and Prince Tethelion will benefit from this victory. I shall report to Prince Laethelas immediately. You have done well, herald. Now, you must return with all alacrity to Calandras and warn him that the Vampires are also about. Calandras must make ready, for I foresee another battle in his future and the Vampires will not be so easily bested. Go now, time is precious!” Folariath rushed the herald out and signaled his men to provide a fresh horse.
A victory had been won, albeit at a heavy price. Another battle, one more ominous than the skirmish that had just taken place, was looming like a dark cloud on the horizon.
Monday, January 17, 2011


Friday, January 14, 2011
Painted Renegade Imperial Guard Officers

Sunday, January 9, 2011
Grismeire Valley Campaign Turn 3
At this point in the campaign, the Ogres, who had not yet fought a battle, were switched with another High Elf player. So the two "3" flag markers would now represent the High Elf Blue and High Elf Purple armies. This player would not have a Lord level character for the campaign.
With their Beastman allies having suffered great losses, the Vampire Counts staged a bit of a counter-attack. They urged the Beastman 1st army, led by their Beastlord, to move back up to St. Mer-Eglise to re-join the war. The Vampire Counts 1st Army pursued and attacked the retreating Bretonnian 2nd Army and massacred the remnants. Only a few remaining Grail Knights fled to escape the slaughter, but Byron Manfred was seriously injured in the battle.
The Vampire Counts 3rd Army moved into defensive positions controlling the bridge near Soude to prevent any possible advance towards their fortress. Their leader, The Master, moved into the 2nd Army and led them South out of Poussenc to attack the Elf 2nd Army. With the overpowering necromantic magic of The Master aiding them, the Vampire Counts Army massacred the High Elves, destroying them completely.

The Bretonnians and High Elves had just suffered their first real setbacks of the campaign, and responded swiftly with a massive offensive. The Bretonnian 1st Army simply moved a little east towards Chateaux D'If, remaining in reserve. The High Elf Blue Army maneuvered around the Vampire Counts 1st Army to attack the Beastman 1st Army in the village of St. Mer-Eglise.
The High Elf 1st Army, led by Lord Tethelion of Caledor riding his mighty Dragon, moved North to attack the Vampire Counts 3rd Army defending the bridge near Soude. And, in one of the great feats of stragic meaneuvering in the history of the Old World, the High Elf Purple Army swung around to the South, crossed the bridge at Nice, and turned back North to spring a surprise attack on the Vampire Counts 2nd Army.

Even though Count Tepes was struck down by the might High Elf Dragon, his honor guard and the remnants of his army managed to hold off the Elf attack at the bridge and defeat them solidly. The High Elves fled in disarray after their fleeing commander, Prince Tethelion of Caledor, and his dragon.
The High Elf Blue army slaughtered the final remaining Beastman army, killing their leader and retaking the devastated Bretonnian village of St. Mer-Eglise.
The High Elf Purple army marched swiftly, all the way from Chateaux D'If, across the Grismeire river, through Nice, and finally North along the river to attack the Vampire Counts 2nd army. The High Elves spread out along a wide front, hoping to trap the Vampire Counts army against the river, but that would be their undoing. The Vampire Lord directed his army from the safety of a haunted house, protected by Grave Guard. The sent the bulk of his army against the left flank of the Elves. His most powerful unit, Grave Guard with great weapons, led by his army standard bearing Wight King with the Drakenhof banner, fought off nearly the entire High Elf left flank when it destroyed two chariots, and cause a large unit of Sea Guard containing the Elf general to flee.
The Vampire Counts then attempted to swing their forces to form a new line against the remaining High Elf right flank. As they did so, they suffered huge casualties from the magical onslaught of three mages added to the massive firepower of sea guard, bowmen, and bolt throwers. However, the ranged attacks were not enough to defeat the Vampire Counts, who could use their necromancy to replace some of the casualties. Once the Vampire Counts army had finally gotten all of their forces into a new battle line facing the remaining High Elves, it was clear that victory was impossible for the Elves. With their general already gone, the rest of the army retreated. Their army was too depleted to continue on it's own, and would join up with the High Elf Blue army to replace some of their casualties.

The Vampire Counts armies had weathered the enemy attacks. They could continue to send their forces out to search for the powerful artifact they came for, though the enemy still had several armies in the area to oppose them.
Thursday, December 30, 2010
Renegade Imperial Guard Rough Riders
Monday, December 20, 2010
InkBiz 1:200 scale Napoleonic French
I was lucky enough to receive some sample models from a brand new range of miniatures. They are 1:200 scale French Napoleonic infantry. This range is being created by a man who on The Miniatures Page goes by the name InkBiz. The figures aren't for sale yet, but he was nice enough to send out some samples to some of the people on TMP who have shown interest in them, including myself.
His goal with this new range seems to be creating correctly proportioned and scaled figures, which I'm sure is very difficult as such a small size. Most 10mm figures I've seen, and all 6mm figures, are really chunky and thick. GHQ are the only 10mm figures I've seen that look to have roughly human proportions, until I got these samples from InkBiz. So I thought seeing the two ranges side-by-side might make for a good comparison.
Here are some pictures of the InkBiz 1:200 French Napoleonic infantryman next to one of my spare 10mm GHQ American Civil War infantry figures. They are actually not all that different in size, though the InkBiz figure is taller because it is on a thicker base. The GHQ figure does have slightly crisper detail, especially in the face. Being a different scale, the GHQ figure is slightly larger in general. I'm not sure the difference in size or detail would be very noticeable when seeing them at a distance on the gaming table.


The InkBiz figure has a little weirdness going on with the elbow of the left arm, which looks a little strange. This was probably necessary to make it go around the musket without making the arm way too long, and again probably not noticeable on the table. The musket on the InkBiz figure appears to be the only exception to proper proportions, but I think that was a good decision. The thin rifles on my GHQ Civil War figures get bent all the time. Whenever the rifle is touched at all, it bends. The thicker musket on the InkBiz figure is extremely sturdy and likely won't get bent through any normal handling of the figures. It also allows additional details on the InkBiz figure's musket. So a good compromise between realism and practicality.
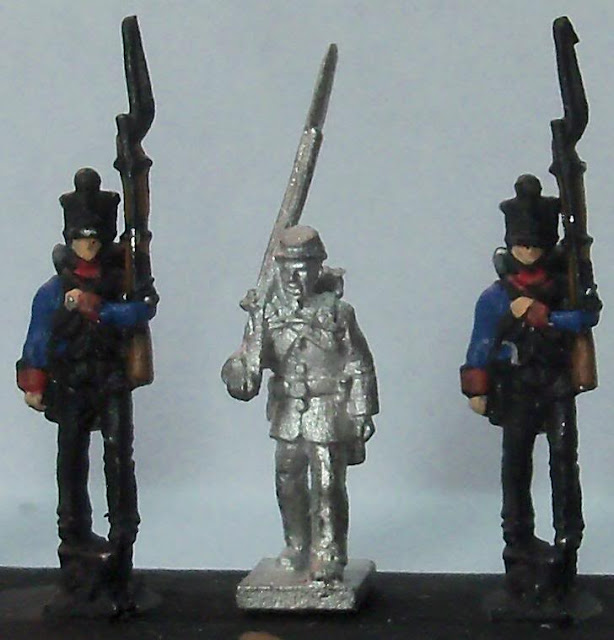
InkBiz also sent along a few figures that he'd primed and started to paint. Here's a couple pictures of that GHQ Civil War infantry figure between two of the partially painted InkBiz figures. They are obviously not finished, but at least this gives some idea what the figures look like with some paint on them. I'll post pictures of some finished painted figures as soon as I can finish painting them.

I think these pictures show the real strength of these Inkbiz 1:200 figures, which is the mass effect of seeing them all together on a base. I've put 12 of the figures, in 3 ranks of 4 figures, onto a 3/4" square base. Once they're painted and there are several more such bases, that is going to be a splendid looking unit. The fact they they are reasonably proportioned and that you can fit them so close together is going to make the finished units look great.


Getting the figures ready for painting was really easy. Whether by brilliant design or happy accident, the mold lines on these ended up in places where they aren't very noticeable. Even if you are really obsessive about cleaning off mold lines, it won't take much effort. There were two pieces of "flash" on each figure, one on the end of the bayonet that could just be twisted off, and one on the top of the blanket roll that I preferred to trim off with the hobby knife. There are some mold lines along the insides of the legs, which you would hardly even see when looking at them from above (though I removed them anyway). There are mold lines on the outside of the legs that you'd want to remove. The rest of the lines are mostly in places where they don't look out of place, like along the barrel of the musket. It's hard to explain, and even harder to try to photograph, but I was pleased with how quickly and easily I cleaned the mold lines and had these ready to paint.
All in all, this is a pretty nice figure. InkBiz plans to expand on the french range. To quote a post of his on the TMP message boards: "The remainder of the French Line are coming out in a few weeks (volts and grens), followed by command, then French Lights, and mounted command. After that artillery and cavalry will follow." No specific date on this so far, or when the figures might be for sale anywhere. He's also working on another range of even smaller 1:500 Napoleonic figures, which equates to about 4mm. Quite ambitious, but hopefully he continues with it.
As for these 1:200 figures, if the range does expand I will be getting some. If GHQ made any Napoleonic figures that weren't in that "Advancing" pose that I don't really like, it might be a decision about which range to use. As it is, as soon as I can buy InkBiz 1:200 figures for an army I want to collect, I will be getting some. I'll be sure to post again once I have some painted figures to show, or if I have any more information about how to purchase the figures.
His goal with this new range seems to be creating correctly proportioned and scaled figures, which I'm sure is very difficult as such a small size. Most 10mm figures I've seen, and all 6mm figures, are really chunky and thick. GHQ are the only 10mm figures I've seen that look to have roughly human proportions, until I got these samples from InkBiz. So I thought seeing the two ranges side-by-side might make for a good comparison.
Here are some pictures of the InkBiz 1:200 French Napoleonic infantryman next to one of my spare 10mm GHQ American Civil War infantry figures. They are actually not all that different in size, though the InkBiz figure is taller because it is on a thicker base. The GHQ figure does have slightly crisper detail, especially in the face. Being a different scale, the GHQ figure is slightly larger in general. I'm not sure the difference in size or detail would be very noticeable when seeing them at a distance on the gaming table.


The InkBiz figure has a little weirdness going on with the elbow of the left arm, which looks a little strange. This was probably necessary to make it go around the musket without making the arm way too long, and again probably not noticeable on the table. The musket on the InkBiz figure appears to be the only exception to proper proportions, but I think that was a good decision. The thin rifles on my GHQ Civil War figures get bent all the time. Whenever the rifle is touched at all, it bends. The thicker musket on the InkBiz figure is extremely sturdy and likely won't get bent through any normal handling of the figures. It also allows additional details on the InkBiz figure's musket. So a good compromise between realism and practicality.
InkBiz also sent along a few figures that he'd primed and started to paint. Here's a couple pictures of that GHQ Civil War infantry figure between two of the partially painted InkBiz figures. They are obviously not finished, but at least this gives some idea what the figures look like with some paint on them. I'll post pictures of some finished painted figures as soon as I can finish painting them.


I think these pictures show the real strength of these Inkbiz 1:200 figures, which is the mass effect of seeing them all together on a base. I've put 12 of the figures, in 3 ranks of 4 figures, onto a 3/4" square base. Once they're painted and there are several more such bases, that is going to be a splendid looking unit. The fact they they are reasonably proportioned and that you can fit them so close together is going to make the finished units look great.


Getting the figures ready for painting was really easy. Whether by brilliant design or happy accident, the mold lines on these ended up in places where they aren't very noticeable. Even if you are really obsessive about cleaning off mold lines, it won't take much effort. There were two pieces of "flash" on each figure, one on the end of the bayonet that could just be twisted off, and one on the top of the blanket roll that I preferred to trim off with the hobby knife. There are some mold lines along the insides of the legs, which you would hardly even see when looking at them from above (though I removed them anyway). There are mold lines on the outside of the legs that you'd want to remove. The rest of the lines are mostly in places where they don't look out of place, like along the barrel of the musket. It's hard to explain, and even harder to try to photograph, but I was pleased with how quickly and easily I cleaned the mold lines and had these ready to paint.
All in all, this is a pretty nice figure. InkBiz plans to expand on the french range. To quote a post of his on the TMP message boards: "The remainder of the French Line are coming out in a few weeks (volts and grens), followed by command, then French Lights, and mounted command. After that artillery and cavalry will follow." No specific date on this so far, or when the figures might be for sale anywhere. He's also working on another range of even smaller 1:500 Napoleonic figures, which equates to about 4mm. Quite ambitious, but hopefully he continues with it.
As for these 1:200 figures, if the range does expand I will be getting some. If GHQ made any Napoleonic figures that weren't in that "Advancing" pose that I don't really like, it might be a decision about which range to use. As it is, as soon as I can buy InkBiz 1:200 figures for an army I want to collect, I will be getting some. I'll be sure to post again once I have some painted figures to show, or if I have any more information about how to purchase the figures.
Monday, December 13, 2010
Warhammer 40,000 Battle Report: Fortress Antorktica - Part 1

This was a 2000 point Warhammer 40,000 game pitting my Tyranids against two friends playing Orks. We planned a small campaign consisting of three linked battles. The first would represent a surprise attack by the Tyranids on artillery emplacements in the rear of the Ork lines. This would be an attempt to disrupt the artillery from being used in the defense during the main Tyranid attack planned for the same time.
For the game, we used the Reconnaissance In Force mission from the Battle Missions book, with the Tyranids taking the place of the Necrons. The Objectives would represent the artillery pieces of the Orks. As per the mission, the Tyranids had to secretly select a table edge before the Orks deployed their army anywhere on the table 12" from the edge. The Tyranids would then move on from their table edge on the first turn. The game would use Random Game Length, and the player capturing the most objective would be the winner. Also, during the first game turn, units would need to pass a leadership test to shoot or assault, to represent the surprise of the attack and not knowing the positions of the defenders.
Monday, December 6, 2010
Warhammer Fantasy movement trays
I'm trying out a new idea for Warhammer Fantasy movement trays. The existing solutions haven't really worked well. For one thing, when playing on tables with a lot of hills, having to prop up a large movement tray on a hill is difficult, looks silly, and may result in many of the models falling over. In fact with some of the more unbalanced models, just pushing the tray around can result in many of them tipping over. In a big unit, this can cause quite a mess and it can take longer to reposition all the models that it is worth.
The other problem is that movement trays have to be made in specific sizes, so I'd need a lot of them in 15, 20, 25, and 30 model sizes at least, for 20mm and 25mm square models. That's a lot of different options I'd need to make. Not to mention that once a unit starts taking casualties, there's a big empty space at the back of the movement tray that doesn't look good and is a pain when you have to put another unit in that vacated space.
The solution I'm going to try out is to use magnetic sheet and steel bases to make magnetic movement trays. I will cut out magnetic sheet in rectangles, some big enough to fit one rank of five models, some big enough to fit two ranks of five models. I'll then glue thin steel bases to the bottom of the Warhammer bases and attach the models magnetically to the sheet. With plastic models that have the completely empty base bottoms, I'll probably be able to find washers that fit in there. But with the slotta-bases, these thin steel squares work perfectly. I got the steel bases here. The 3/4" x 3/4" bases fit a 20mm Warhammer base perfectly.
With the different sizes of sheet, I'll be able to combine them to make different sized units. So a unit of 25 models will only require moving around three of the magnetic rectangles. The magnetism will also hold the models down, effectively keeping them from tipping when I move the unit or when they need to be positioned on a hill. If I need to reform the unit, the most common widths of 5 or 10 wide will be simple, and I can always make a handful of 2 and 3 model length rectangles of magnetic sheet for adding more files.
Below is a picture of a few Empire Greatswords with the thin steel bases glued to the bottom of their bases. The next picture shows the Greatswords with the two sizes of magnetic sheet I've cut out, one for holding a single rank of five models, the other for two ranks of five models.


Here I've attached the models to the magnetic sheet. The cling on quite nicely. If I wanted to use a unit of 15 Greatswords in the game, I can do it like this, without needing a special sized movement tray that holds 15 models or having extra movement tray hanging off the back of the unit. And when moving them, I only have to push around these two sheets of models. Looking from above, you can barely see the magnetic sheet at the bottom of the base. But I will be painting the magnetic sheet green so that it looks better once a few models have been taken off, exposing the sheet that was beneath them.


As you can see, any sort of incline or other unusual terrain will be no problem for these guys.

I have yet to try this out in a game, but I think it will work pretty well. I'll give an update after I've tried it out. I've you've tried out any interesting ideas for how to move your Warhammer units around the table, I'd be interested in hearing about them.
Subscribe to:
Posts (Atom)